
Embracing the Planning Process
Identify Purpose and Brainstorm
When writing a lesson plan, the first step is to identify your purpose. Think about the concept or skill you want students to learn and whether the lesson will focus on a single subject or integrate multiple areas. Clear learning goals aligned with grade-level standards are essential. Consider what you want students to understand by the end of the lesson and how it connects to their real-world experiences. For example, a lesson could focus on understanding the water cycle in science, practicing persuasive writing in language arts, or exploring measurement through baking, integrating both math and life skills.
Brainstorm activities and materials that will help bring the lesson to life. Consider hands-on projects, read-alouds, experiments, journaling, and collaborative group work. Think about what tools you will need—books, art supplies, technology, or real-world items like measuring cups or plants. Also plan for differentiation and assessment. Offer support and challenges as needed to meet the diverse needs of your students. Assess learning through tools like exit tickets, student reflections, observations, or final presentations. A well-thought-out lesson plan ensures both engagement and academic growth.
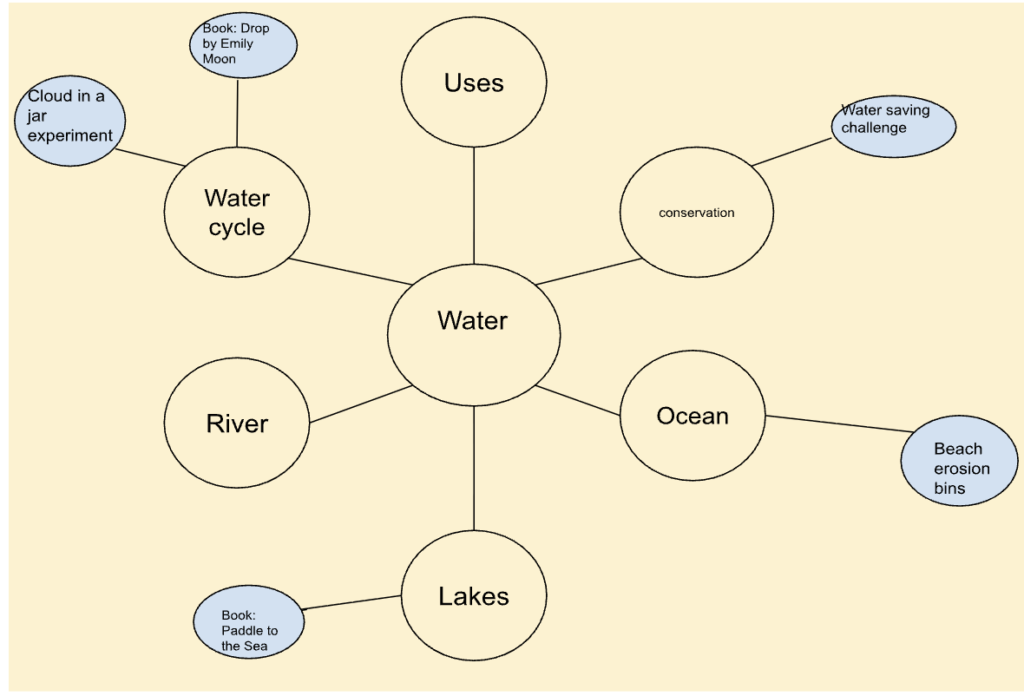
Brainstorming ideas for thematic units using webbing is an effective visual strategy that helps educators generate and organize interconnected concepts around a central theme. To begin, place a broad, engaging theme, such as “Water” or “Change”, in the center of a blank page or digital canvas. From this central idea, draw lines outward to related sub topics or questions, such as “water cycle,” “oceans,” “conservation,” or “uses of water.” Continue branching out from each subtopic with more specific ideas, activities, or subject connections. For example, “water cycle” could link to science experiments, diagram labeling in language arts, or graphing rainfall in math. This process helps uncover cross-curricular links naturally and encourages creative thinking.
Webbing also supports differentiation and flexibility in planning. As ideas expand, teachers can identify entry points for various learning styles, grade levels, and content standards. The visual layout allows educators to see how subjects like literacy, social studies, and art can all contribute to the exploration of a single theme. It also encourages collaboration among teachers by highlighting shared goals across disciplines. By using webbing as a brainstorming tool, educators can develop rich, interconnected thematic units that are both comprehensive and adaptable to student needs.
When planning thematic units with Howard Gardner’s theory of multiple intelligences in mind, educators aim to create lessons that engage students through their unique strengths and learning preferences. Gardner identifies intelligences such as linguistic, logical-mathematical, spatial, bodily-kinesthetic, musical, interpersonal, intrapersonal, and naturalistic. By incorporating activities that tap into these various intelligences, teachers can provide more inclusive and meaningful learning experiences. For example, a unit on ecosystems might include writing a nature poem (linguistic), charting animal populations (logical-mathematical), building a habitat model (spatial), acting out food chains (bodily-kinesthetic), composing nature sounds (musical), participating in group research (interpersonal), reflecting in a nature journal (intrapersonal), and observing plants outdoors (naturalistic). This approach not only supports diverse learners but also deepens understanding by allowing students to connect with content in multiple, personalized ways.
Another way to begin planning a lesson is to begin with the end in mind, or backwards design. This method starts with identifying the desired learning outcomes and then designing assessments that will effectively measure whether those outcomes have been achieved. Furthermore, it allows for the development of both formative assessments, which provide ongoing feedback, and summative assessments, which evaluate overall learning, ensuring a comprehensive approach to student evaluation.
Steps for Lesson Planning
The following steps will help walk you through the key elements of planning an engaging, hands-on learning opportunity for young children. Although this is an unwritten process, when we build lesson with intent and purpose, everyone benefits.
Step 1: Writing an Objective Statement
Begin with a clear, measurable learning objective that describes what students should know or be able to do by the end of the lesson. To keep instruction focused and manageable, limit the lesson to one or two concise objectives. Use specific action verbs (e.g., identify, explain, create, compare) and ensure the objective aligns with grade-level standards. Bloom’s Taxonomy provides a hierarchical framework of cognitive skills that supports the development of objective statements ranging from basic recall to higher-order thinking and synthesis. Using this approach clarifies the intended learning outcome and strengthens alignment among objectives, instructional strategies, and assessments.
Examples
Bloom’s Taxonomy Levels with Measurable Water Cycle Objectives
- Remember (recall facts, terms)
Objective: Students will identify the four stages of the water cycle (evaporation, condensation, precipitation, and collection). - Understand (explain ideas or concepts)
Objective: Students will explain how evaporation and condensation contribute to the movement of water in the water cycle. - Apply (use information in new situations)
Objective: Students will demonstrate the water cycle by labeling and describing each stage in a diagram. - Analyze (examine relationships, break information apart)
Objective: Students will compare evaporation and precipitation by analyzing how each process changes water’s form or location. - Evaluate (justify decisions or opinions)
Objective: Students will evaluate how changes in temperature affect the speed of evaporation in the water cycle. - Create (produce new or original work)
Objective: Students will create a model or visual representation of the water cycle that accurately shows the sequence and interaction of its stages.
These examples show how Bloom’s Taxonomy supports the development of measurable objectives that progress from foundational knowledge to higher-level thinking while maintaining a clear focus on the learning target.
Create Focused Objective Statements
Notice how that all begin with “Students will”, they use one verb from the list and are clear and concise. This is because the main purpose of an objective statement is to focus the lesson to a specific task a student will do and learn. This allows us to measure if students have learned the objective. Measuring an objective means determining whether students have successfully achieved the specific learning goal you set. To measure an objective effectively, you need clear criteria or evidence that shows what success looks like. This often involves creating assessments or observations that directly align with the objective’s action verb and content. For example, if an objective states that students will “describe the stages of the water cycle,” you can measure it by asking students to verbally explain, write a summary, or complete a diagram labeling each stage. The key is to use tools that clearly indicate whether students have mastered the knowledge or skill stated in the objective, ensuring the measurement is both valid (measuring what you intend) and reliable (consistent results over time or across groups).
A common mistake when writing objective statements is that they are too long and lack focus, thus making them difficult to measure.
Examples
Here’s an example of a long, unclear objective statement:
By the end of the unit, students should hopefully be able to understand various aspects of ecosystems and maybe explain some of the relationships between animals and plants, as well as possibly showing some knowledge about how things work in nature through activities and discussions.
In this example, there are 3 objectives loosely mentioned. Therefore there will likely be too much in the lesson and students will be unsure of what they are learning or what they will do. Finally, a teacher would not have a specific skill to measure student learning.
Key Ways to Make Objectives Measurable
- Replace vague verbs (know, understand, learn, appreciate) with action verbs from Bloom’s Taxonomy.
- Specify what students will do to demonstrate learning.
- Include observable products or performances (explain, label, compare, create).
- Align objectives with assessments that clearly show whether the goal was met.
Using measurable objectives ensures clarity, improves assessment alignment, and supports more effective lesson planning. Measurable objectives lead to targeted assessment by clearly defining what evidence of learning teachers should look for during and after instruction. When objectives use specific, observable action verbs, teachers can design assessments that directly measure those outcomes rather than relying on broad or subjective judgments. This alignment ensures that assessments accurately reflect the intended learning goals, whether through performance tasks, written responses, or formative checks for understanding. Targeted assessments also allow teachers to pinpoint student strengths and misconceptions, making it easier to adjust instruction, provide timely feedback, and plan purposeful next steps that support student growth.
Backward design helps align objective statements and assessments by starting the planning process with the end goal in mind—what students should know or be able to do. By first identifying clear, measurable objectives, teachers can then design assessments that directly measure those outcomes, ensuring that evidence of learning is intentional and focused. Instruction is planned last, with activities and strategies chosen specifically to prepare students for success on the assessment. This approach creates strong coherence among objectives, assessments, and instruction, reduces misalignment, and supports purposeful teaching that keeps student learning at the center of lesson planning.
Examples
Here’s an example of an aligned objective statement:
Objective statement: Students will explain the stages of the water cycle using correct scientific vocabulary.
Assessment: Look at the diagram of the water cycle. Identify and label the four stages of the water cycle by writing the correct term next to each part of the diagram: evaporation, condensation, precipitation, and collection.
Example 1
- Non-measurable: Students will understand the water cycle.
- Why it’s not measurable: “Understand” cannot be directly observed or assessed.
- Measurable revision: Students will explain the stages of the water cycle using correct scientific vocabulary.
Example 2
- Non-measurable: Students will learn about evaporation.
- Why it’s not measurable: “Learn about” does not specify what students will do to show learning.
- Measurable revision: Students will describe evaporation and identify one real-world example.
Example 3
- Non-measurable: Students will know the parts of the water cycle.
- Why it’s not measurable: “Know” does not indicate how mastery will be demonstrated.
- Measurable revision: Students will list and label the four stages of the water cycle on a diagram.
Example 4
- Non-measurable: Students will appreciate how water moves through the environment.
- Why it’s not measurable: “Appreciate” reflects an internal feeling rather than observable behavior.
- Measurable revision: Students will explain how water moves through the environment by tracing the water cycle in a written response.
Example 5
- Non-measurable: Students will be familiar with precipitation.
- Why it’s not measurable: “Be familiar with” lacks clear performance criteria.
- Measurable revision: Students will identify types of precipitation and classify them as rain, snow, sleet, or hail.
Step 2: Gather Materials
List all the materials and resources required to teach the lesson. Include books, handouts, technology, art supplies, science tools, or any manipulatives. Planning this ahead of time allows for teachers to gather the materials needed and organize them for student use. The success of any lesson depends on whether the lesson is prepared. Nothing derails a lesson faster than.
“Students, please wait while I find ___” or “I’m sorry, we will have to finish this tomorrow, we need ____ to continue.”
You should read all books ahead of time, check the quantity of any supplies, tools or manipulatives, copy handouts and check any technology to make sure it is functioning.
Step 3: Procedure (Step-by-Step Instructions)
Writing a clear lesson plan procedure requires enough detail so that another teacher could successfully implement the lesson without additional explanation. The procedure should outline the sequence of instructional steps while clearly describing what the teacher will say or model and what students will do at each stage of the lesson. Including specific teacher prompts, questions, and directions helps ensure consistency and clarity, while describing student actions makes expectations explicit and supports engagement. Detailed procedures also help teachers plan transitions, anticipate student responses, and manage time effectively, resulting in instruction that is purposeful, organized, and aligned with the lesson’s objectives.Outline the sequence of activities in a logical order. Break the lesson into key parts such as:
- Warm-up/Anticipatory Set: Activate prior knowledge, introduce the topic and get students excited about the lesson.
- Direct Instruction: Deliver the content (lecture, read-aloud, demonstration).
- Guided Practice: Students work with teacher support (group work, discussion).
- Independent Practice: Students complete a task on their own to apply learning.
- Closure: Review the objective, summarize key points, and transition to next steps.
Step 4: Evaluation or Assessment
Formal and informal assessments both play important roles in monitoring student learning, but they differ in purpose and structure. Formal assessments are planned, standardized, and often used to evaluate student learning at the end of a lesson, unit, or term, such as tests, quizzes, or benchmark exams. They typically provide summative data that can be compared across students or groups. In contrast, informal assessments are flexible, ongoing, and embedded within daily instruction, including observations, questioning, exit tickets, and student work samples. While formal assessments measure overall achievement, informal assessments give immediate insight into student understanding and guide real-time instructional decisions, making both essential for effective teaching.
| Formal Assessment Examples | Informal Assessment Examples |
|---|---|
| Unit or chapter tests | Teacher observations |
| Quizzes | Class discussions |
| Standardized tests | Questioning during instruction |
| Benchmark assessments | Exit tickets (1-2 question quiz directly after a lesson to check for understanding) |
| End-of-project exams | Thumbs up/down checks |
| Final essays or reports | Student journals or notebooks |
| Performance-based rubrics | Quick writes |
| Midterm or final exams | Think-pair-share responses |
In backward design, lesson planning can begin by creating the assessment alongside the objective statement, ensuring that instruction is focused on clearly defined learning outcomes. By first determining how students will demonstrate mastery of the objective, teachers can design assessments that directly measure the intended skills or knowledge. This approach makes objectives more precise and measurable, guides the selection of instructional activities, and keeps the lesson aligned from start to finish. Planning in this way ensures that every part of the lesson—teacher modeling, student practice, and guided activities—serves the ultimate goal of helping students successfully meet the learning target.
Step 5: Adaptation – Meeting Student’s Diverse Learning Needs
Knowing your students’ specific needs is essential for creating effective and inclusive lesson plans. By understanding students’ prior knowledge, learning styles, and areas of difficulty, teachers can adapt instruction, materials, and pacing to support all learners. For example, using the objective statement “Students will identify and label the four stages of the water cycle” and the corresponding assessment prompt, a teacher might provide visual aids, simplified diagrams, or one-on-one support for students who struggle with reading or vocabulary. Conversely, for advanced learners, the teacher could extend the lesson by asking them to explain how the stages interact or to create a more detailed diagram. Tailoring lessons in this way ensures that every student has the opportunity to achieve the learning goal and that assessments accurately reflect each student’s understanding.
Differentiating instruction is the practice of tailoring teaching strategies, content, and learning activities to meet the diverse needs, abilities, and interests of students within a classroom. Rather than using a one-size-fits-all approach, differentiated instruction provides multiple pathways for students to access the curriculum, engage with the material, and demonstrate their understanding. This can involve modifying the level of difficulty, offering varied formats for learning (such as visual, auditory, or hands-on experiences), or providing choices in how students complete tasks. By differentiating instruction, teachers can support all learners, challenge advanced students, and provide targeted assistance to those who need extra help, ensuring equitable opportunities for success.
Modifications and Accommodations
Modifications and accommodations are important strategies used to support diverse learners in the classroom, ensuring all students have access to the curriculum and can demonstrate their understanding in ways that meet their needs. While the terms are sometimes used interchangeably, they have distinct meanings. Accommodations refer to changes in how a student accesses information or demonstrates learning without altering the learning expectations or standards. They provide students with equal opportunities to succeed. In contrast, modifications involve altering the content or expectations of the curriculum itself, often to match a student’s individual abilities or goals.
Accommodations help students overcome barriers without changing what is being taught. For example, a student with dyslexia might receive extra time on tests, allowing them more time to process and respond to questions. Another accommodation could be preferential seating near the teacher or away from distractions to help a student with attention difficulties stay focused. Additionally, providing audio versions of texts supports students with visual impairments or reading challenges, enabling them to access the same material as their peers. These accommodations maintain the integrity of the curriculum while addressing specific needs.
Modifications, on the other hand, adjust the curriculum expectations or learning outcomes to better fit a student’s abilities. For instance, a student with significant cognitive disabilities might work on a simplified version of a writing assignment, focusing on basic sentence structure rather than full paragraphs. Another example is reducing the number of math problems on a worksheet or adjusting the complexity of the problems to match the student’s skill level. Lastly, a student might complete a project on a different, more accessible topic within the same thematic unit to align with their learning goals. Modifications ensure that all students can participate meaningfully, even if their learning path differs from the standard curriculum.
Step 6: Extension Activities
Creating extension activities based on observations during a lesson is an effective way to differentiate instruction and meet the needs of advanced or accelerated learners. By closely monitoring student engagement, participation, and understanding, teachers can identify students who have mastered the lesson objectives and provide them with additional challenges that deepen their learning. For example, if most students successfully identify and label the four stages of the water cycle, a teacher might offer an extension activity where students design a model showing how the water cycle impacts weather patterns or ecosystems. These activities not only keep advanced learners engaged but also allow teachers to tailor instruction in real time, ensuring that all students continue to grow and remain motivated.
Lesson Plan Templates
Using a lesson plan template (see example in the Appendix) offers several important benefits for teachers. First, it saves time by providing a ready-made structure, reducing the need to start from scratch each time a new lesson is planned. This structure also ensures consistency across lessons, making it easier for substitute teachers, administrators, or co-teachers to follow along. A well-designed template keeps lessons organized by including essential components such as objectives, materials, activities, and assessments, helping the teacher stay focused and on track.
Additionally, most templates are aligned with educational standards, ensuring that lessons meet curriculum requirements. They often include sections for teacher reflection, encouraging continuous improvement by allowing educators to evaluate what worked and what didn’t. Clear plans also support classroom management by outlining transitions and time estimates, which help keep students engaged and minimize downtime. Furthermore, templates typically prompt teachers to consider student diversity by incorporating strategies for differentiation. Finally, a standardized format makes lesson plans easier to review and evaluate, which is especially helpful for administrative oversight or professional development.
Examples
Below is a sample lesson plan for a kindergarten geometry lesson on shapes which can also be found in the Appendix.
Part 1: The Plan
Standards:
- CCSS.Math.Content.K.G.B.5
- Model shapes in the world by building shapes from components (e.g., sticks and clay balls) and drawing shapes.
- CCSS.Math.Content.K.G.B.4
- Analyze and compare two- and three-dimensional shapes, in different sizes and orientations, using informal language to describe their similarities, differences, parts (e.g., number of sides and vertices/”corners”) and other attributes (e.g., having sides of equal length).
Objective
The student will create triangles with 3 sides and 3 corners, but with different length sides using straws and playdough.
Set Up and Materials needed
- Book: Triangle (The Shapes Trilogy) by Mac Barnett
- Laminated poster with Triangle shaped pictures:
- Pizza slice
- Watermelon wedge
- Roof
- Tent
- Hanger
- Half of a sandwich
- Laminated poster with different shaped triangles facing different directions
- Straws cut into different lengths
- Playdough
- Trays arranged with a ball of playdough and 21 straws.
- One tray per student.
Key Terms
- Triangle
- Sides
- Corners
Activity Procedure
Anticipatory Set:
- Read Triangle (The Shapes Trilogy) aloud to the class.
- Ask: Why couldn’t the square fit through the Triangle’s door? How is a square different from a triangle?
- Prompt students until they state that a triangle has 3 sides and 3 corners.
Direct Instruction:
- Present Poster 1 with the pictures in a triangle shape.
- Use a dry erase marker to draw a triangle over the first picture.
- Say:
- The pizza slice is in the shape of a triangle.
- How many sides did I draw?
- How many corners can you count?
- Have a child come up and count the sides and corners.
- Repeat with the other pictures.
- Present Poster 2: Ask:
- Are these all triangles?
- How do you know?
- Have children come up and count sides and corners for each.
Guided Practice:
- Students are sitting on a carpet in a circle.
- Take out a tray with playdough and different size straws.
- Say: Let me show you how I can make a triangle with these shapes.
- Model carefully adding a small ball of playdough for each of the three corners.
- Hold up the triangle and ask: Is this a triangle?
- Turn it in a different direction and ask: Is it still a triangle?
- Give students a tray with straws and playdough.
- Ask them to get three straws of the same size and make a triangle.
- Ask them to get two straws of the same size and choose a 3rd to make a triangle.
- Ask them to get 3 straws of different sizes to make a triangle.
Independent Practice:
Give students time to make different triangles until all of their straws are used.
Closure:
- Put a poster size piece of paper in the middle of the circle
- Ask students, one at a time, to bring their favorite triangle that they made and lay it carefully on the poster paper.
- Each time ask: Does your triangle have 3 sides and 3 corners?
- When all triangles on the poster paper, prompt students to recognize that triangles sometimes look different and are facing different directions but they all have 3 sides and 3 corners.
Assessment
Students will be given a page of quadrilaterals and triangles of different sizes. Students will be able to point to all of the triangles.
Modifications
Create a poster showing the steps for creating triangles with straws and playdough. Have models of 3 equal sides, 2 equal sides and no equal sides.
Extensions
- Students can make triangles with bigger materials such as yard sticks or pvc pipes.
- Students can trace triangle shapes, overlap them and color new triangles formed while doing so.
Guided review of the Sample Lesson Plan
- Do the two standards go together?
- Read the objective statement and the assessment. Are they aligned?
- Read the materials list. How might a teacher prepare these materials beforehand?
- Read the procedure. Can you visualize the lesson and recreate it?
- Read the modifications and extensions. Did this lesson lead to flexibility for diverse learners?
Resources and References
- National Governors Association Center for Best Practices and Council of Chief State School Officers. (2022). Mathematics Standards. https://www.thecorestandards.org/Math/
Media Attributions
- Water Web © Kerry Diaz is licensed under a CC BY-NC-SA (Attribution NonCommercial ShareAlike) license
