
Observation
The Benefits of Sighting, Organizational Lines, Plumb Lines, Viewfinders, and Proportion Boxes
Introduction
Observational drawing is about learning to see. In our busy and fast-paced society, we are constantly bombarded with imagery. Consequently, our visual attention span seems to only last seconds.
Observational drawing is about slowing down and spending time learning a new way to see. It is the practiced skill of paying attention to the subject matter in front of you, then figuring out how to accurately convey observed forms in an organized and well-composed fashion on a two-dimensional picture plane.
The various components discussed in this chapter are tools to help you better understand and draw observed subject matter. Good observational drawing takes practice, patience, and a few simple techniques that help you draw more accurately. Over time, this technique will become second nature, helping to make the drawing process more efficient.
In this chapter, we will go over a few of the most essential skills and techniques that can be used to help your drawings look more realistic and well-proportioned. In addition to techniques from earlier chapters, such as gesture, contour line, and linear perspective, this chapter will explore visual tools and techniques, including sighting, organizational line, plumb and axis lines, and the use of simple tools to aid in proportion and composition. These concepts might seem complicated and cumbersome at first, but they will make a significant difference in your drawings once you build up your confidence with these techniques.
Visual Tools & Techniques
Sighting
Sighting is a technique used to achieve accuracy and realism in drawing. It is sometimes referred to as measuring, mapping, or sight-sizing. It is one of the most important techniques to master in order to draw from observation. Think of it as a more user-friendly shorthand for drawing in linear perspective, a term we covered in Chapter 5, Perspective Drawing.
To sight, an artist uses a simple handheld object as a measuring device to realistically depict subject matter and achieve more accurate perspective without the need for special drawing accessories like long straightedges or large drafting tables. Sighting is a broad term that includes the use of measuring devices such as a viewfinder and sighting tool (skewer stick, pencil, etc.)
A viewfinder is a frame with an open window that artists use to help translate a three-dimensional reference onto a two-dimensional space. This measuring device also helps artists consider multiple orientations and compositions before starting the physical drawing. This tool will be discussed in depth later in this chapter.
While a viewfinder is helpful, many artists solely use a sighting stick to accomplish all of their measuring needs for comparing objects and creating drawings with accurate proportions. A sighting tool can vary, but many artists use a pencil, a trimmed skewer stick, or even a knitting needle. Whether you’re sketching a human figure, still life, complex interior, or a landscape, sighting provides a reliable method for achieving realism by turning the artist’s eye, in coordination with a sighting tool, into an effective means of creating accurate drawings from observation.
Why use Sighting?
There are many practical reasons to use the technique of sighting when planning your composition, such as:
- Finding the difference between an object’s height compared to its width.
- Understanding the size and proportion of one object in relation to other objects.
- Finding the placement of objects in a composition within the picture plane.
- Checking and accurately depicting the angle of horizontal edges as they extend toward vanishing points in a perspective drawing.
- Helping with vertical and horizontal alignment of subject matter in space as it relates to the top and bottom, and left and right, of the picture plane.
Viewfinder
A viewfinder is a simple drawing tool consisting of a frame and an open window, used to help create the illusion of flat space. It is usually a small piece of paper, cardstock, or cardboard with a window cut out of the middle. It can be used to assist with the sighting process by framing a subject to help translate a three-dimensional subject into a planned-out and visualized two-dimensional composition.
Why use a Viewfinder?
- To help with picture plane orientation choices, and whether the composition should be drawn as a horizontal or a vertical composition.
- To visually plan subject arrangements and composition choices.
- To isolate a composition and block out distracting elements.
- To crop subject matter and experiment with close or wide framing.
- To assist in finding the center of a composition as it relates to the picture plane.
The size of a viewfinder window varies depending on how near you are to the subject matter and the proportions of the picture plane. As an example, the image below shows a viewfinder window that is 4 x 5.5” which is proportional to the 16 x 22” picture plane on your 18 x 24” drawing paper used in the three observation drawing activities included at the end of the chapter.
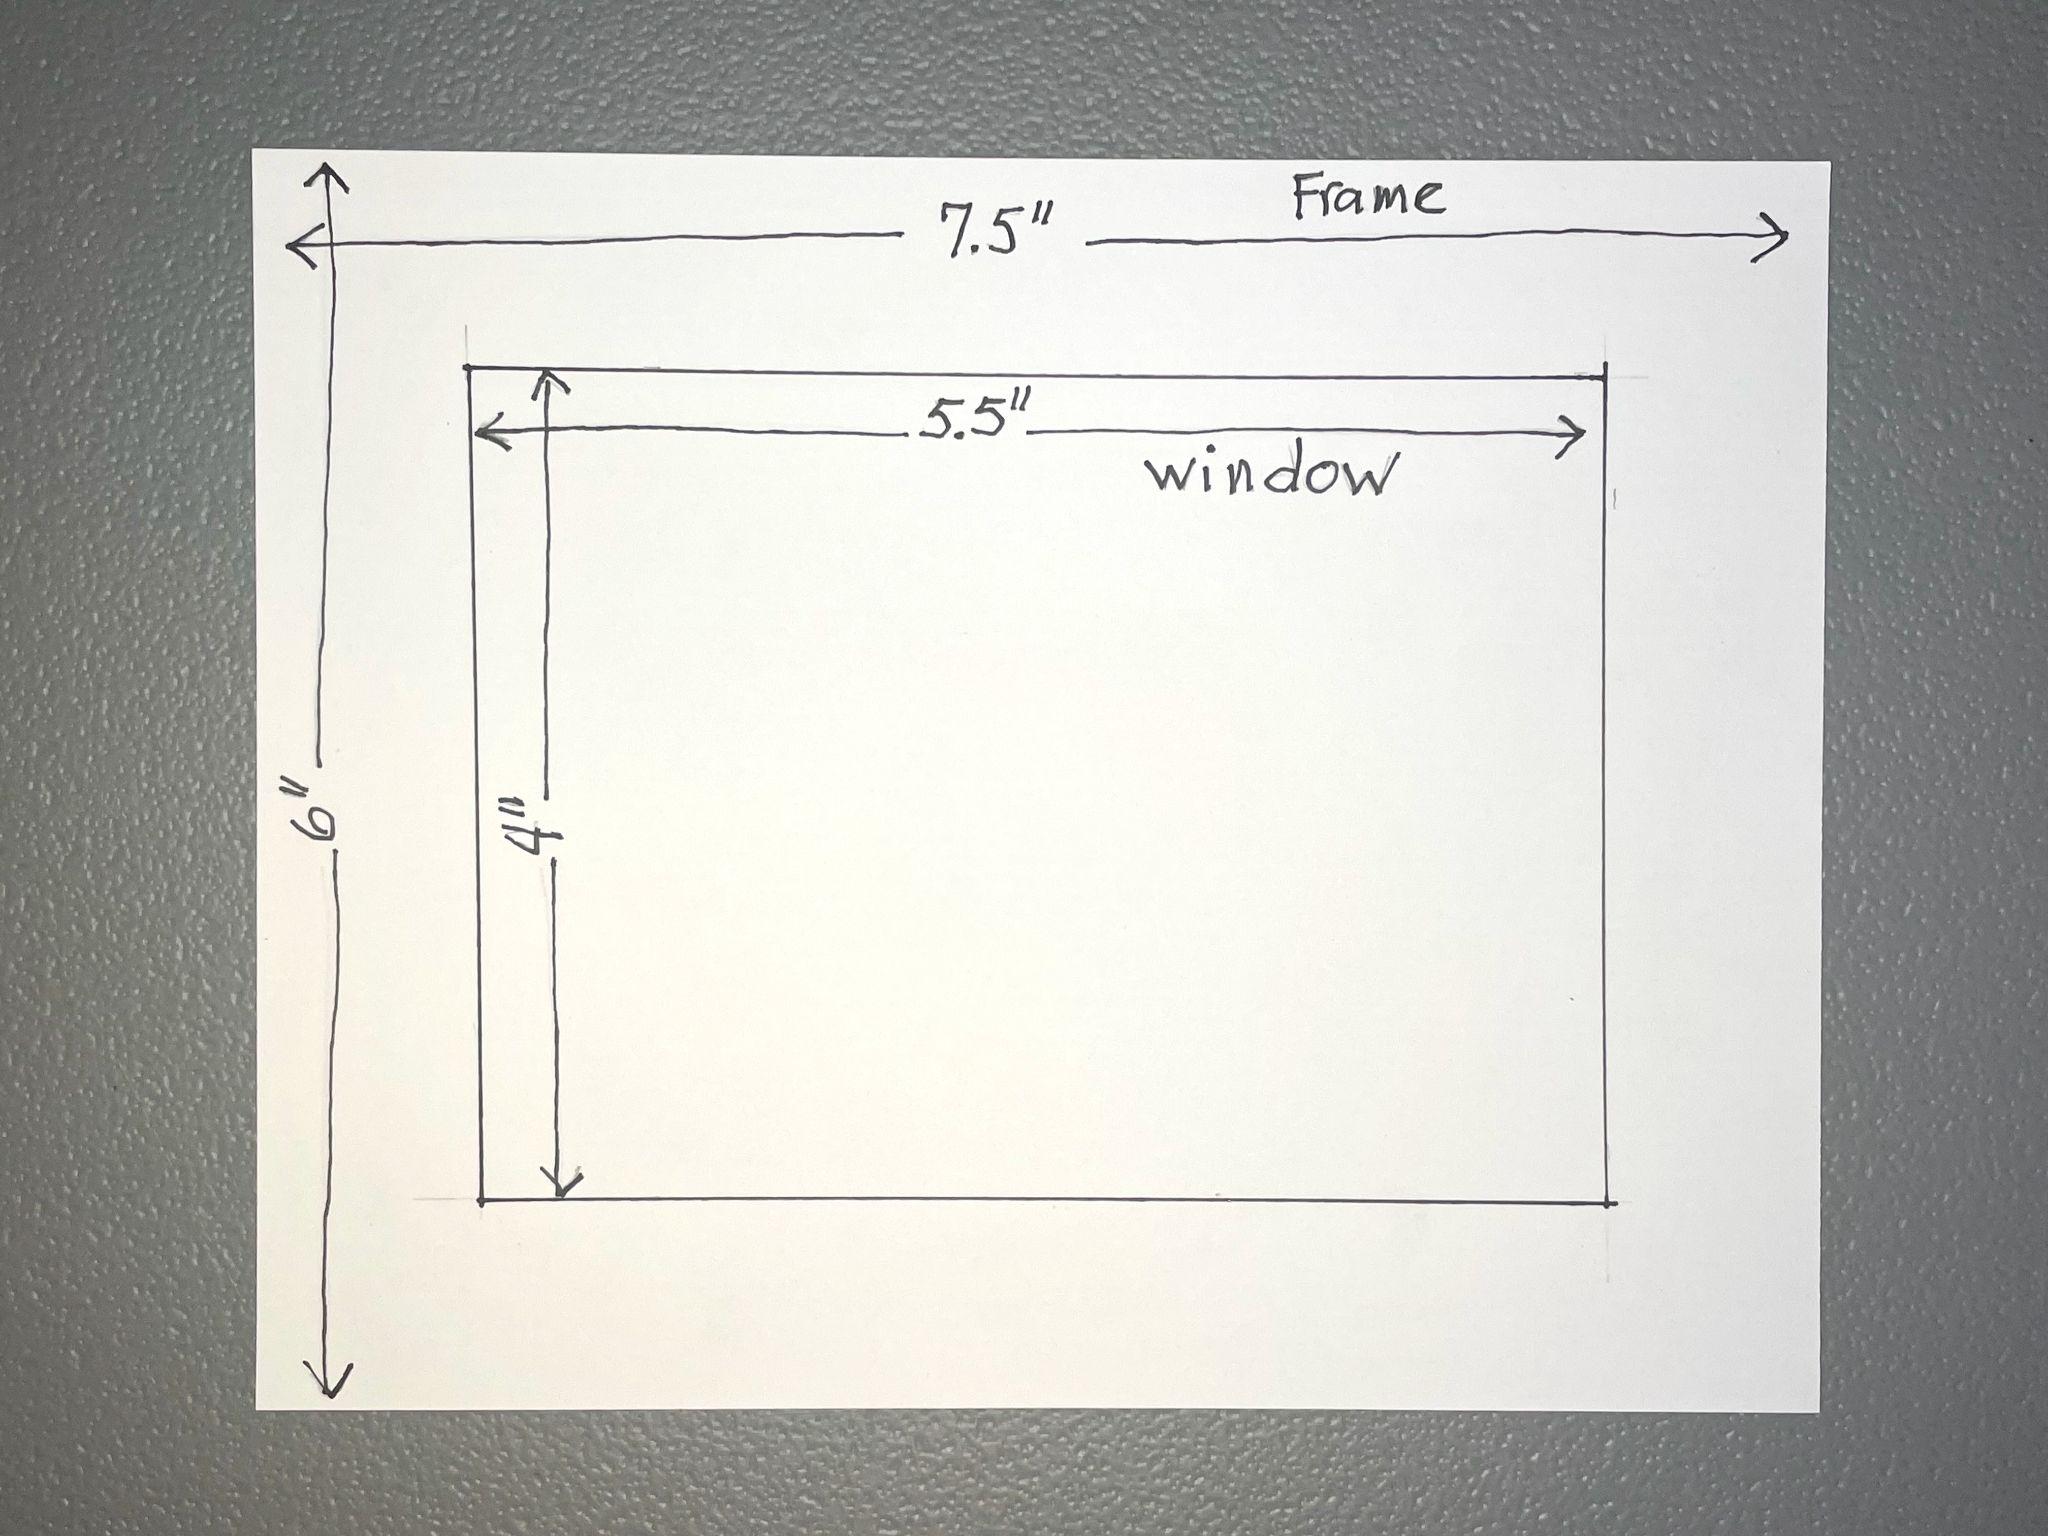
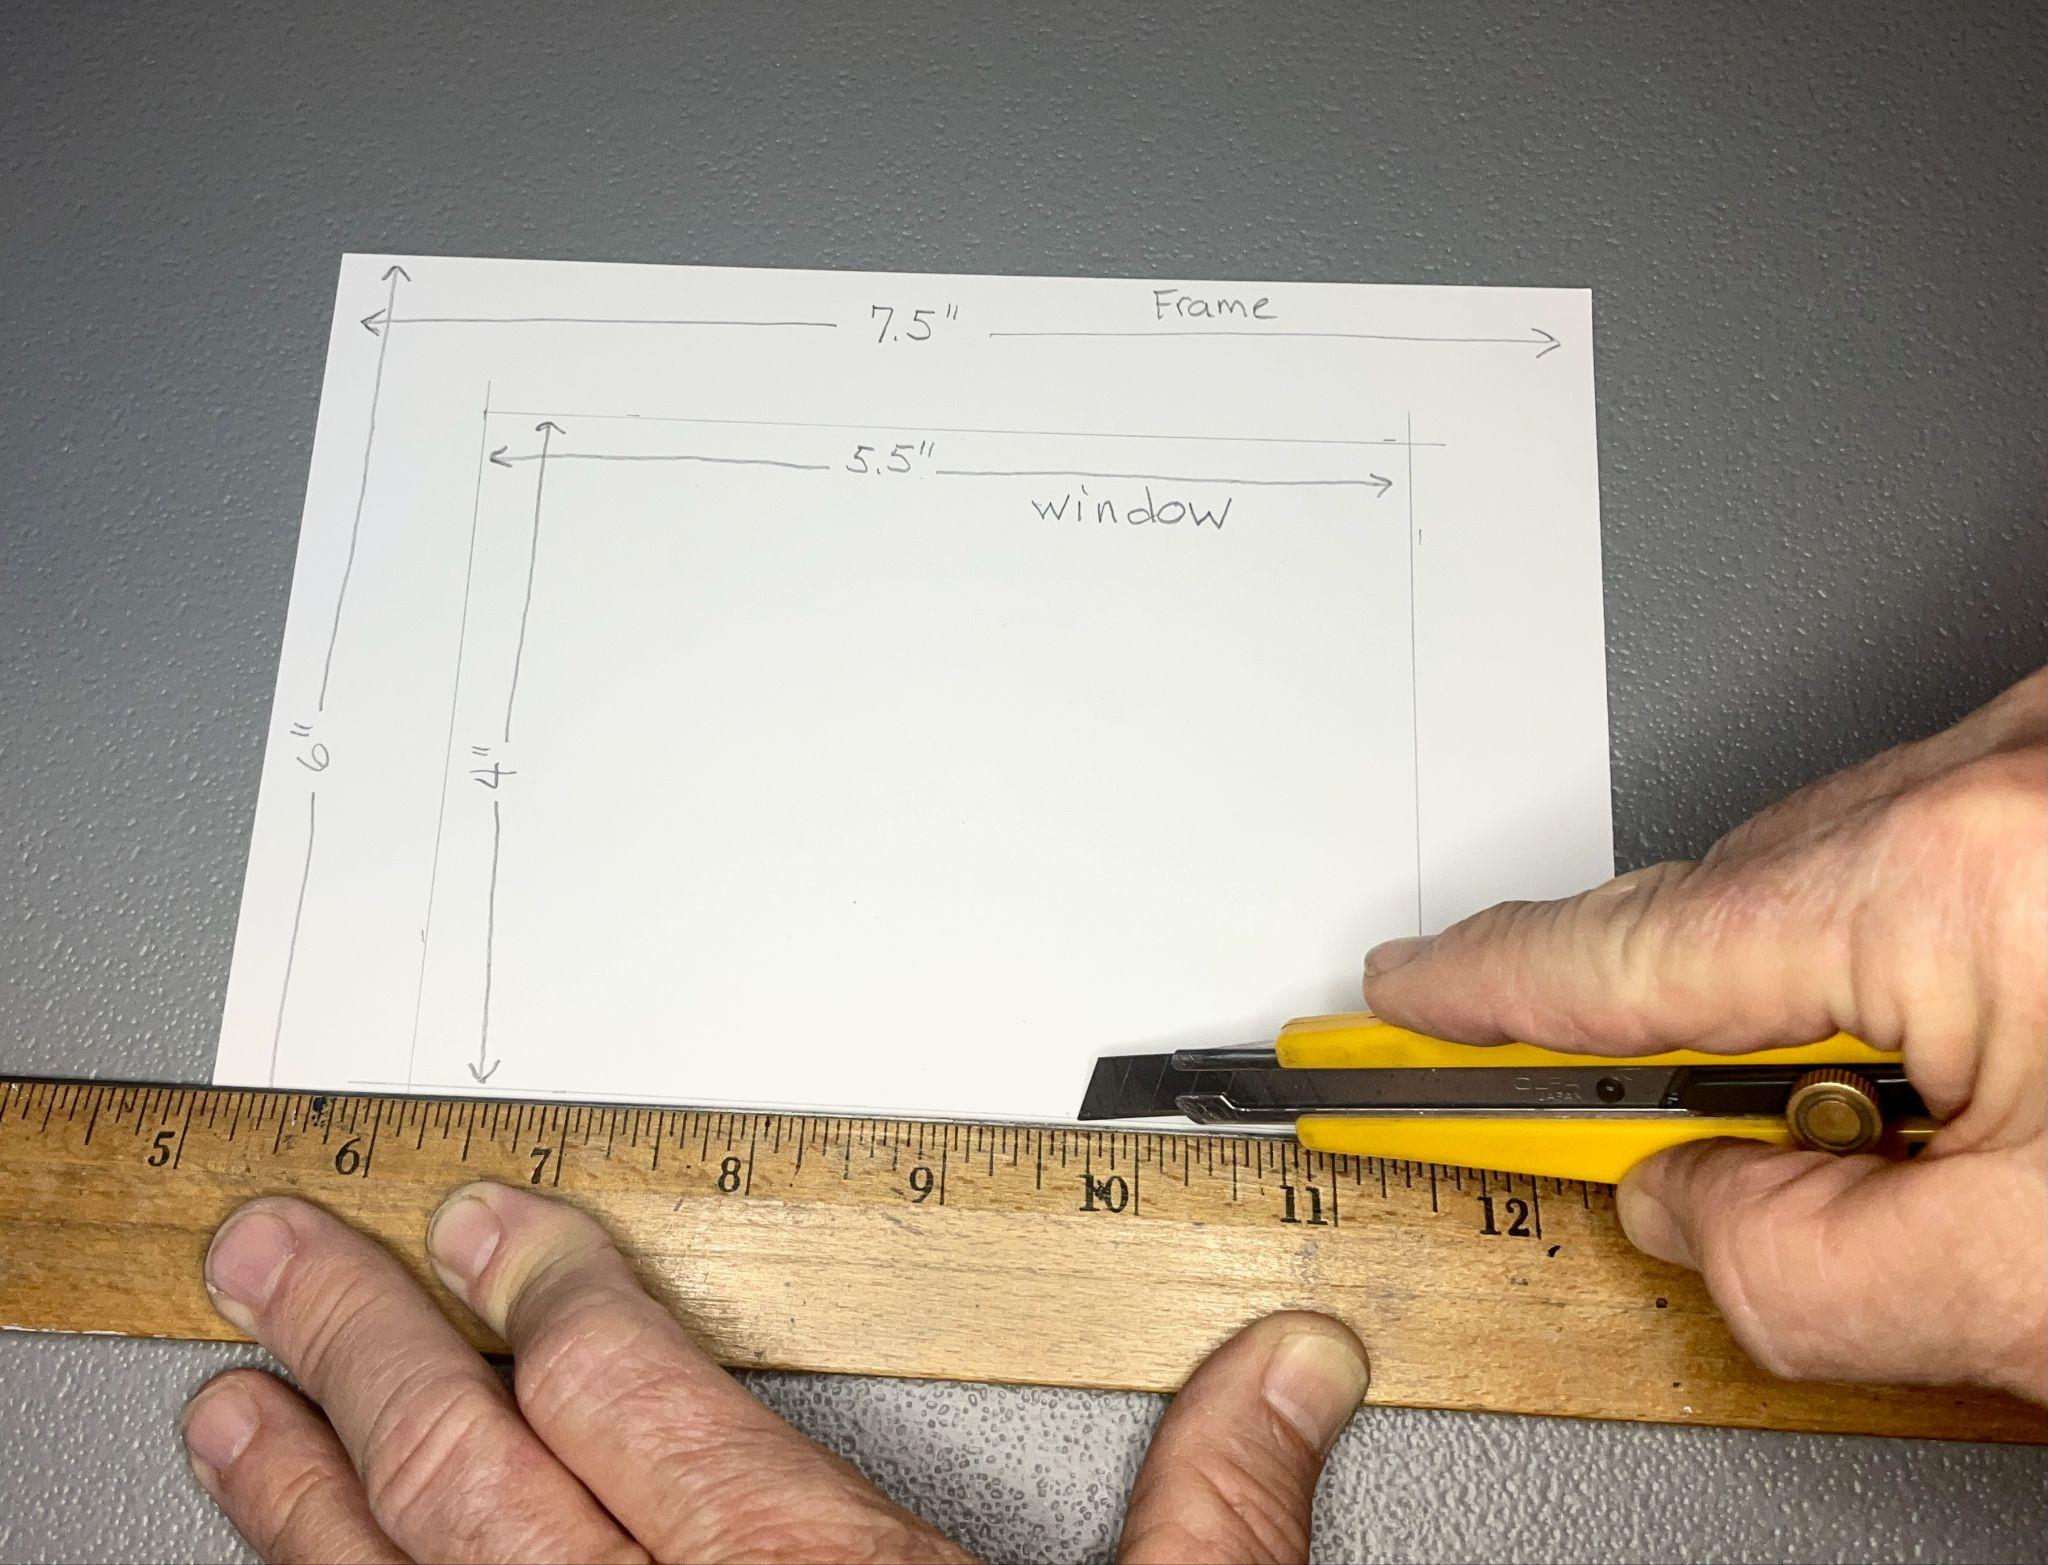
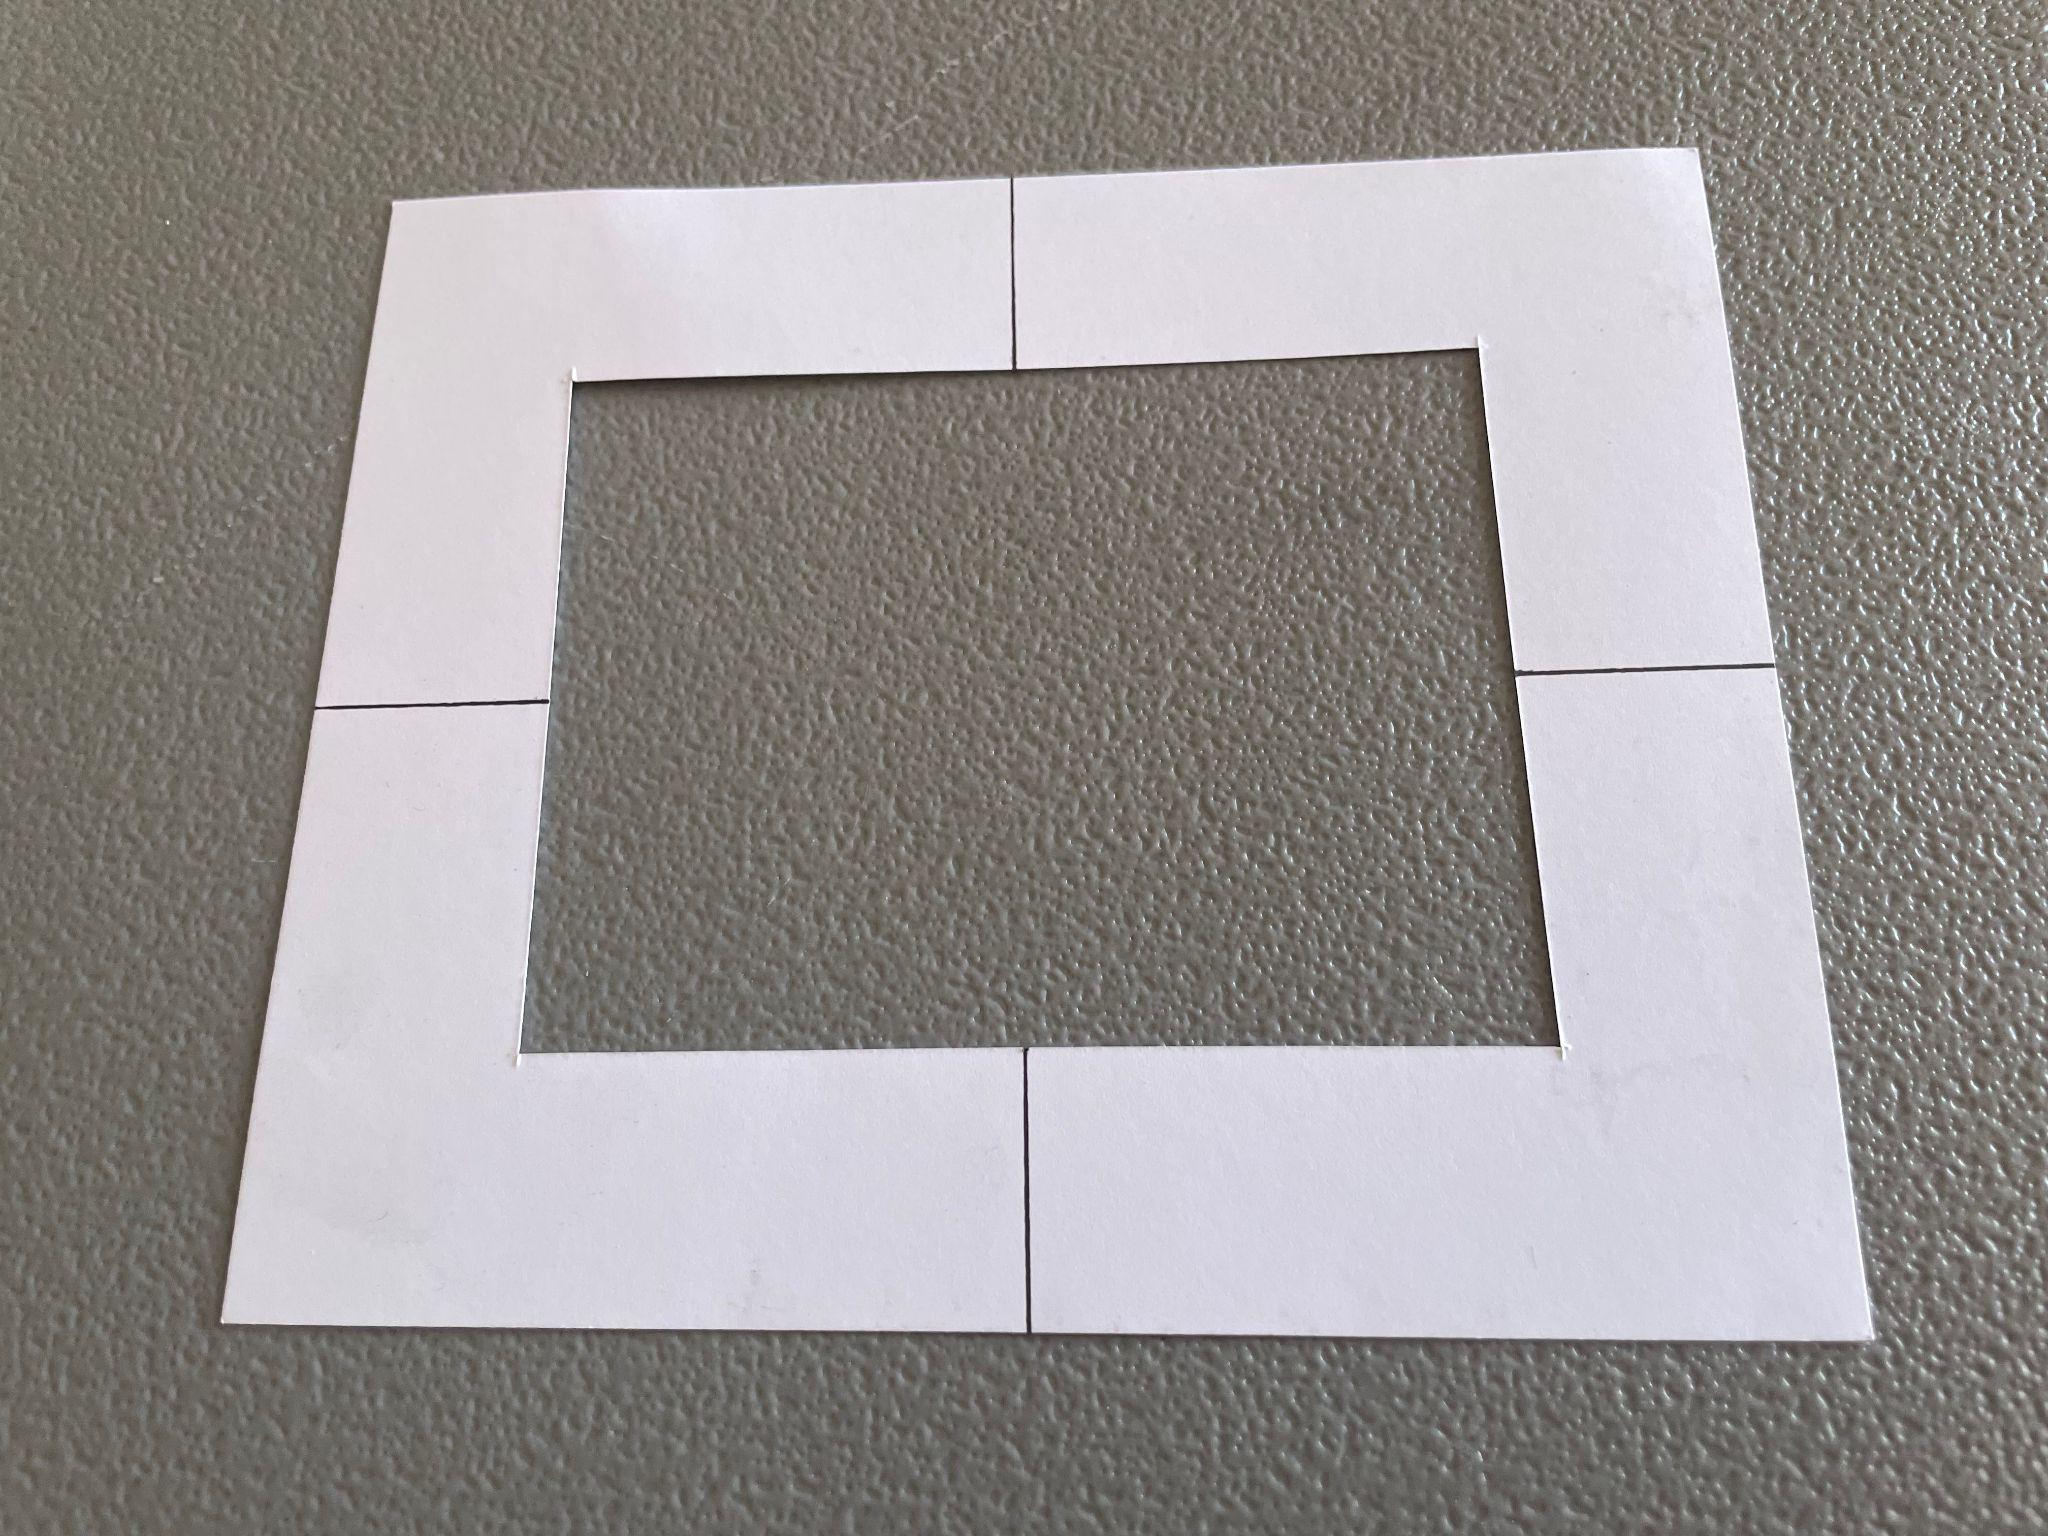
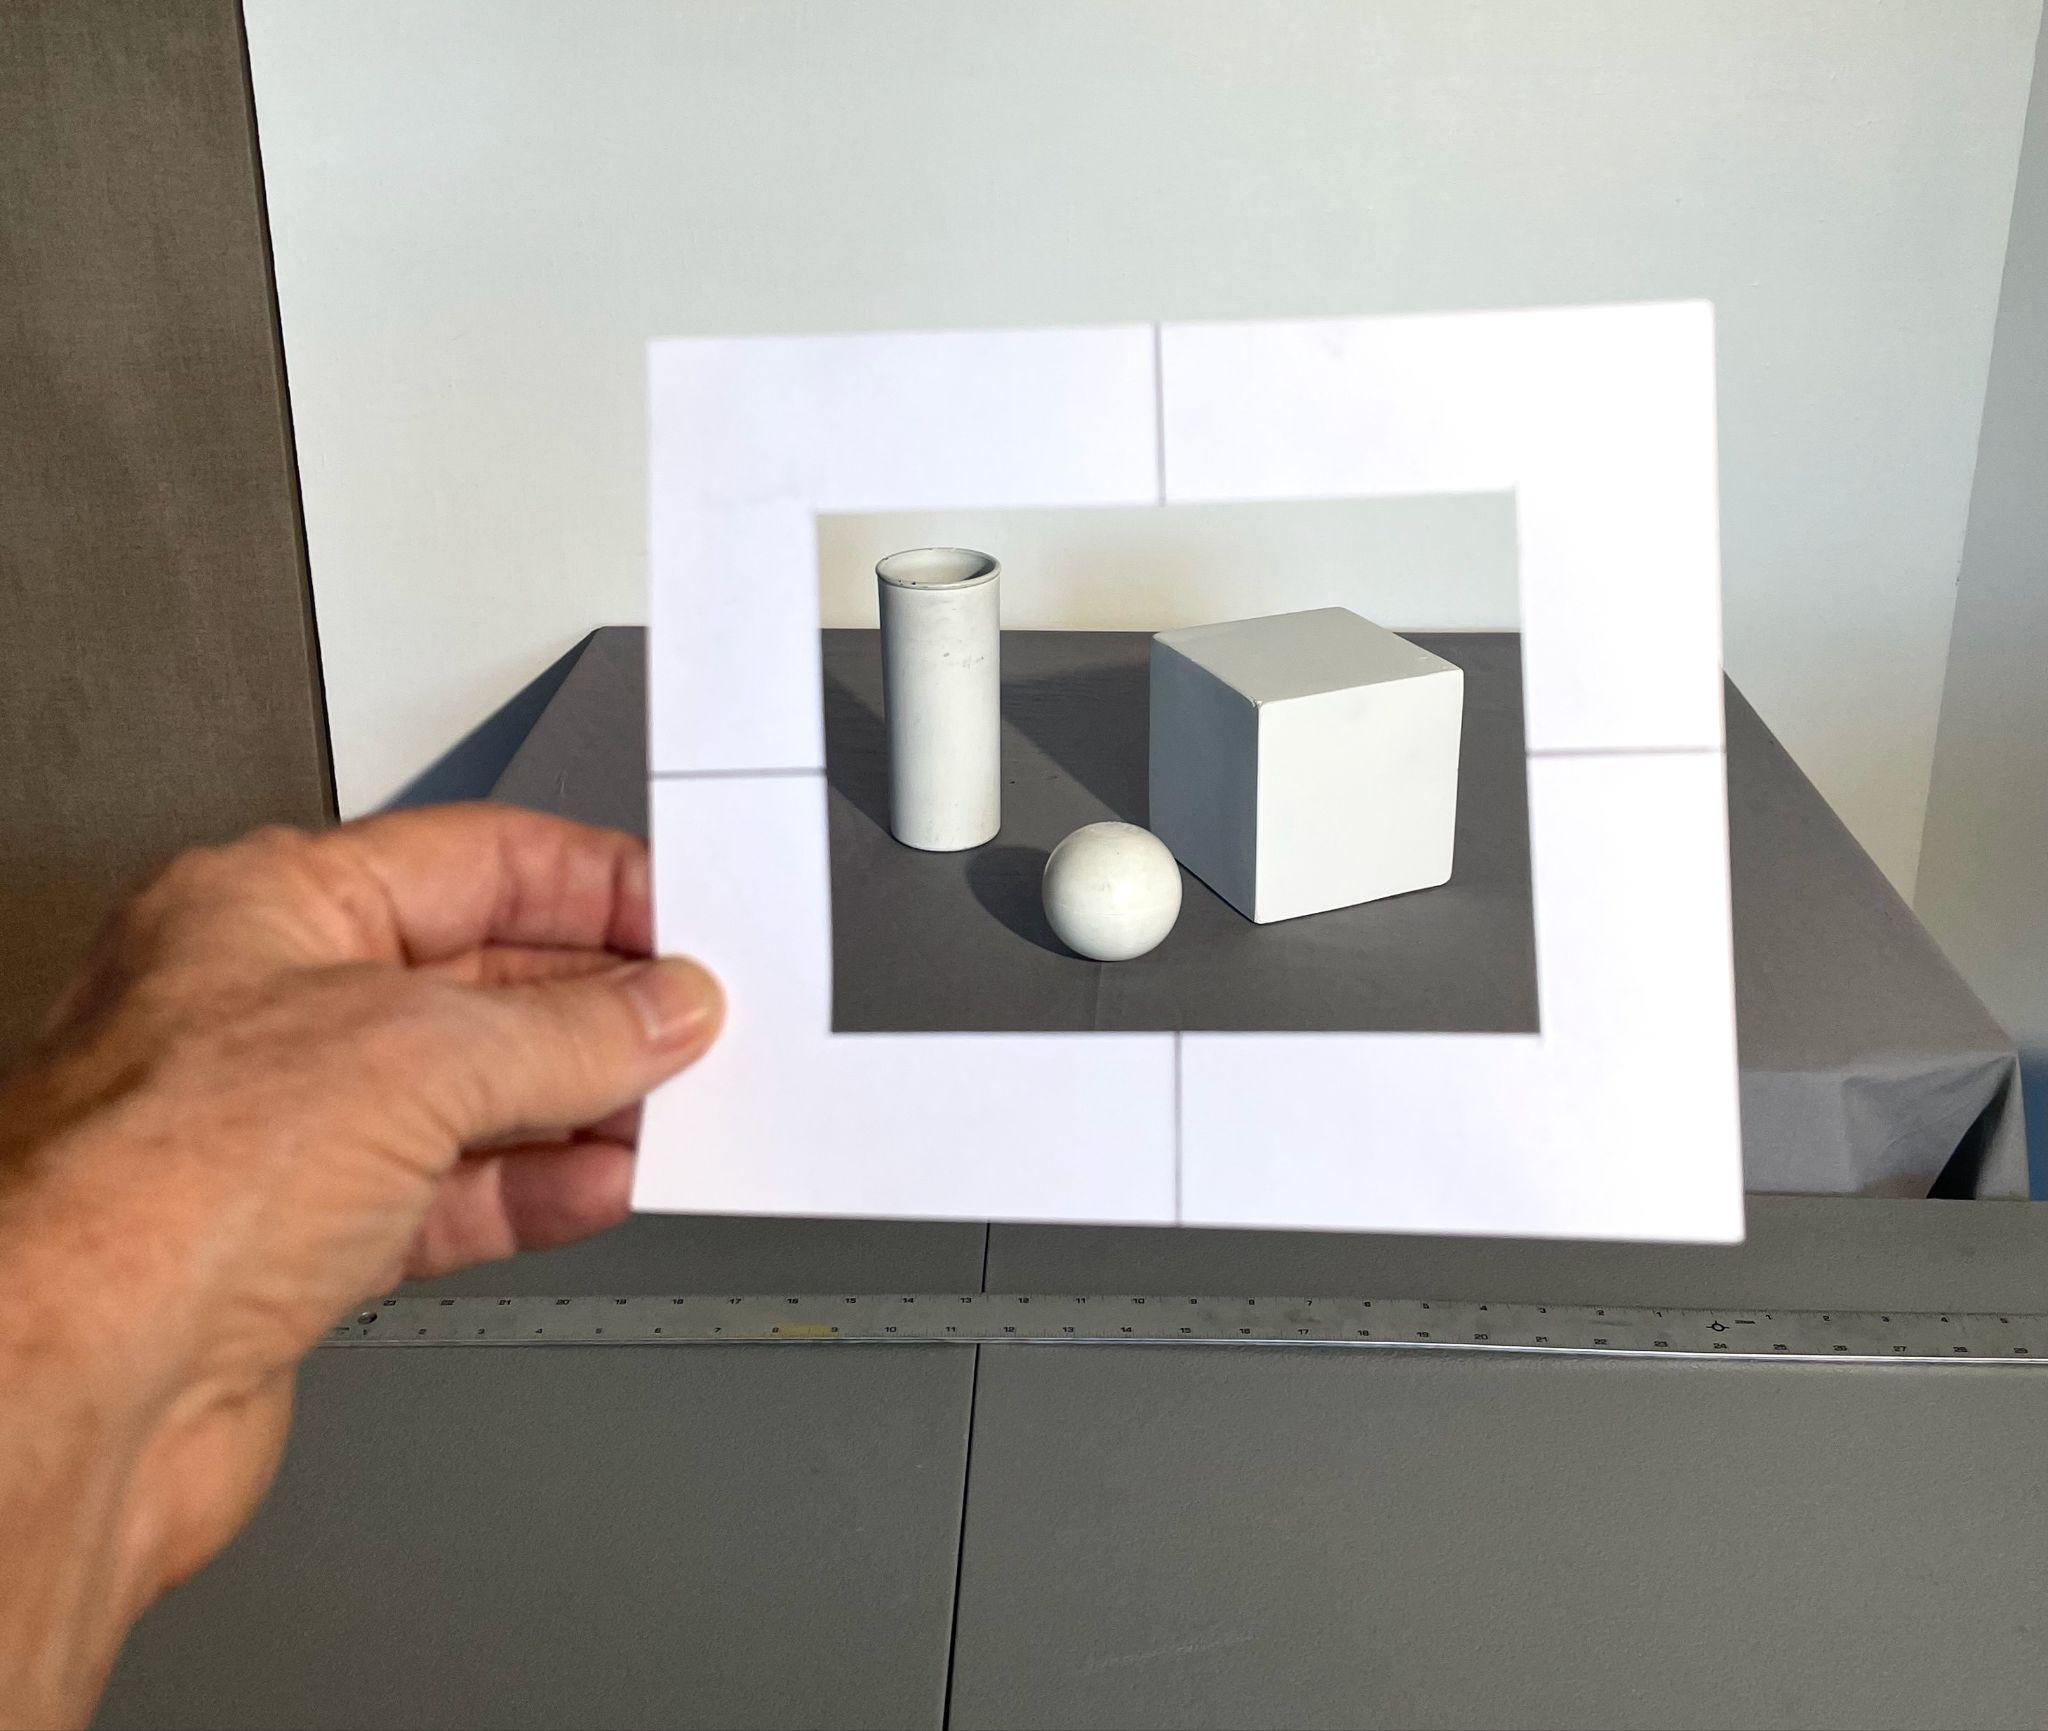
Measurements and cutting out and use of a viewfinder, Stephen P. Curry, digital photos, License: CC BY NC 4.0
Sighting Techniques
You may have seen artists holding their pencil out in front of them with one eye closed—this is sighting. To use sighting effectively, hold your sighting tool in your non-dominant hand at arm’s length, open the eye on the same side as your outstretched arm, and close the other eye. For example, if you are right-handed, your left arm will be extended with the sighting tool, your left eye open, and your right eye closed. Closing one eye flattens your field of vision, making it easier to measure and compare angles or lengths.
Visually, you will measure along the length of your sighting tool using your thumb to mark the measurement and transfer your observations to the paper, adjusting as needed. Over time, your accuracy will improve as your eye becomes more finely attuned to proportion and angle. These are examples of the sighting steps and techniques you will use combined with other observational tools that will be described, in order to complete the three drawing activities at the end of the chapter.
- Hold your sighting tool out in your non-dominant hand at arm’s length with your elbow locked so that your sighting tool is always the same distance from your eye. Whether you are sitting or standing, try to maintain the same position and posture to have a consistent viewing location.
- Hold your sighting tool lengthwise and parallel to your eyes. Attempt to keep the sighting tool perfectly vertical for capturing vertical measurements and perfectly horizontal when capturing width measurements. Line up the sighting tool with an existing vertical or horizontal structure, such as a corner of a room or where a wall meets the ceiling. Then, keep the straight line and return to your original sighting posture, location, and subject.
- Close one eye. This eliminates your stereoscopic vision, helping you see and think in 2D, and makes it easier to translate 3D subject matter into a 2D drawing.
- Choose a single object or part of an object to measure. Measure, AKA sight, from the tip of the sighting tool to your thumb to visualize the size of any subject or portion of an object by measuring it along your sighting tool.
- Compare that measurement to other parts of your subject to see how they relate. Height vs. width, the space between objects, and the size of one object compared to another object.
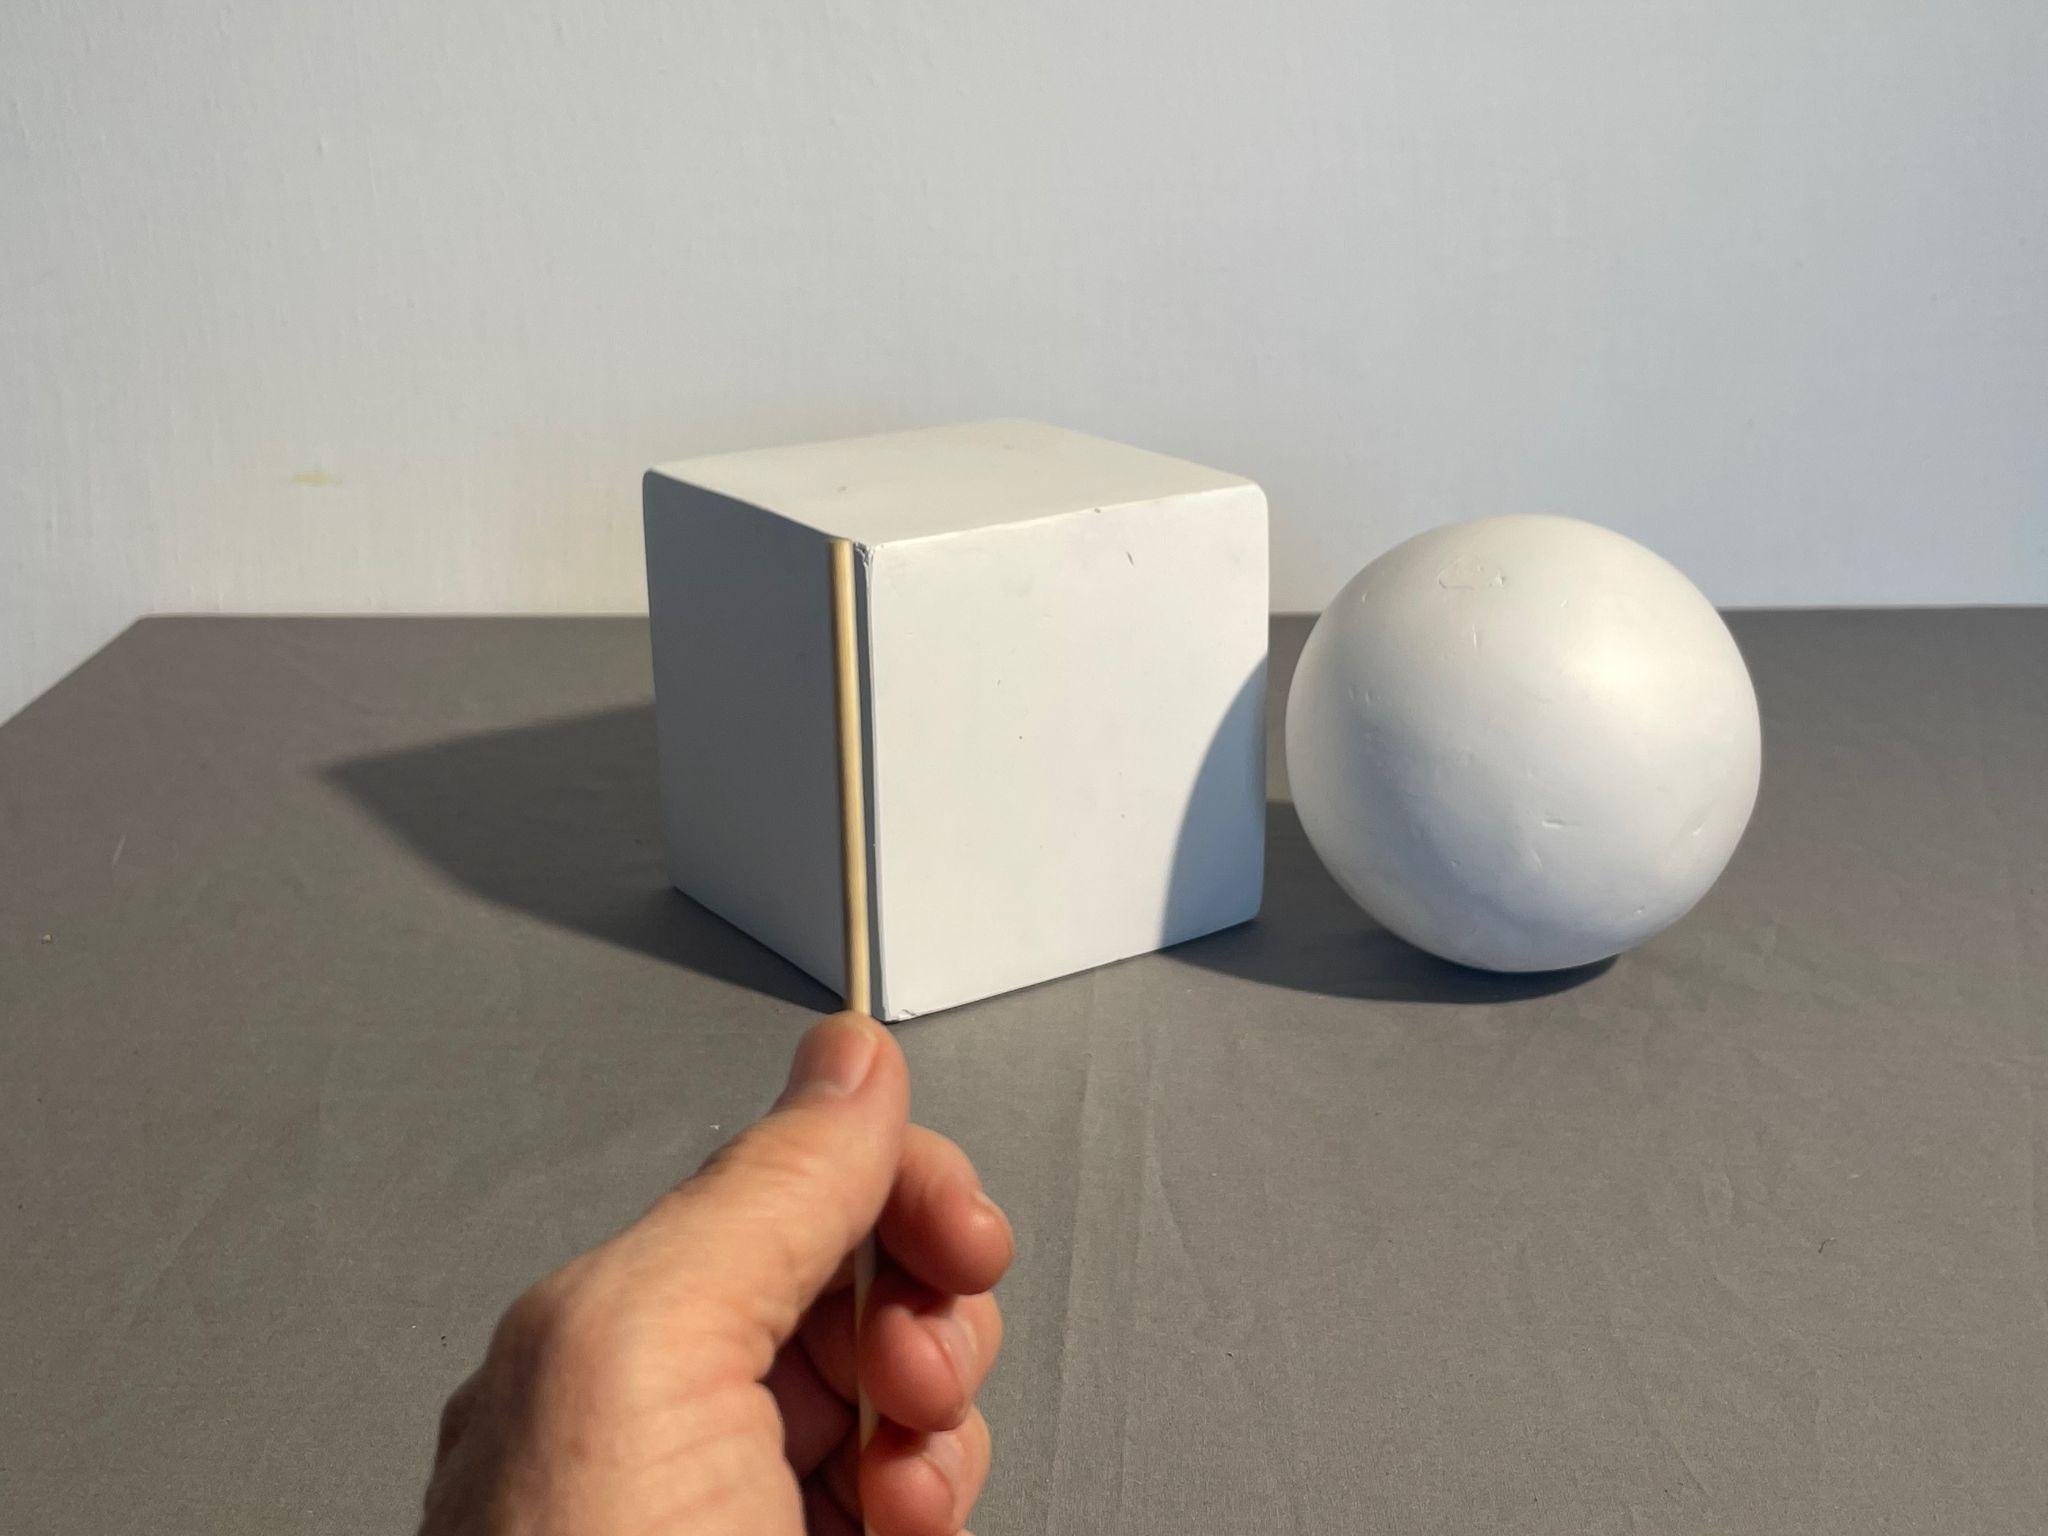
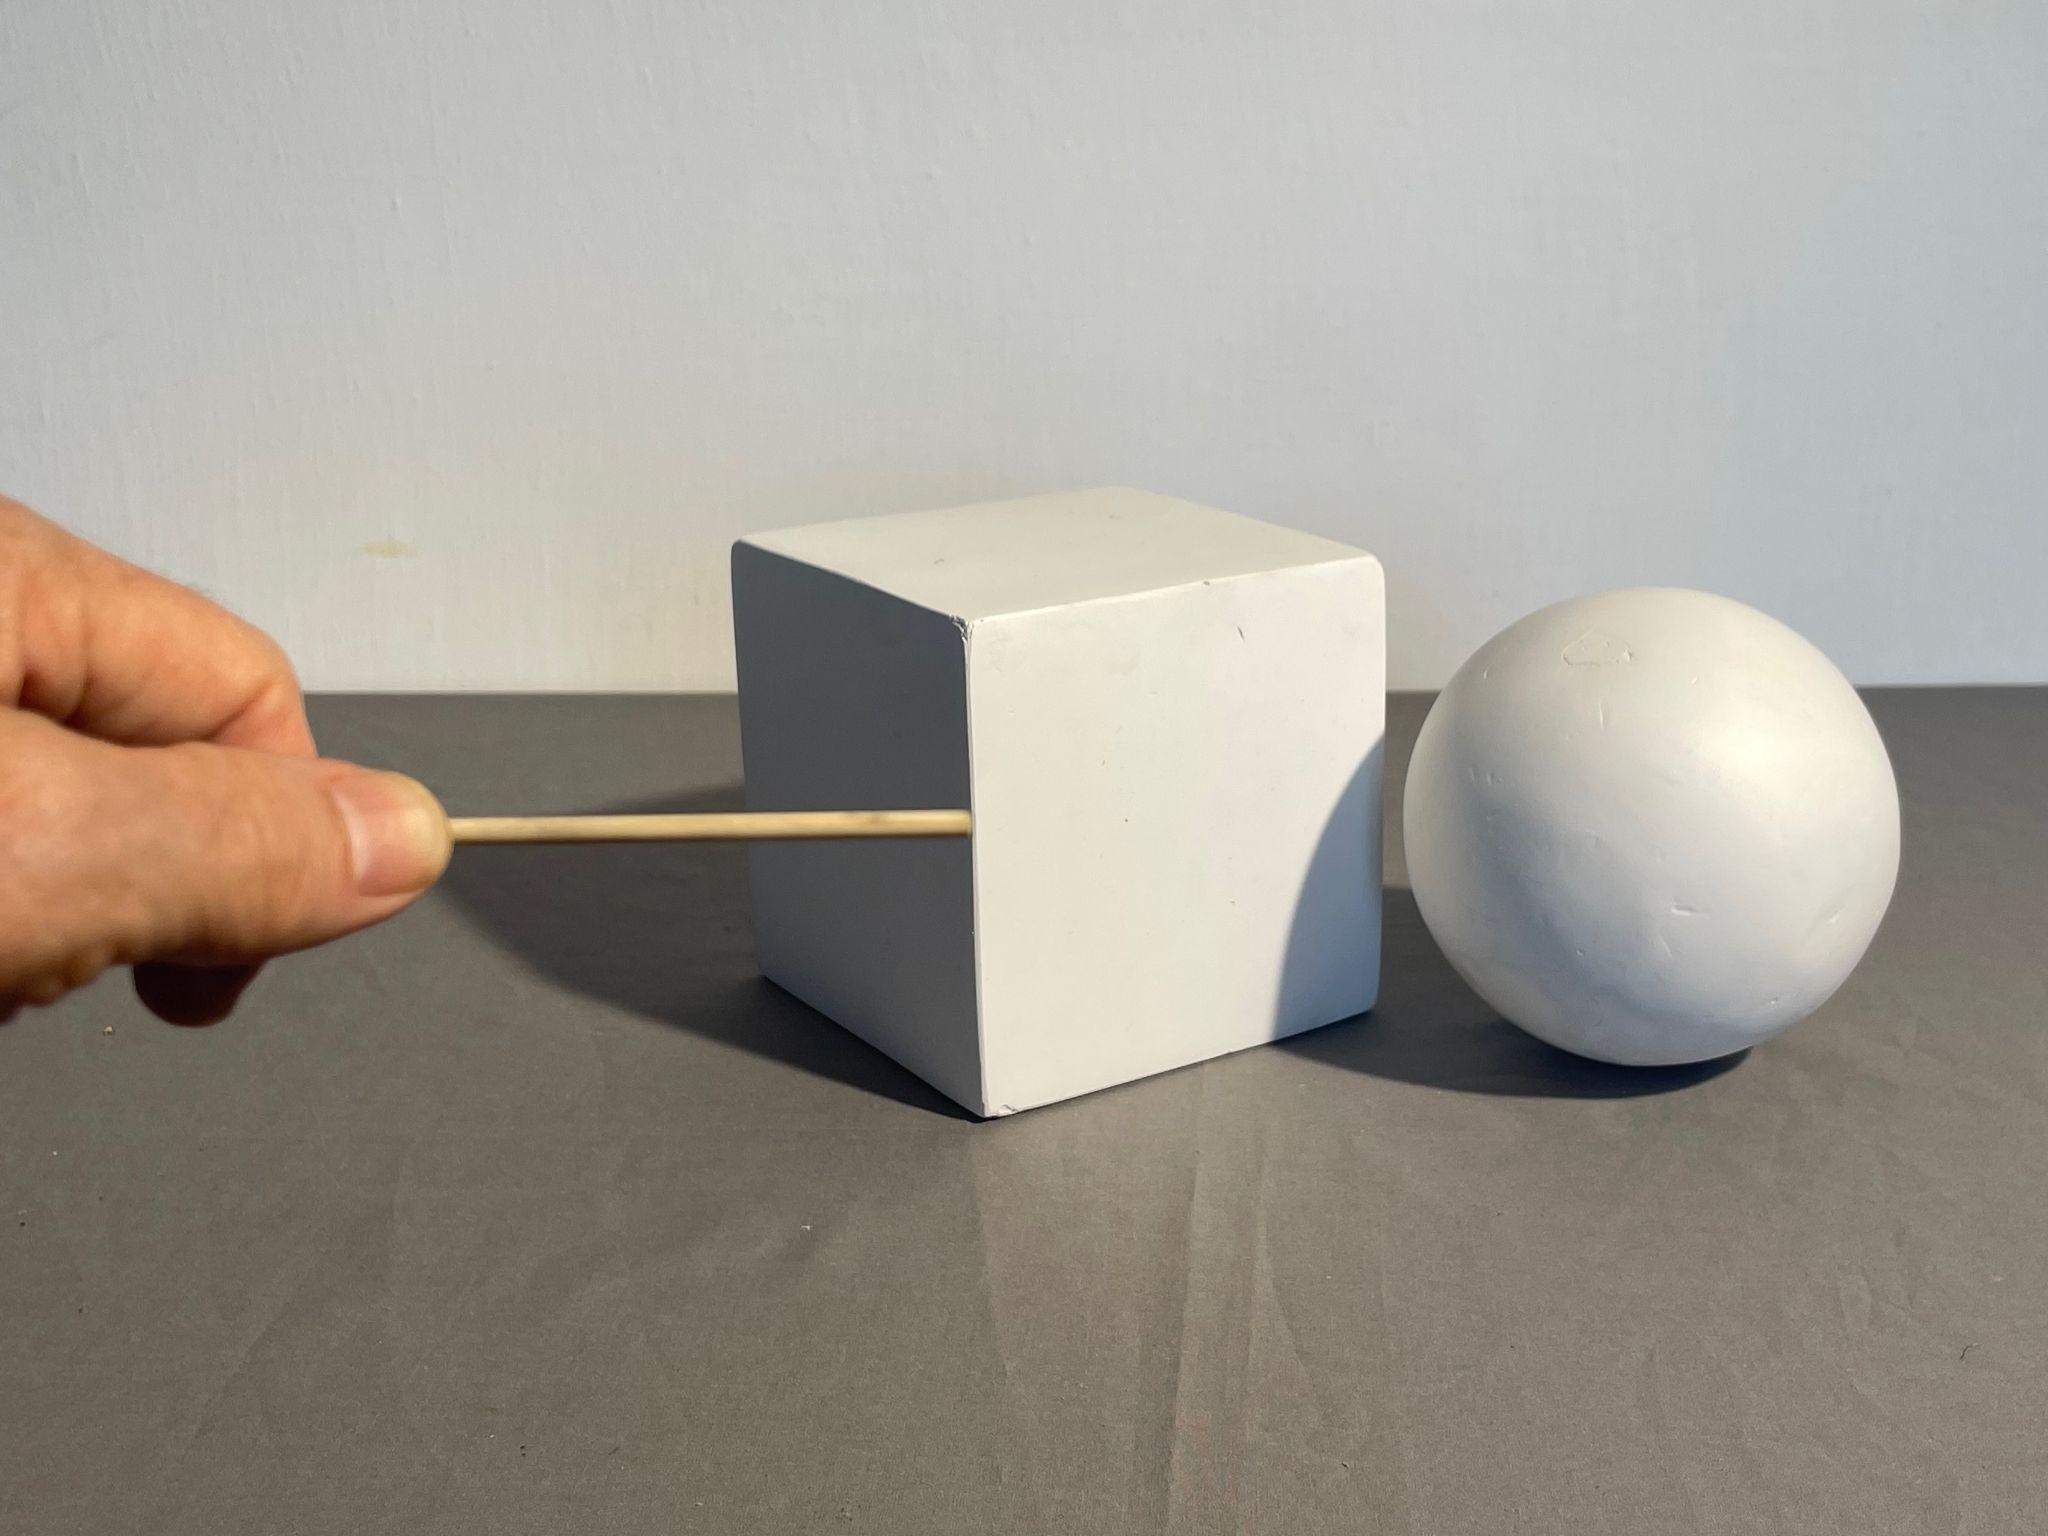
Height vs. width comparison example, Stephen P. Curry, digital photo, License: CC BY NC 4.0
- (See the proportion box technique for additional ways to create observational drawings with a sighting tool.)
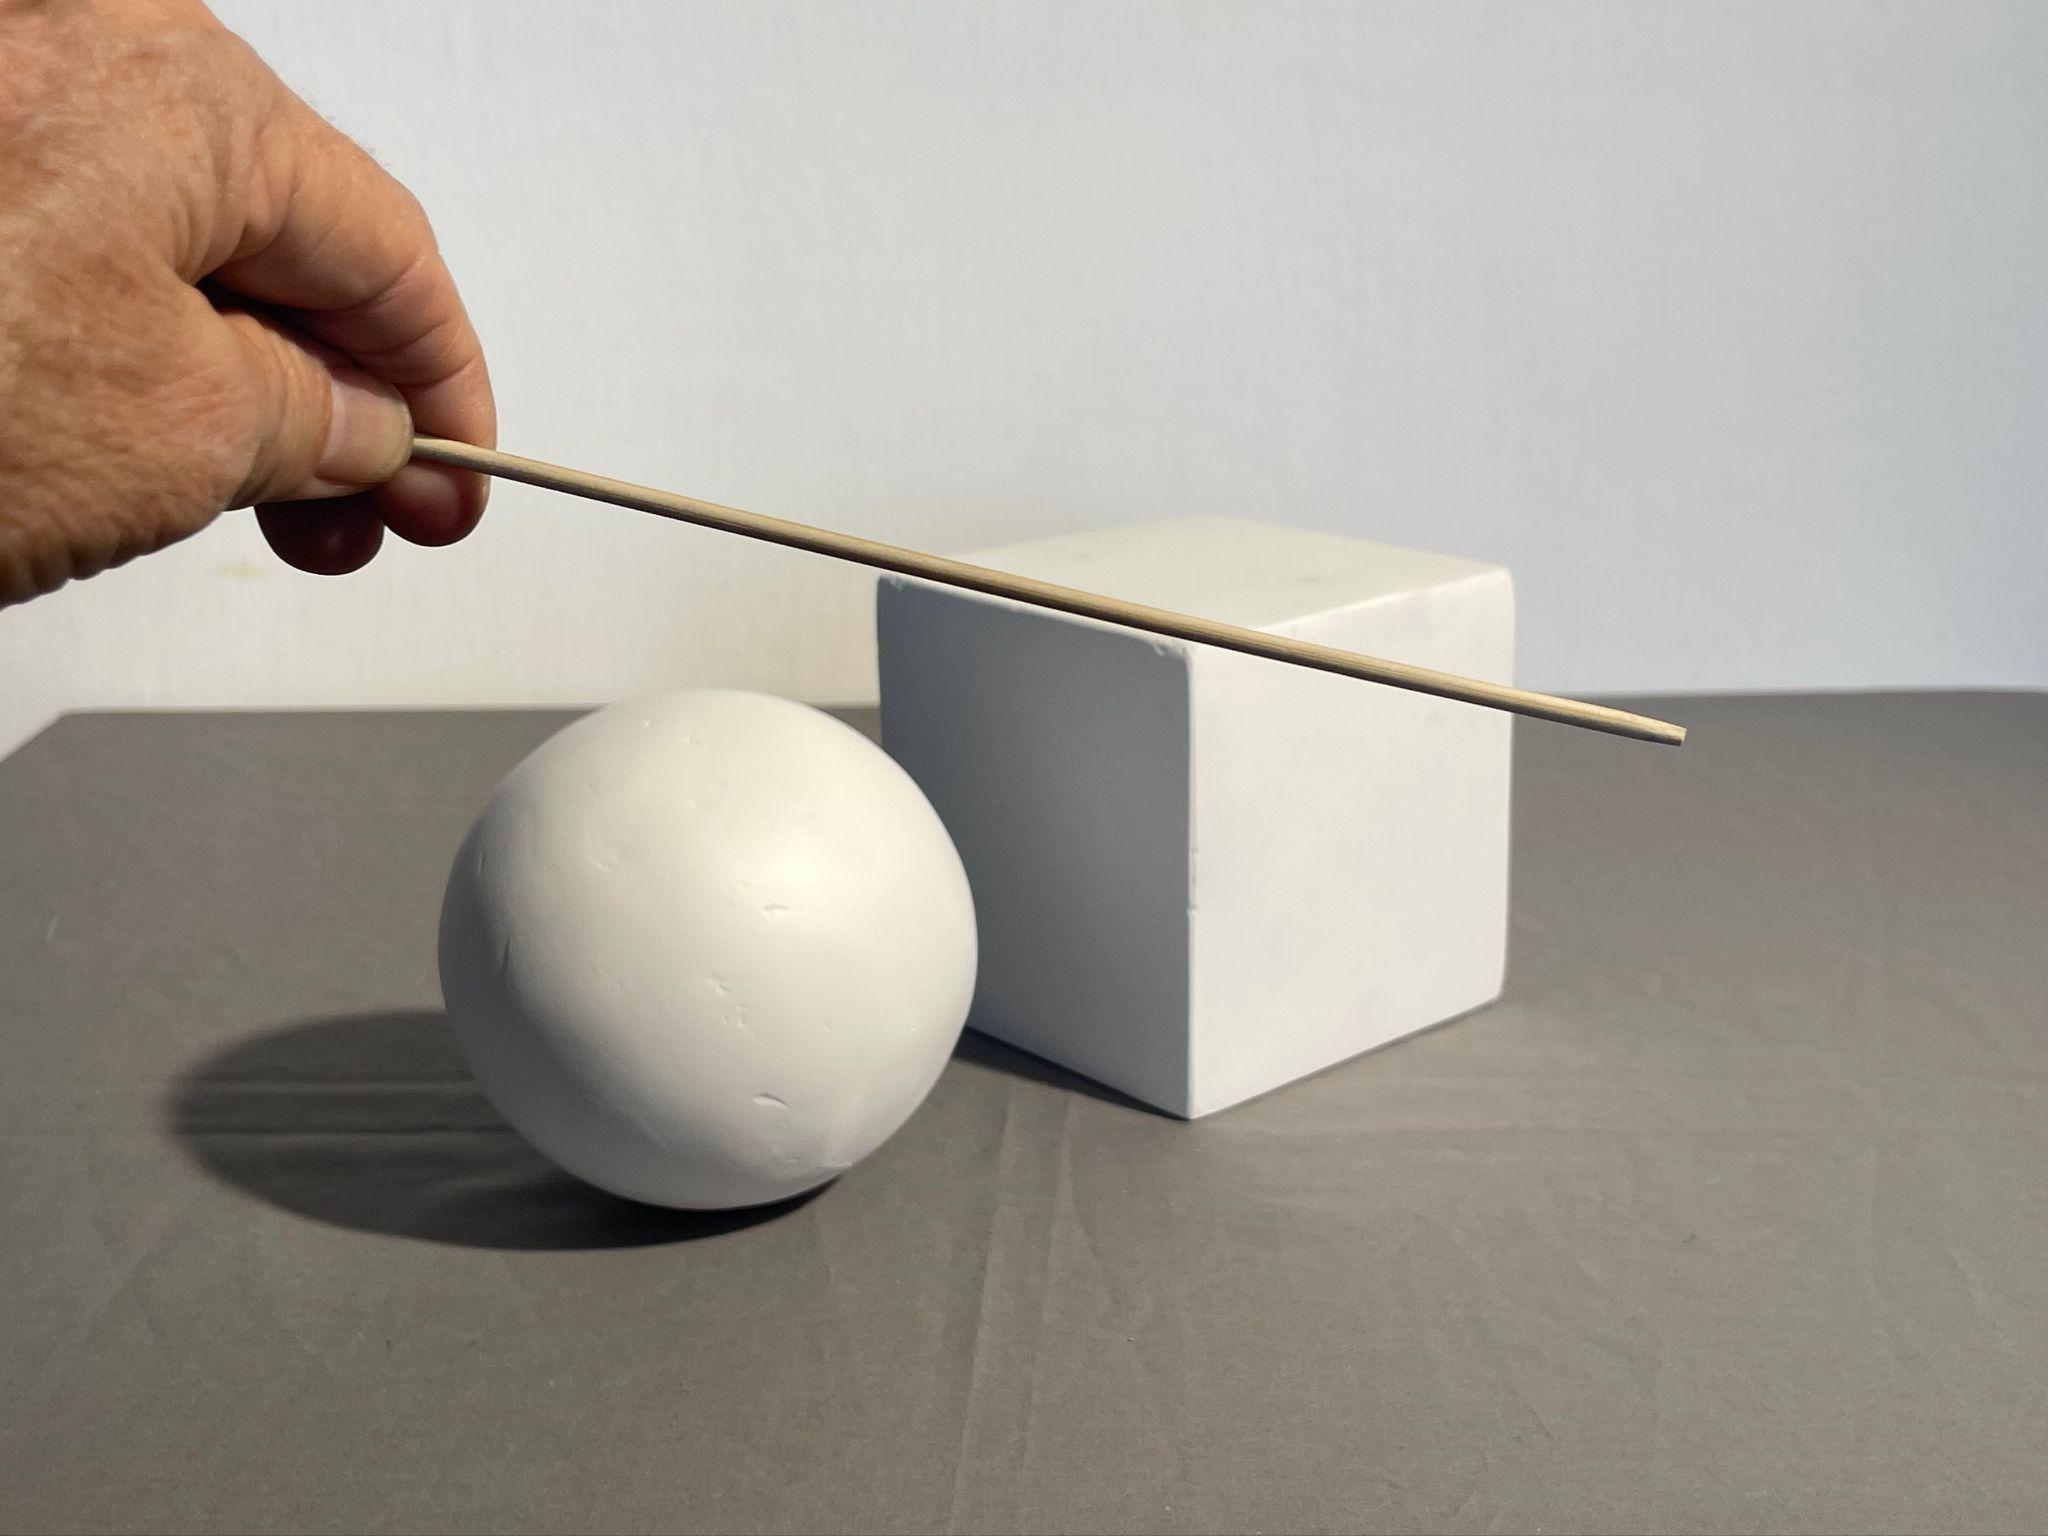
- Find the angle of the edge of an object, such as the top or bottom of a cube, as that horizontal edge extends towards a vanishing point. Hold the pencil parallel to your eyes and match the angle of your pencil to the angle of the edge of the object. Do not extend your pencil towards the object in space, but keep it parallel to your eyes, then hold the angle in place as you move your pencil back to the drawing, keeping your elbow locked to help create accurate measurements by maintaining your sighting location.
Proportion Box Method
This is an optional technique that corresponds with the Advanced Still Life Project in the Observation Drawing Activities at the end of the chapter.
The proportion box method is an advanced sighting technique. The concept of sighting is still used, but in a more specific way to create highly accurate drawings with correct proportions from observation. Proportion was first introduced in the Elements and Principles Chapter; it concerns the size relationships of parts within a whole. The proportion box method is used to break down complex objects into correctly proportioned simple shapes to speed up the drawing process.
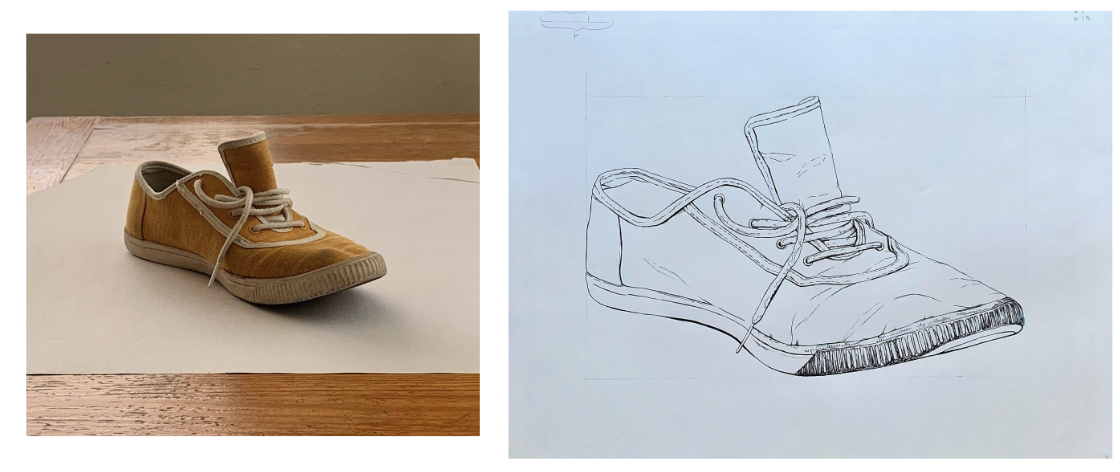
To learn this method, the following information can either be read or followed as instructions. If you apply the information as instructions, you will need a sighting tool, a pencil, and a piece of paper, along with at least one three-dimensional object.
Proportion Box Method Steps
- To start, choose one three-dimensional object to measure from observation.
- Observe the object and notice if the object’s height is smaller than its width, or if the object’s width is smaller than its height.
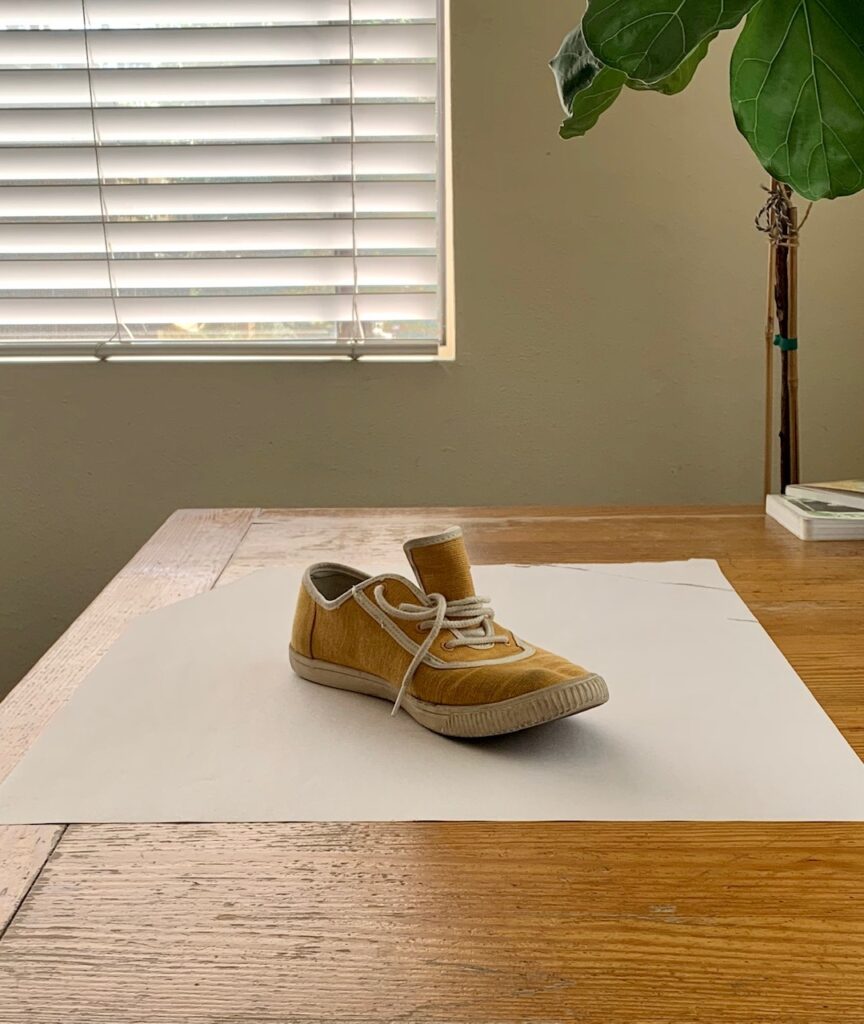
- Use a sighting tool as needed to compare and determine the smaller measurement. For instance, if you use a shoe like the one in the photo below, you will notice the height is smaller than the width.
- Use a sighting tool on a vertical axis to record an accurate measurement of the height. Keep consistent posture with your arm straight when sighting.
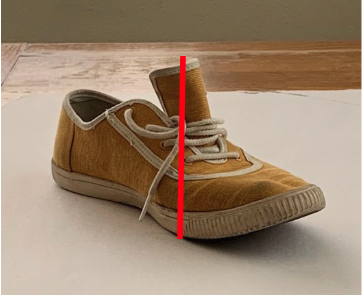
- Line up the top end of the sighting tool with the tallest part of the object and move your thumb so it lines up with the lowest part of the object. This measurement represents the height of the object.
- Double-check that the full height of the object is captured between the end of the sighting tool and your thumb. Remeasure and adjust as needed. An annotated example, showing a red line to represent the full height of the referenced shoe, is shown below.
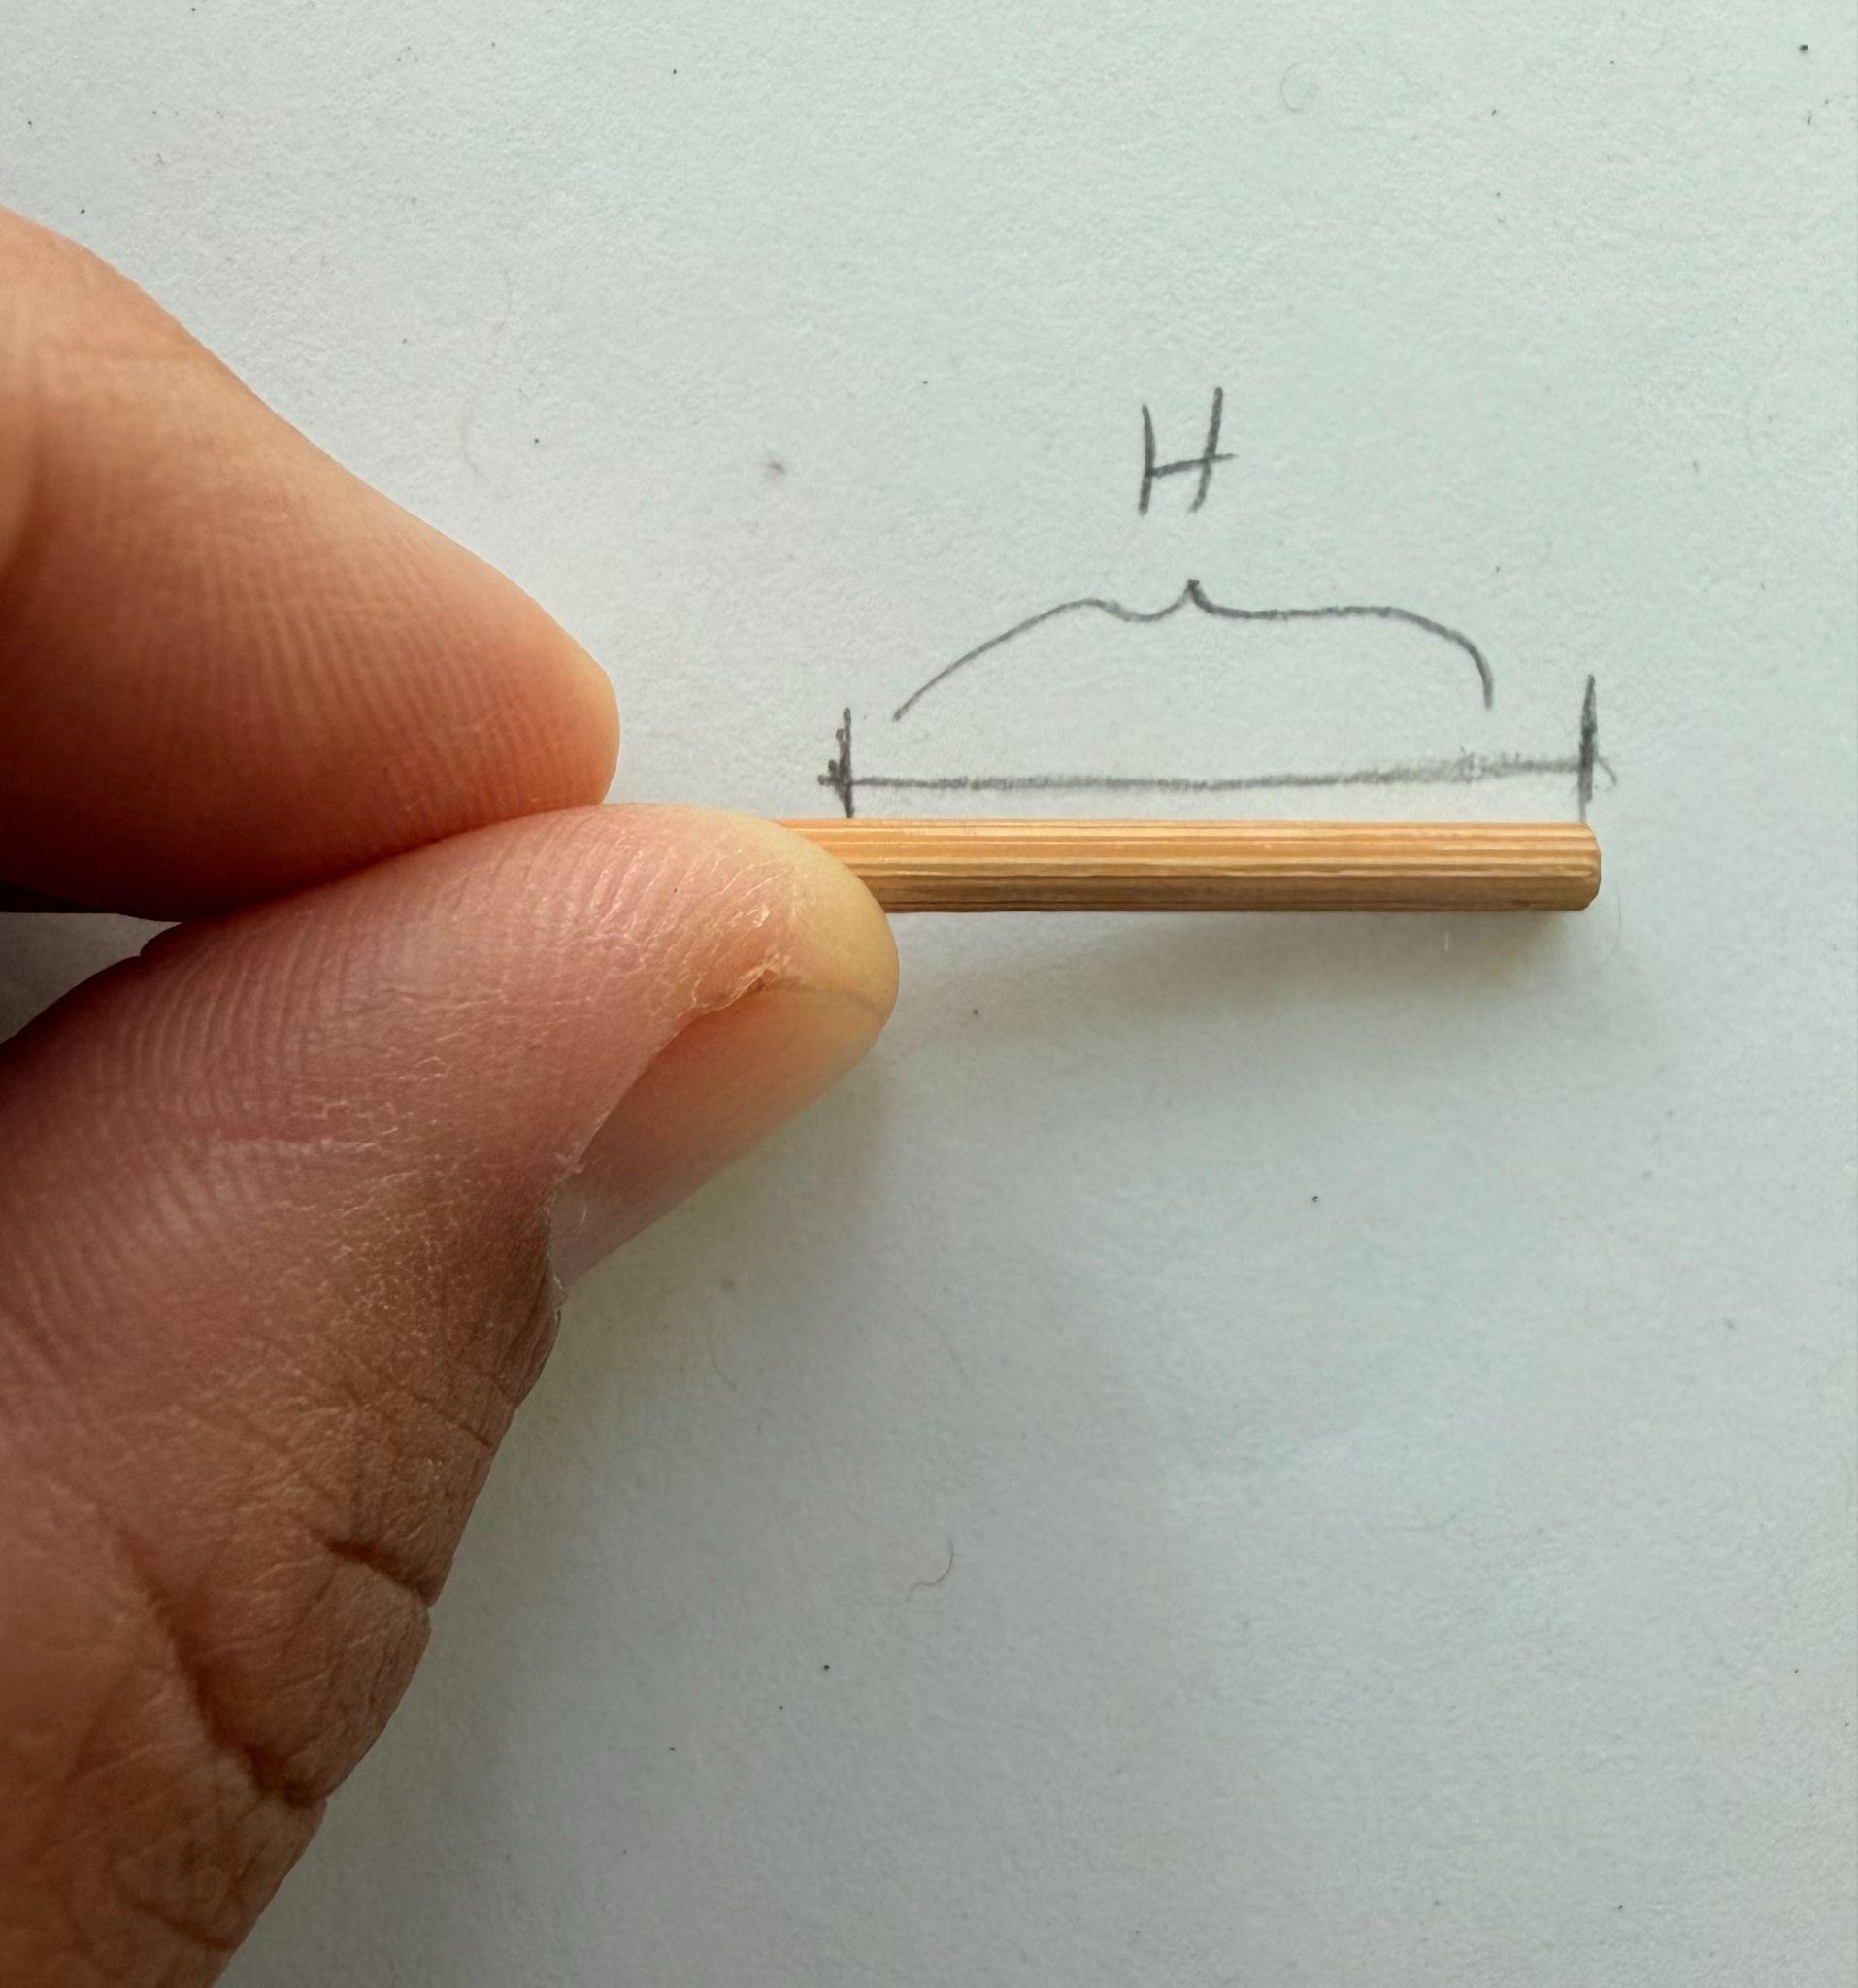
- Record and label the height measurement on the outside edge of a piece of paper. We will call this recording the measurement key. An example of this recording is shown below.
- Repeat this process with the sighting tool on a horizontal axis to measure the width.
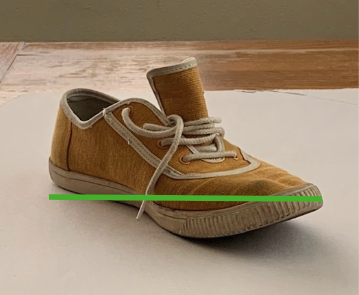
- Line up the right end of the sighting tool with the widest part of the object on the right, and line up the end of your thumb with the leftmost part of the object.
- Double-check that the full width of the object is captured between the end of the skewer stick and your thumb. This measurement represents the widest part of the object. An annotated example, showing a green line to represent the full width of the referenced shoe, is shown below.
- Record and label the width measurement on the measurement key as shown in the Measurement Key Example image below.
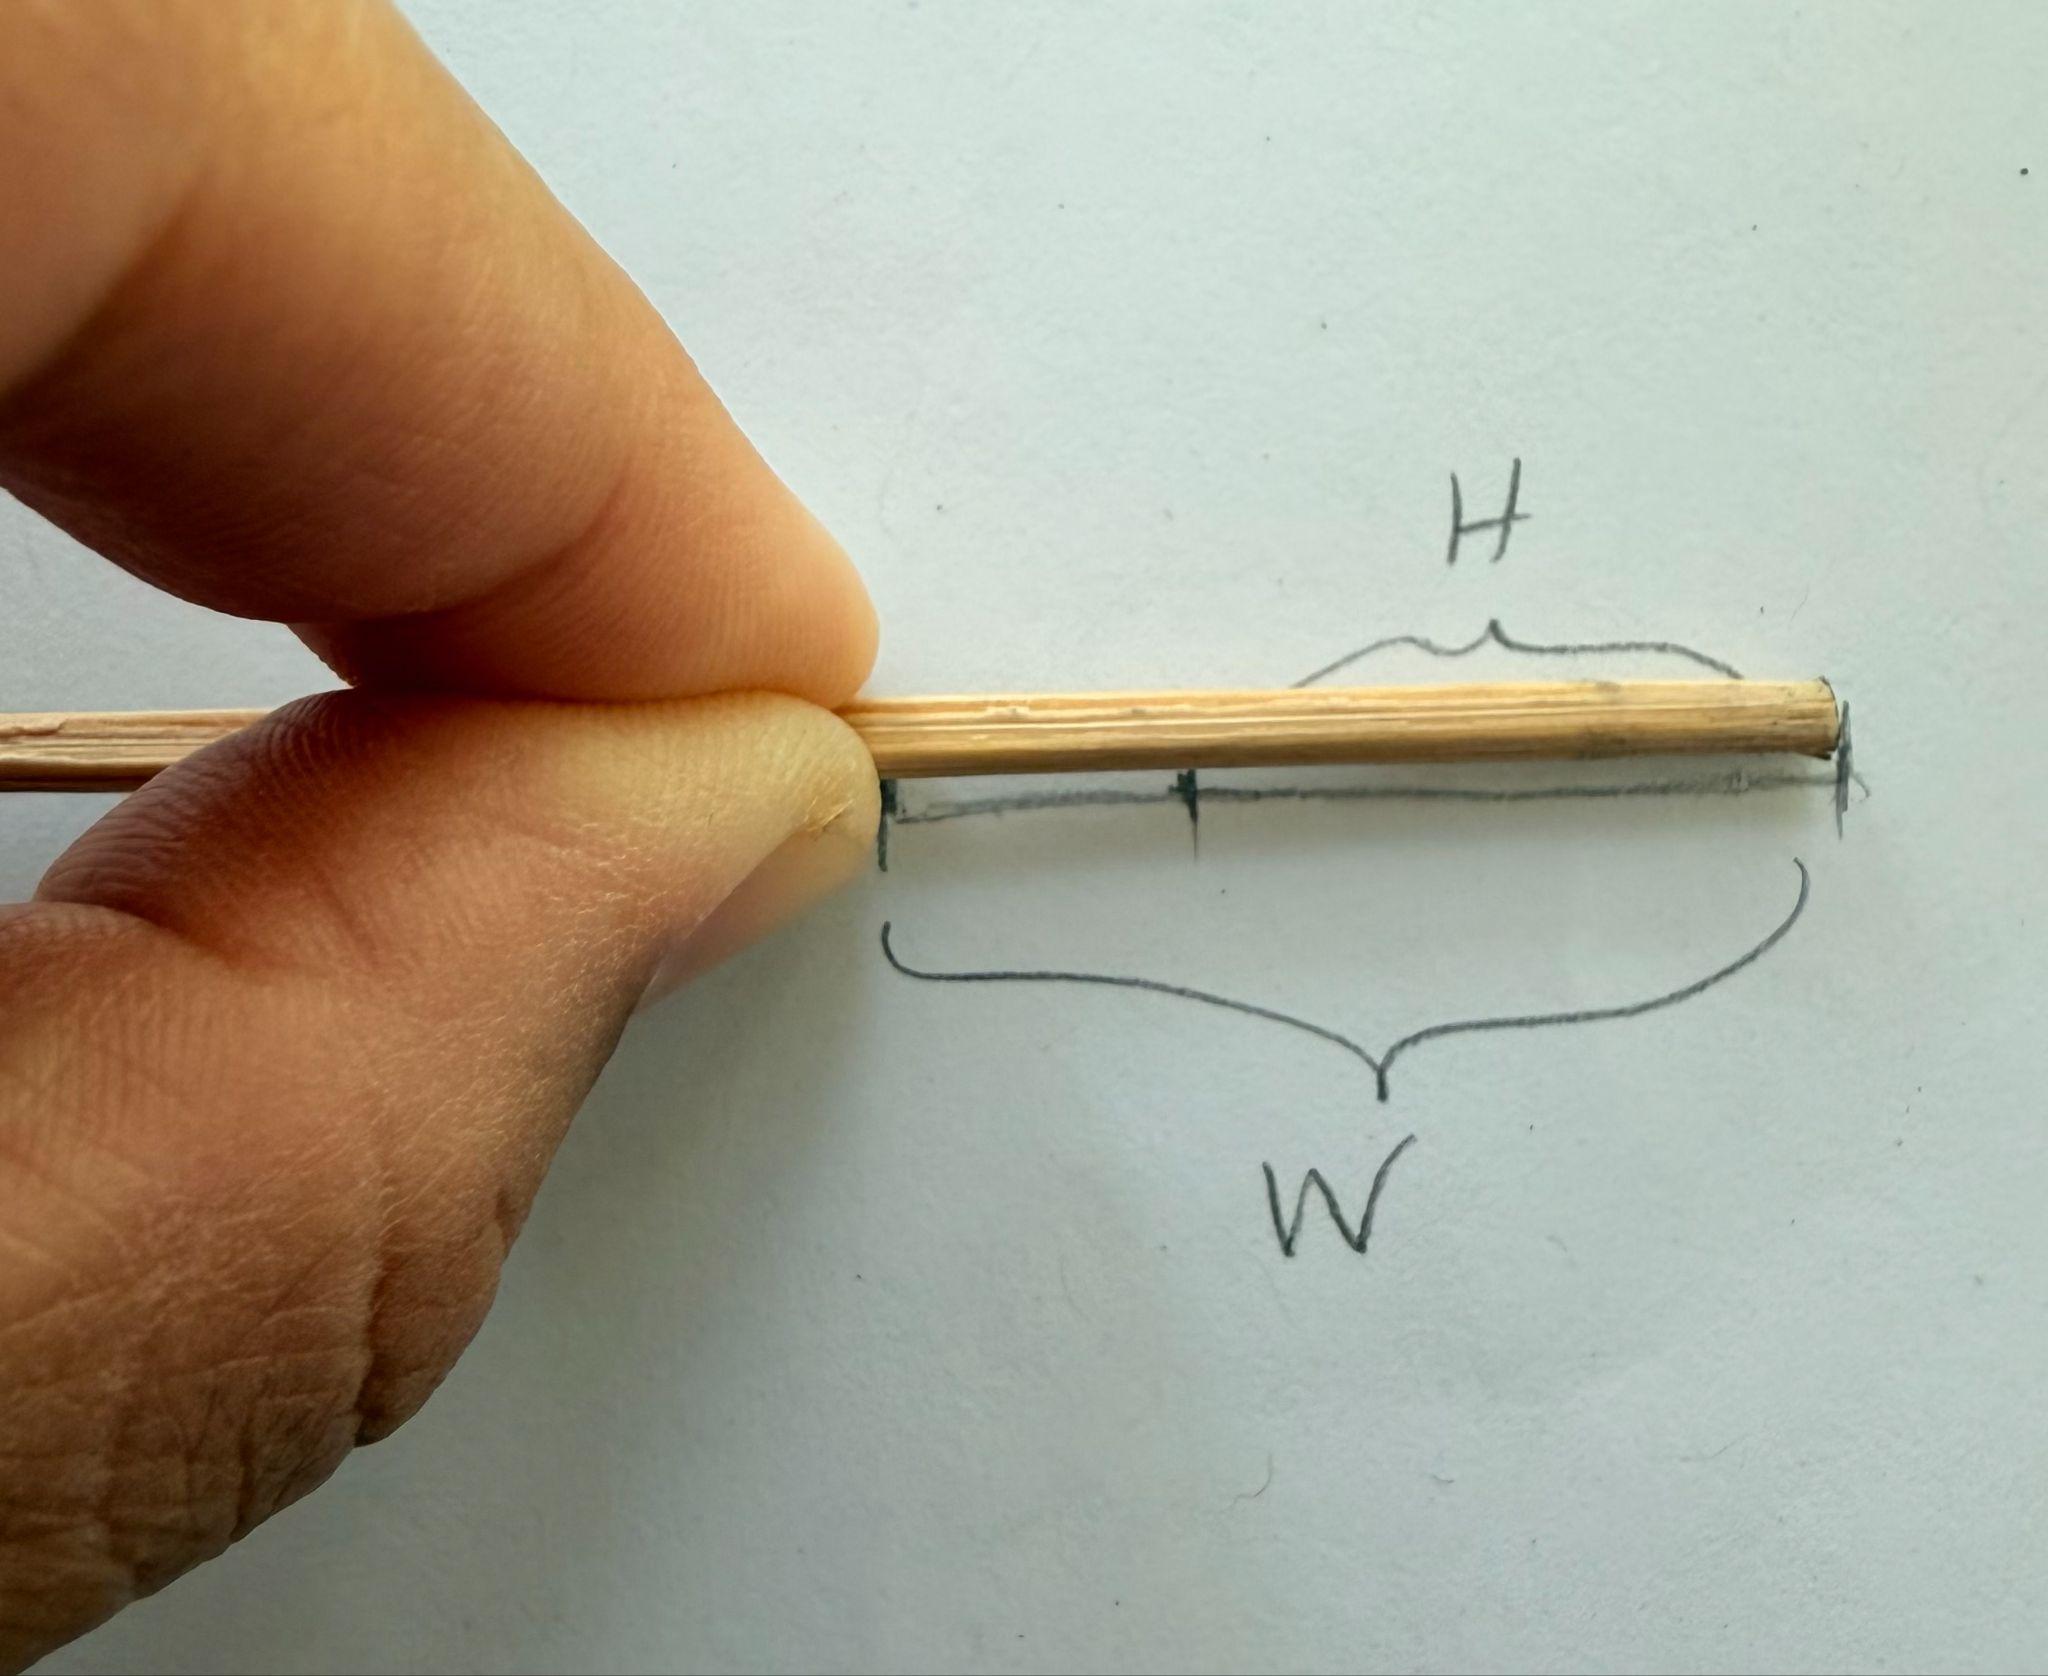
- After the height and width measurements are recorded, the goal is to determine how many times the smaller measurement fits into the larger measurement. In the example, we’re trying to find how many times the height fits into the width.
- As you can see in the images below, the measurement key shows that the shoe’s height fits into the width one and a half times. The images show that we determined this by measuring the differences between the height and the width. The difference fits into the height two times and the width three times. Therefore, the proportion ratio for the shoe is that its height fits into its width 1.5 times.
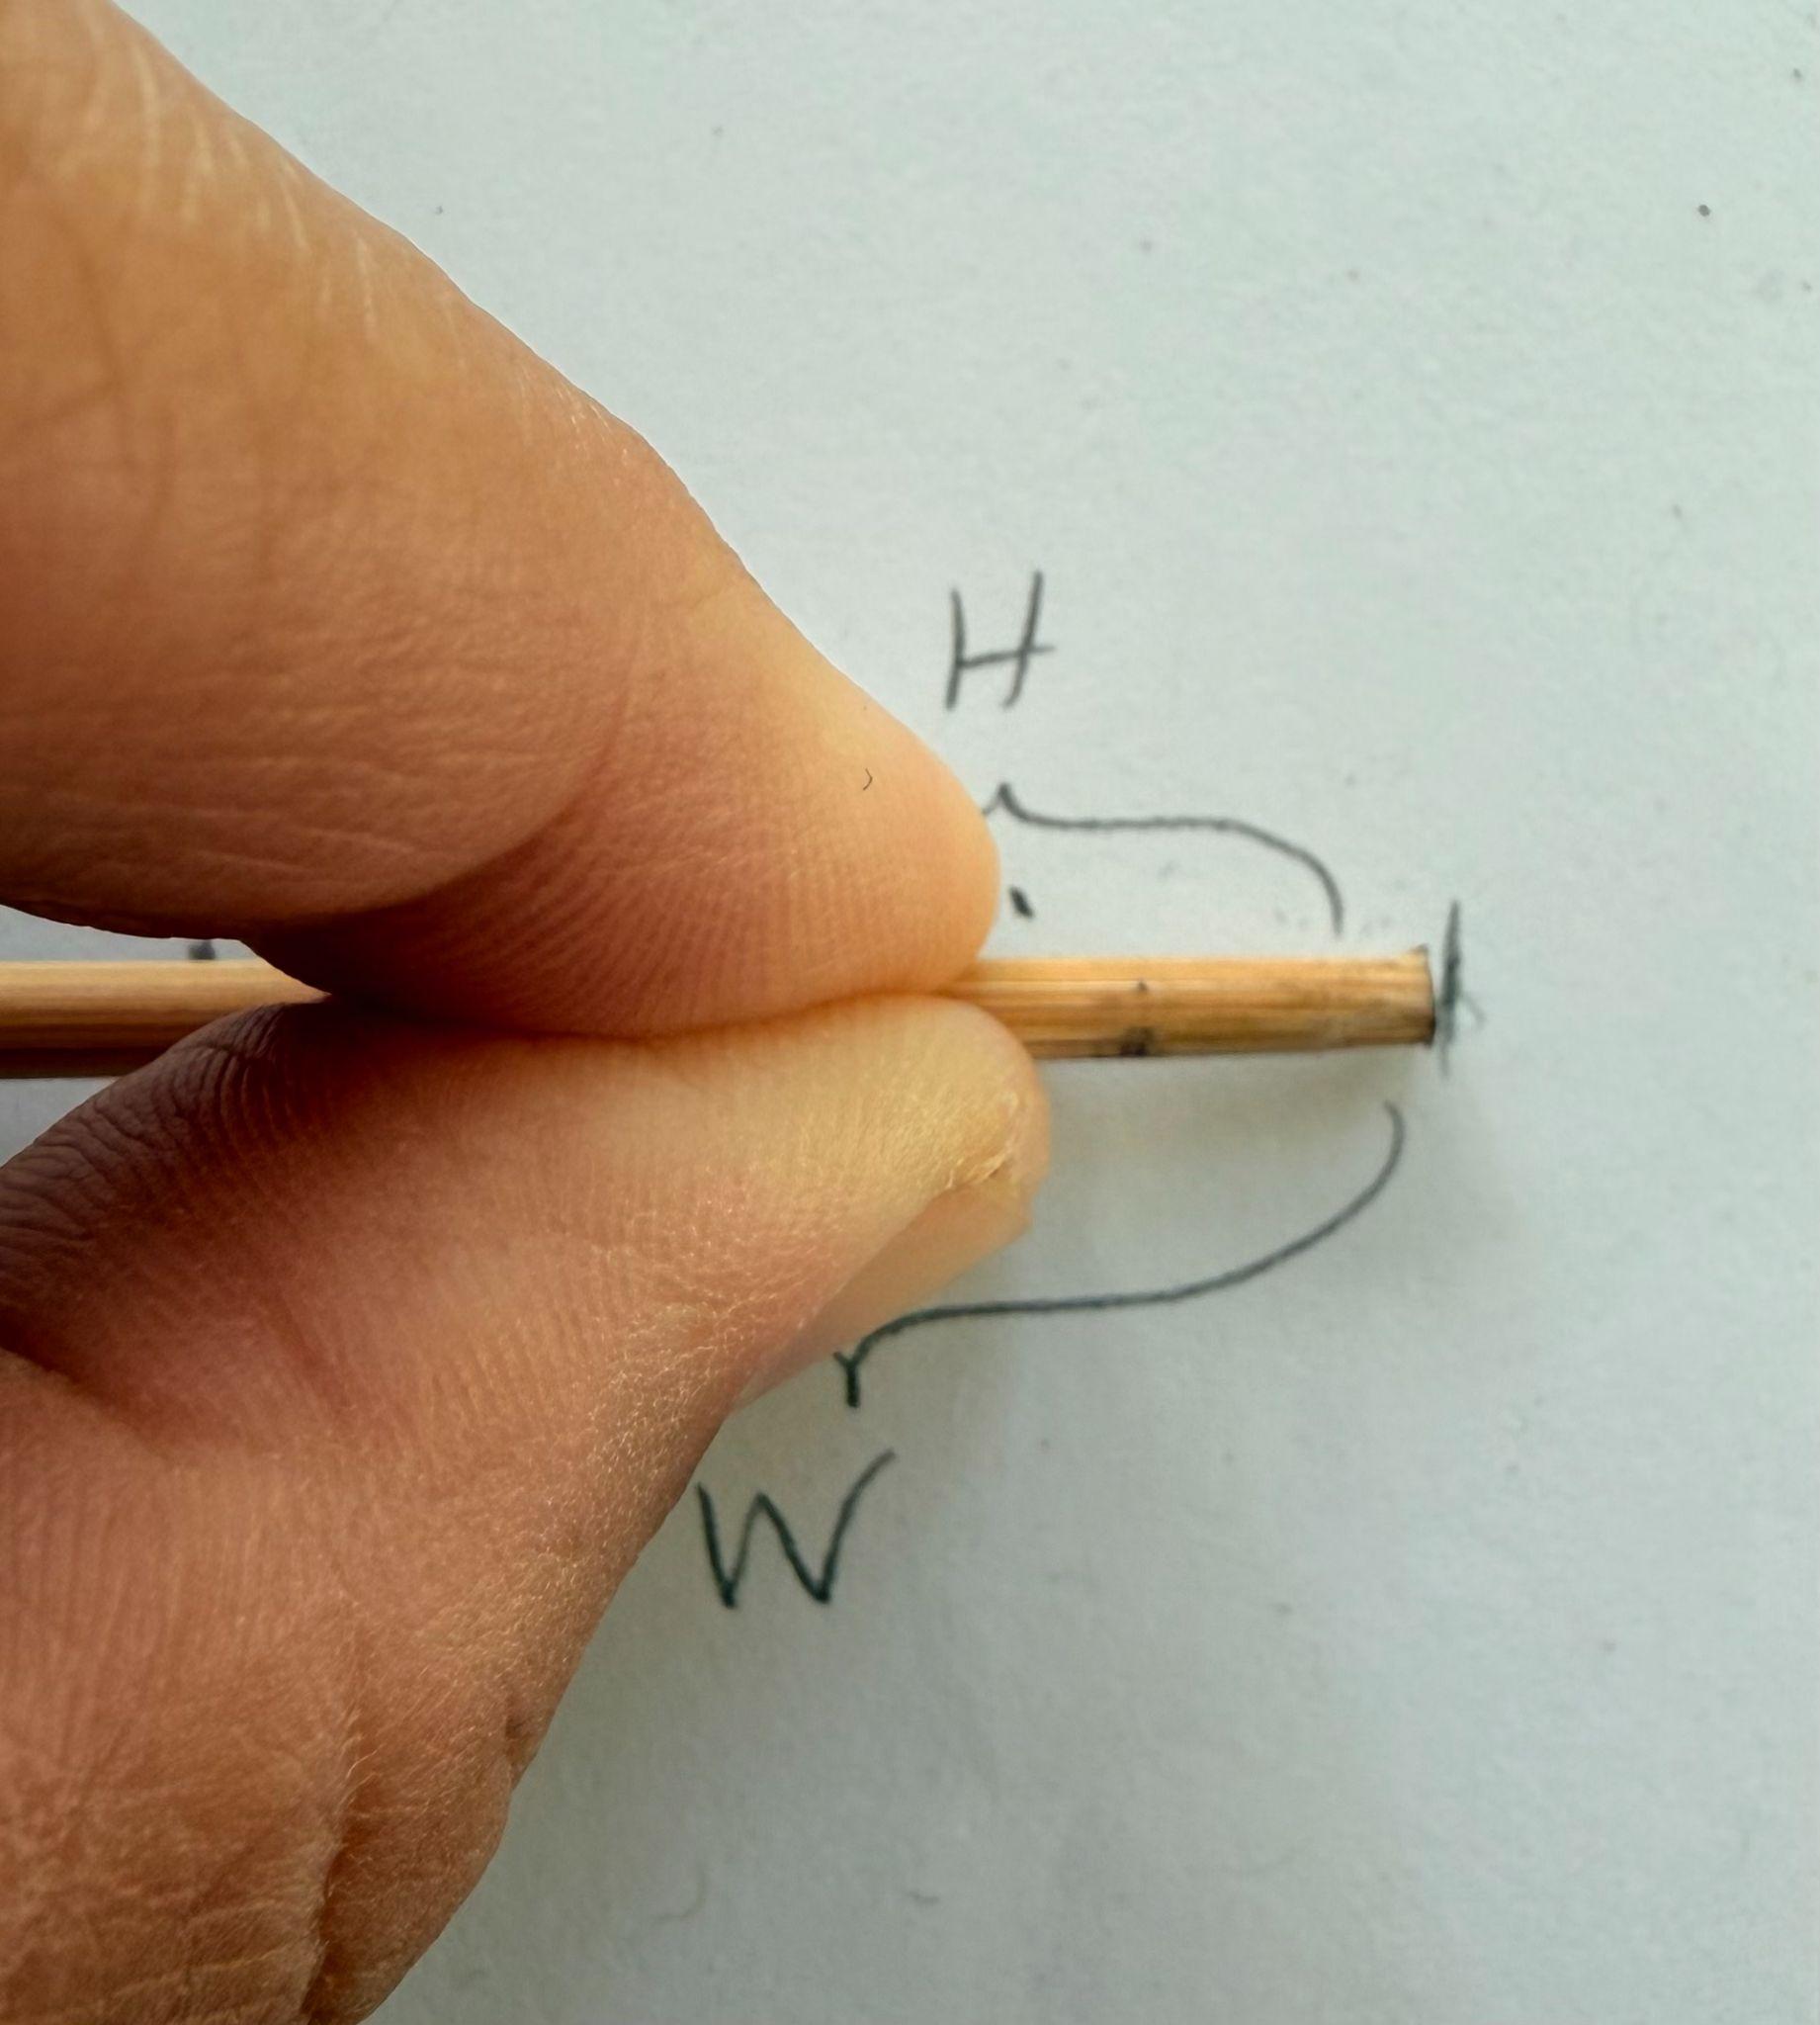
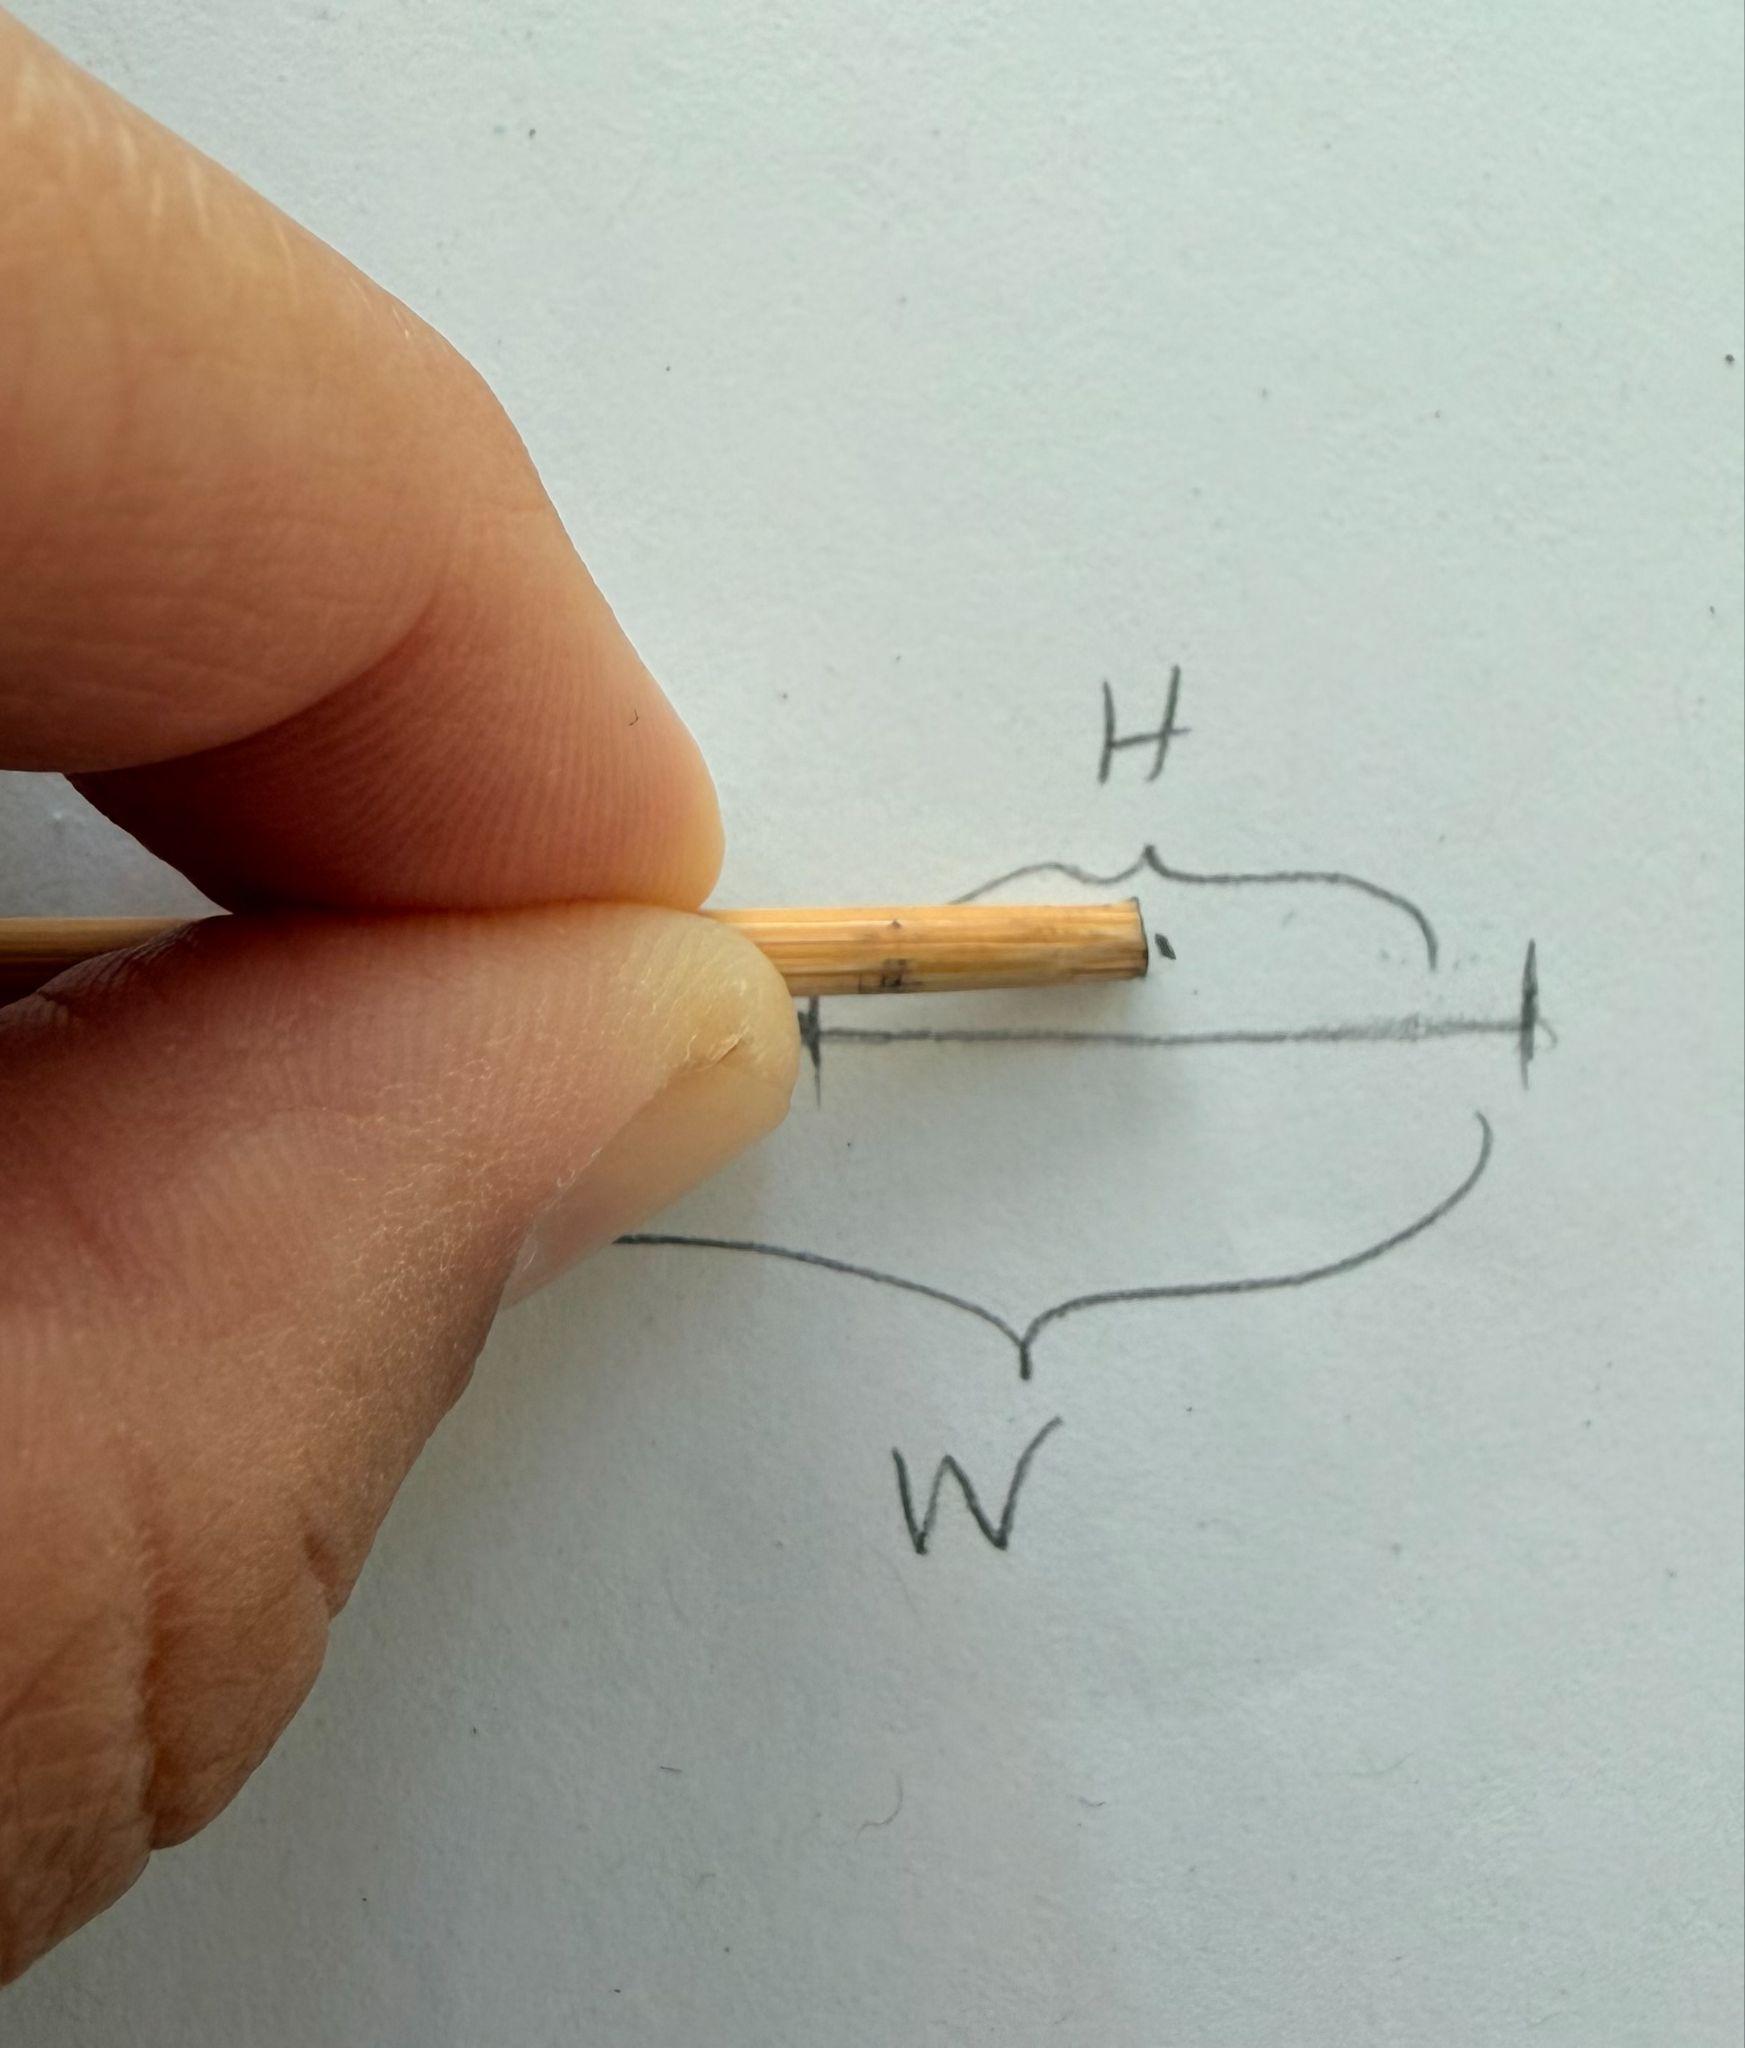
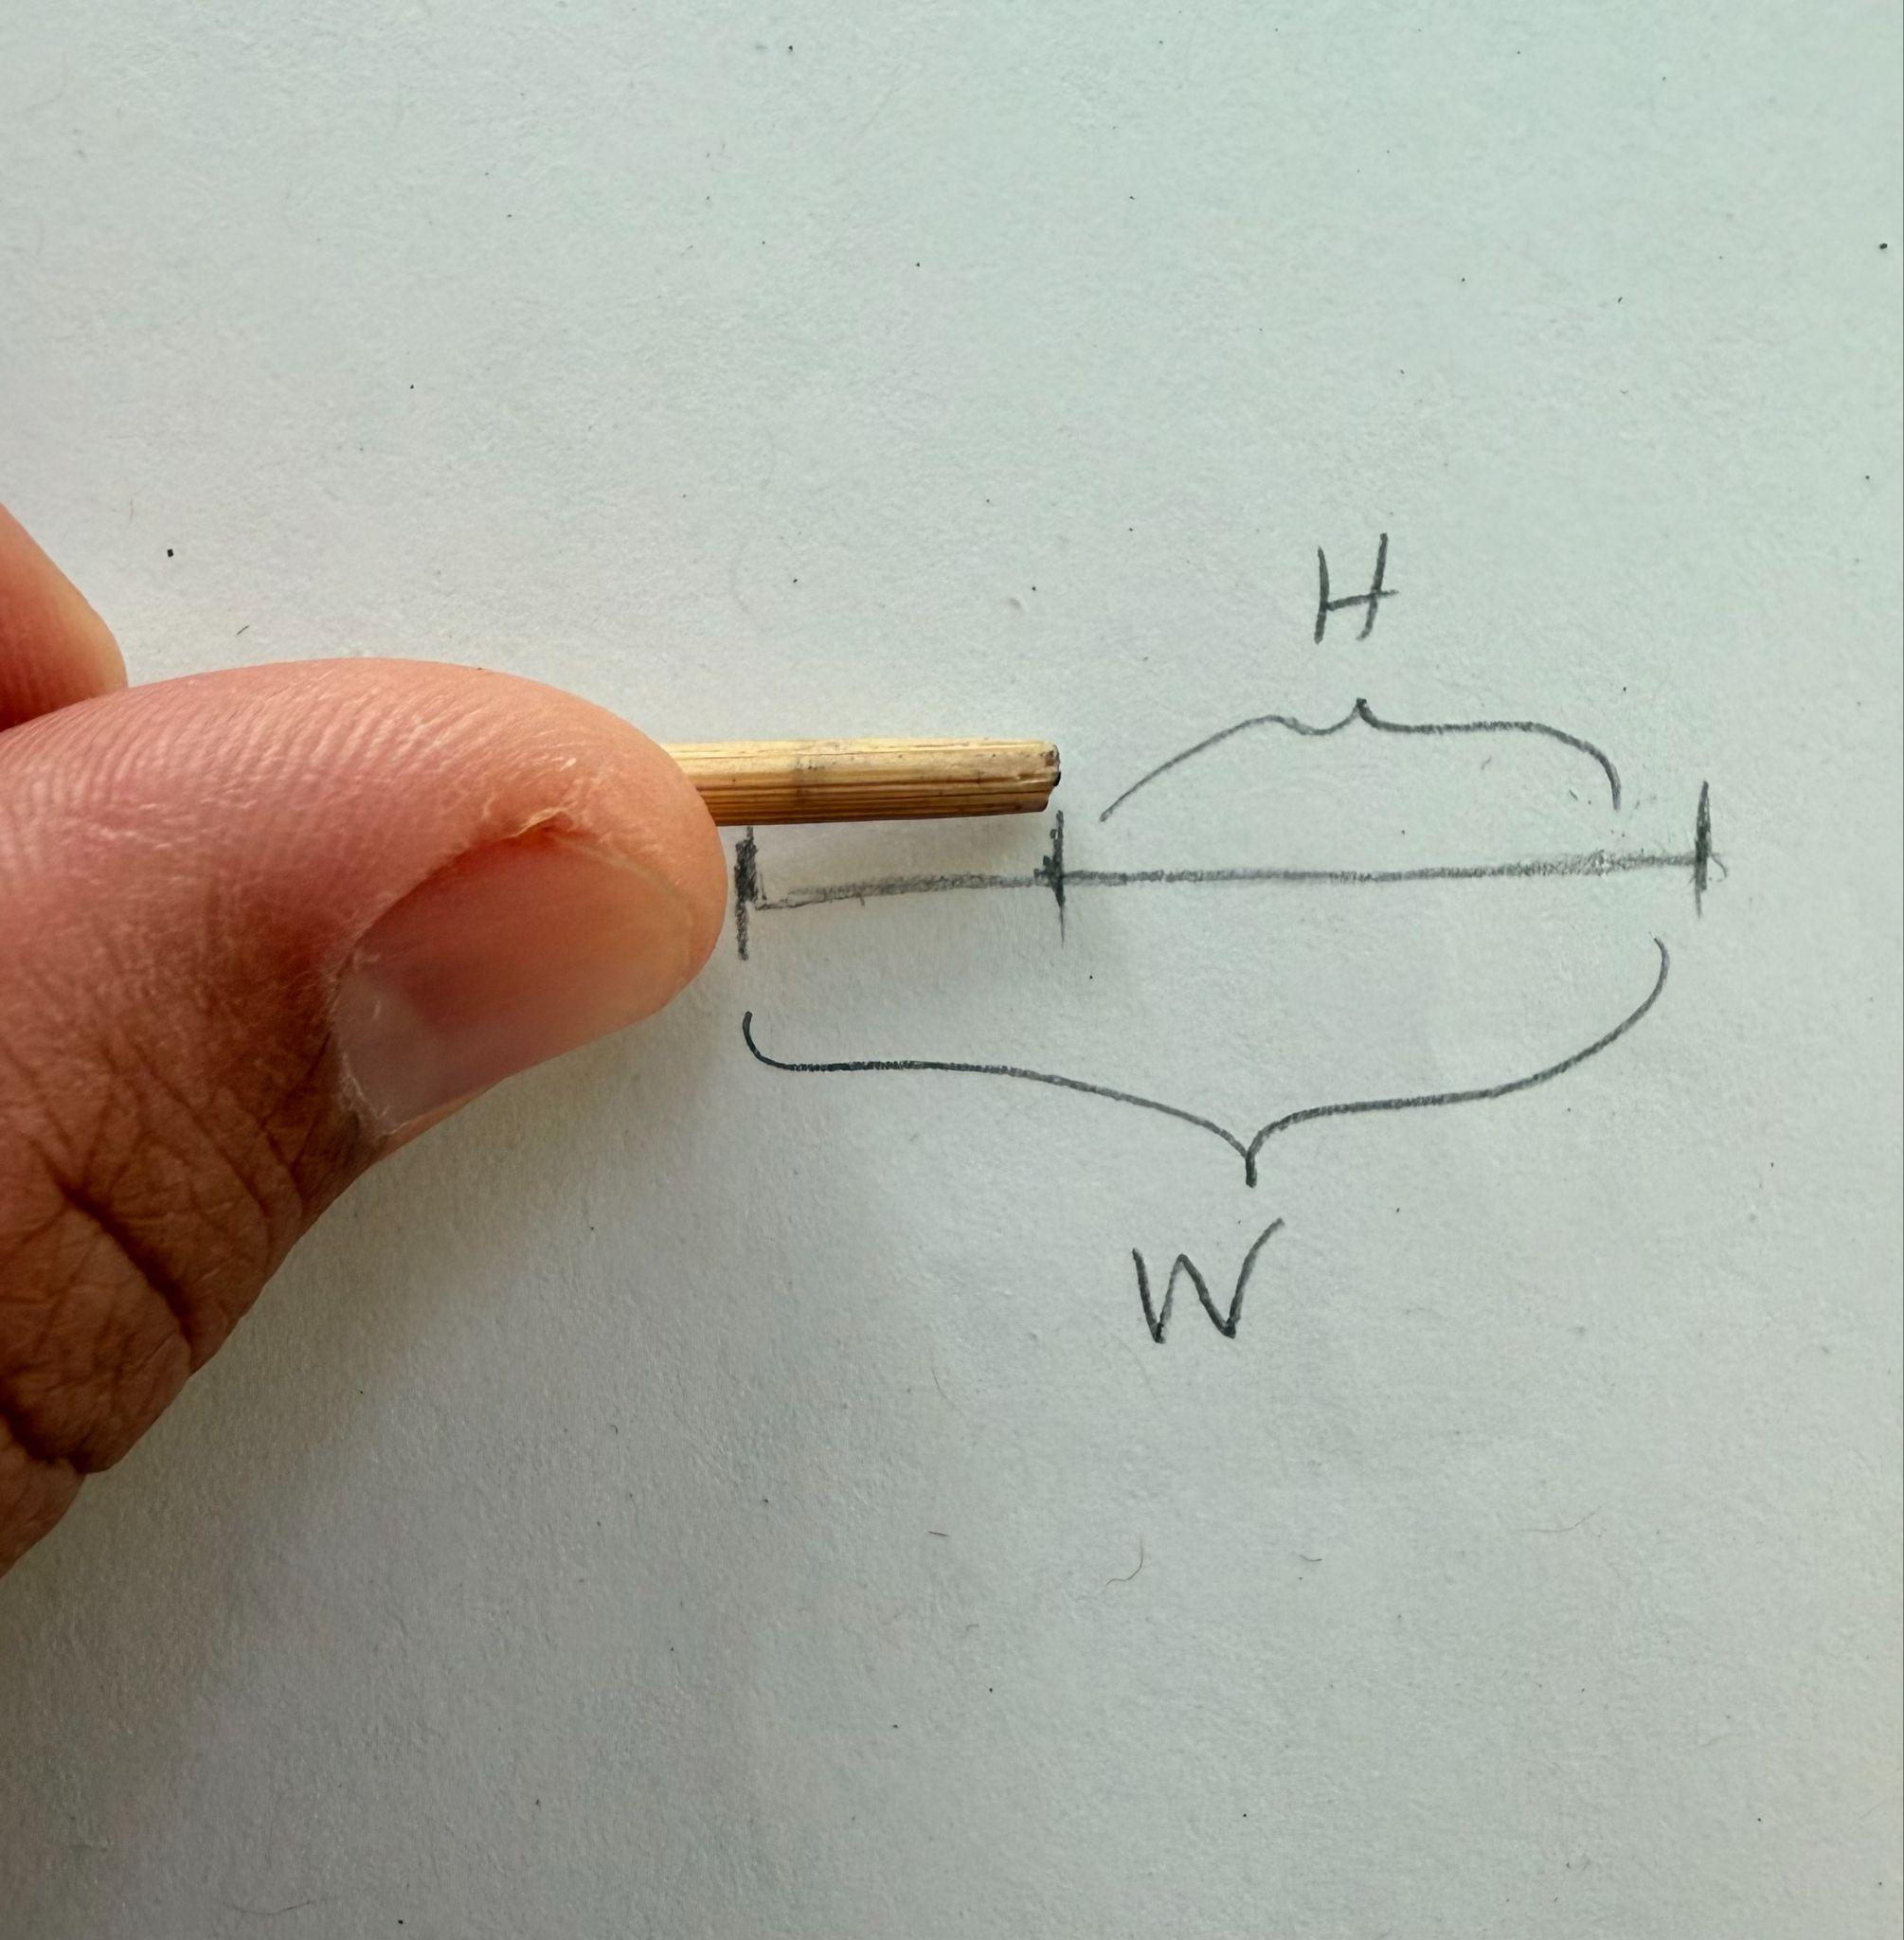
Determining Proportion Ratio on the Measurement Unit Example, Briana Miyoko Stanley, graphite on drawing paper, License: CC BY NC 4.0
Keep in mind that the proportion ratio will change with each object, since an object’s height and width change as the reference changes. As a result, you will encounter cleaner proportions like this example, but often more complex proportions as well. When you encounter a more complex ratio, you can still find the proportion ratio as we did in the example, or you may want to consider an alternative method. A precise alternative is to use a ruler to determine the exact measurements you sight to determine the exact proportions. Another, more intuitive, observation-based approach is to round to the closest and easiest fraction. For instance, the height fits into the width approximately two times, approximately three times, etc., but this, of course, can lead to results that are not as precise and therefore may need some more sighting and revisions as the drawing develops.
It’s always recommended to double-check your measurements and proportion ratio with the observed three-dimensional object. Use your sighting tool to periodically compare your findings and revise as needed.
The more you practice sighting and measurements, the more accurate your drawing proportions will become. For instance, the image below contains a red vertical line that represents the sighted height measurement of the referenced shoe. To double-check that the height fits into the width 1.5 times, which we can also call the proportion ratio of 1:1.5, keep the height measurement in place on the sighting tool and rotate it from a vertical to a horizontal axis. Then, move the measurement from side to side to see how many times the height measurement fits into the width measurement.
In addition to the measurement key findings, it’s always recommended to use the sighting tool to double-check measurements and the proportion ratio with the three-dimensional reference. In the image below, each of the red lines represents one height measurement. As a result, the two horizontal red lines illustrate that the width is 1.5 height measurements.
Proportion Box Method Proportion Ratio Measurement Annotations, Briana Miyoko Stanley, digital photo, License: CC BY NC 4.0
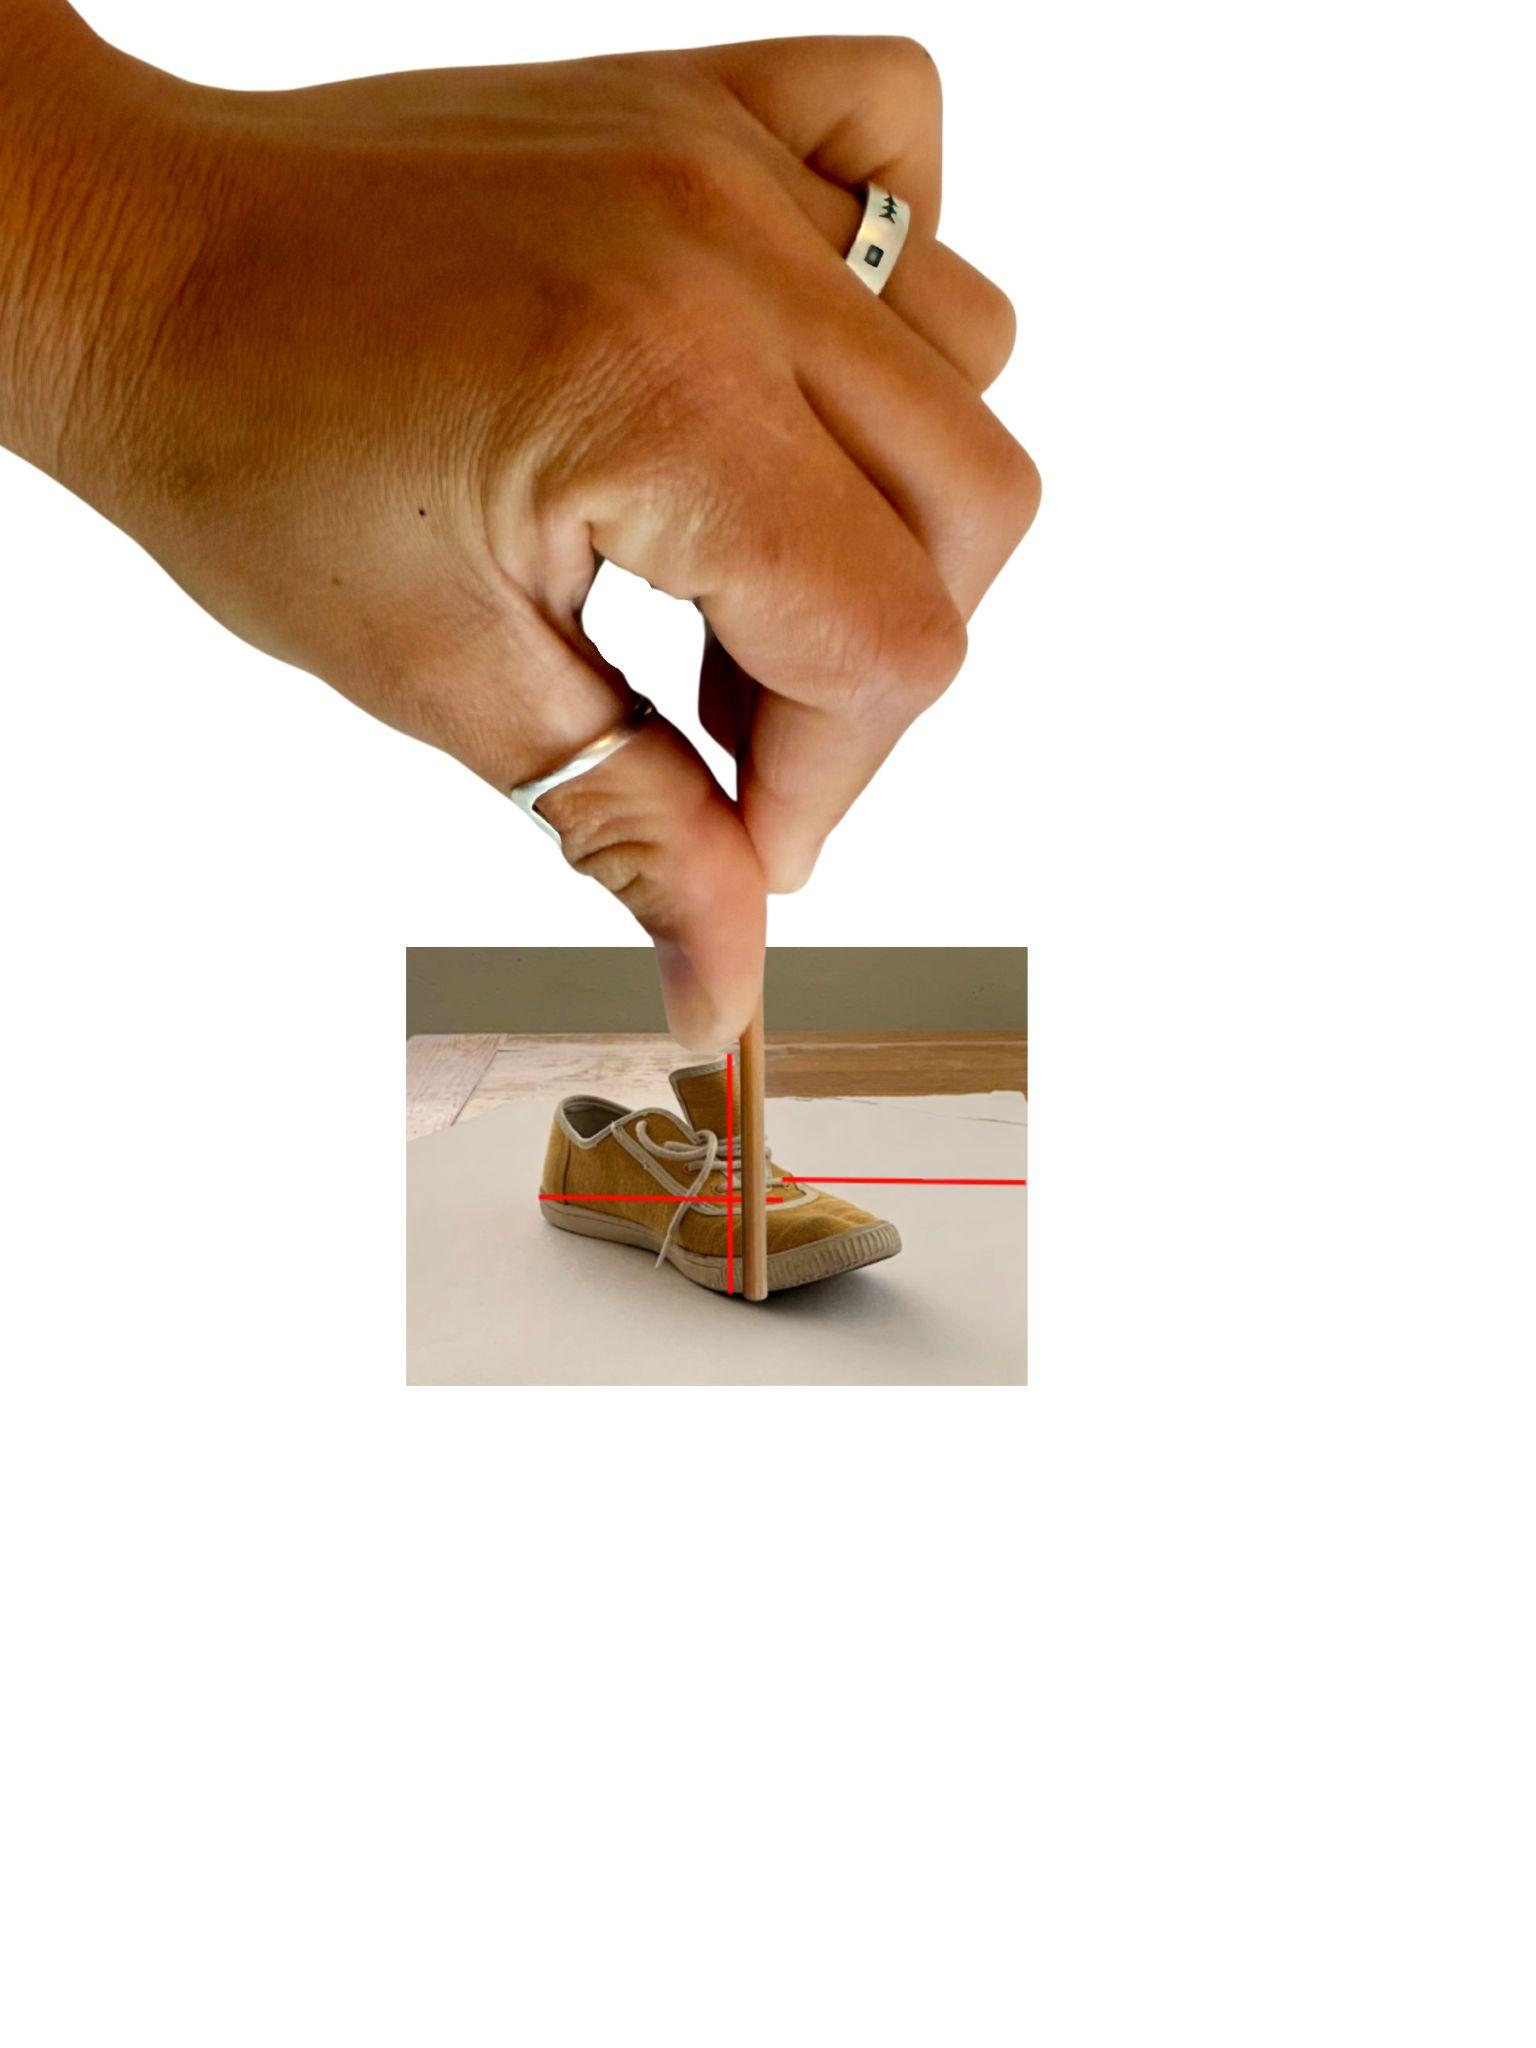
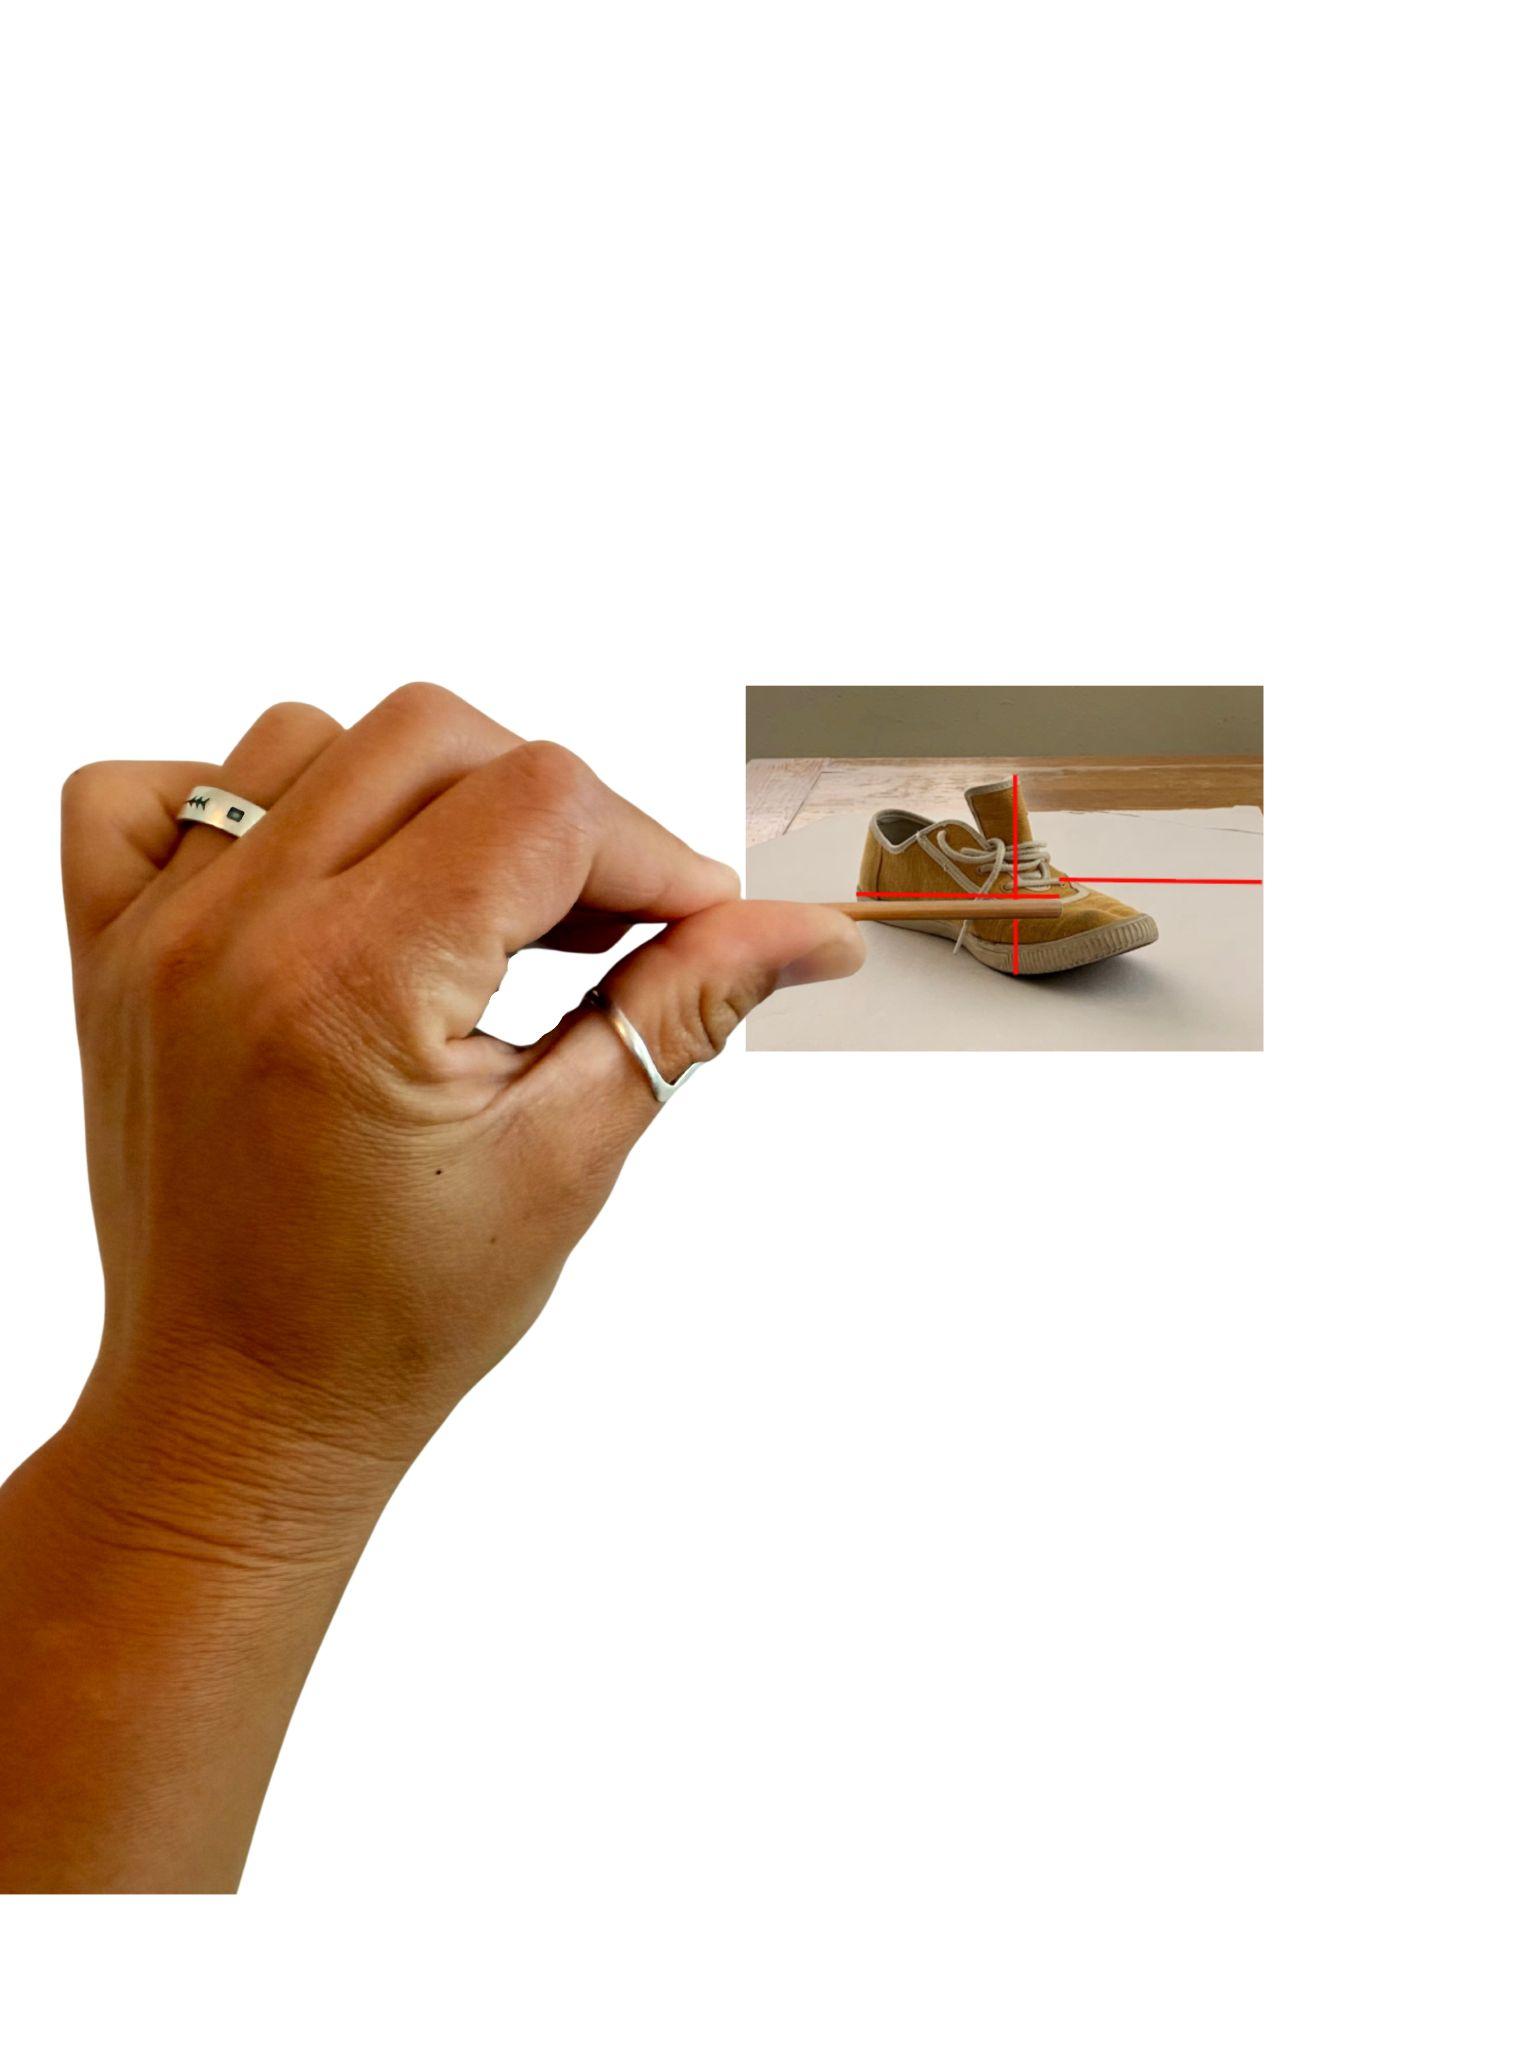
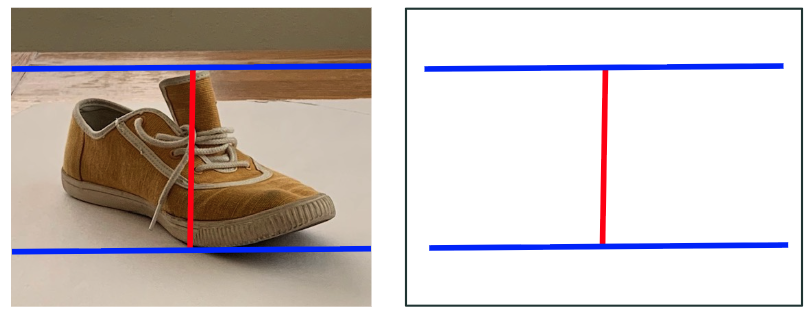
- Once you’ve determined the proportion ratio from the measurement key, you are ready to make the proportion box. Use a pencil and a piece of paper to draw two parallel horizontal lines. These lines will be as far apart as you’d like the height of your object to be.
- In the example, I chose to make the shoe the same height as my sighting tool, so I used a pencil to mark the top and bottom of the sighting tool. The height measurement of one sighting tool is shown as a red horizontal line in the digital drawing on the right in the image below. Then, I used a straight edge to extend the lines that will become the top edge of the proportion box and the bottom edge of the proportion box, shown as blue horizontal lines in the digital drawing below. In the images below, there is a side-by-side view of the annotated reference and a digital version of the drawing paper with a red line to represent the height as the sighting tool and the top and bottom proportion box edges in blue.
- Next, mark the width and draw the vertical sides of the proportion box. To do this, use the proportion ratio determined by the measurement key. In our example, the width is 1.5 times larger than the height. This means the width is one and a half sighting tools; each of the red lines below represents one sighting tool and therefore one height measurement. Draw parallel vertical lines at the ends of the one-and-a-half sighting tool measurement, as shown in blue below. Where the vertical lines intersect with the horizontal lines creates the corners of the proportion box.
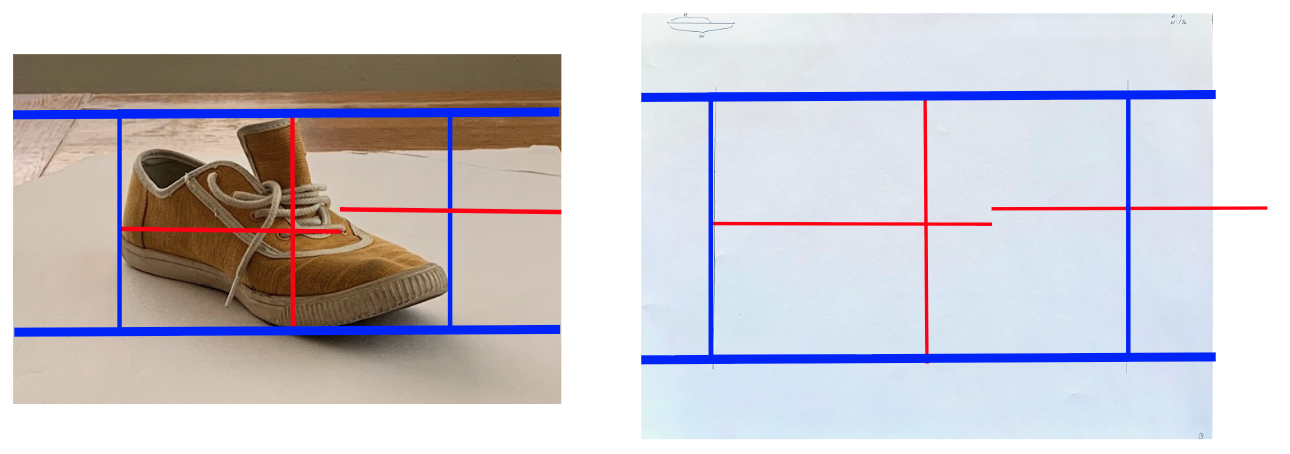
As explained in the Elements and Principles Chapter, proportion concerns the size relationships of parts within a whole. At the end of the day, the proportion box method is all about seeing how many times the smaller measurement goes into the larger measurement. In the example, the smaller measurement was the height, so we determined how many times the height fit into the width. We found the height fits 1.5 times. As a result, the box we create on the drawing paper needs to have a width that is 1.5 times larger than its height. In your observation drawings, each object will have its own unique height and width measurements, so you will need to sight each time to determine the proportion ratio for each object’s proportion box.
The result of these meticulous steps may look like a basic box or square shape, but as we now know, it accurately represents the full height-to-width proportion of the three-dimensional object. By patiently and deliberately using a sighting tool to measure and create a proportion box, an artist starts from an accurate framework to carve out the remaining details of the referenced object.
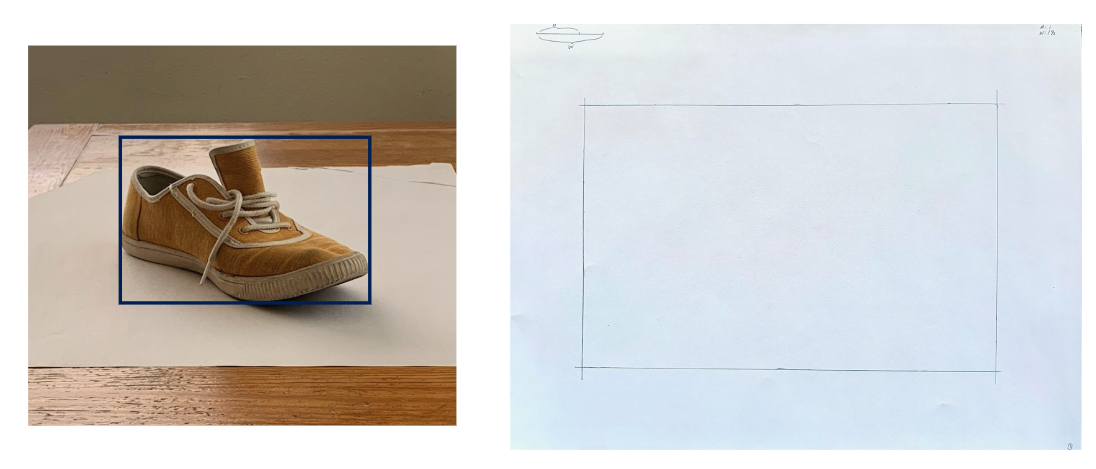 Proportion Box Method Reference Object beside its Proportion Box Drawing Example, Briana Miyoko Stanley, digital photo and graphite on drawing paper, License: CC BY NC 4.0
Why use the Proportion Box Method?
- To help you draw correct proportions from the beginning.
- To cut back on the need to redraw or correct object proportions.
- To make it easier to add curves and details after the basic structure is in place.
- To give you a guide for drawing objects that are angled or overlapping.
Organizational Lines – The Structure of Drawing
Organizational lines are preliminary marks and lightly drawn lines that serve as the scaffolding or structure of any drawing on which the subject matter will be composed. These preliminary marks mimic the visualizing aspects of sighting. The primary purpose of organizational lines is to assist in the placement of key elements within a drawing, ensuring that objects are accurately sized and positioned relative to one another. They help to organize and orient the subject matter correctly within the picture plane, taking into consideration the left, right, top, and bottom of the drawing. These guidelines are lightly drawn across the composition and can easily be erased or incorporated into the final composition.
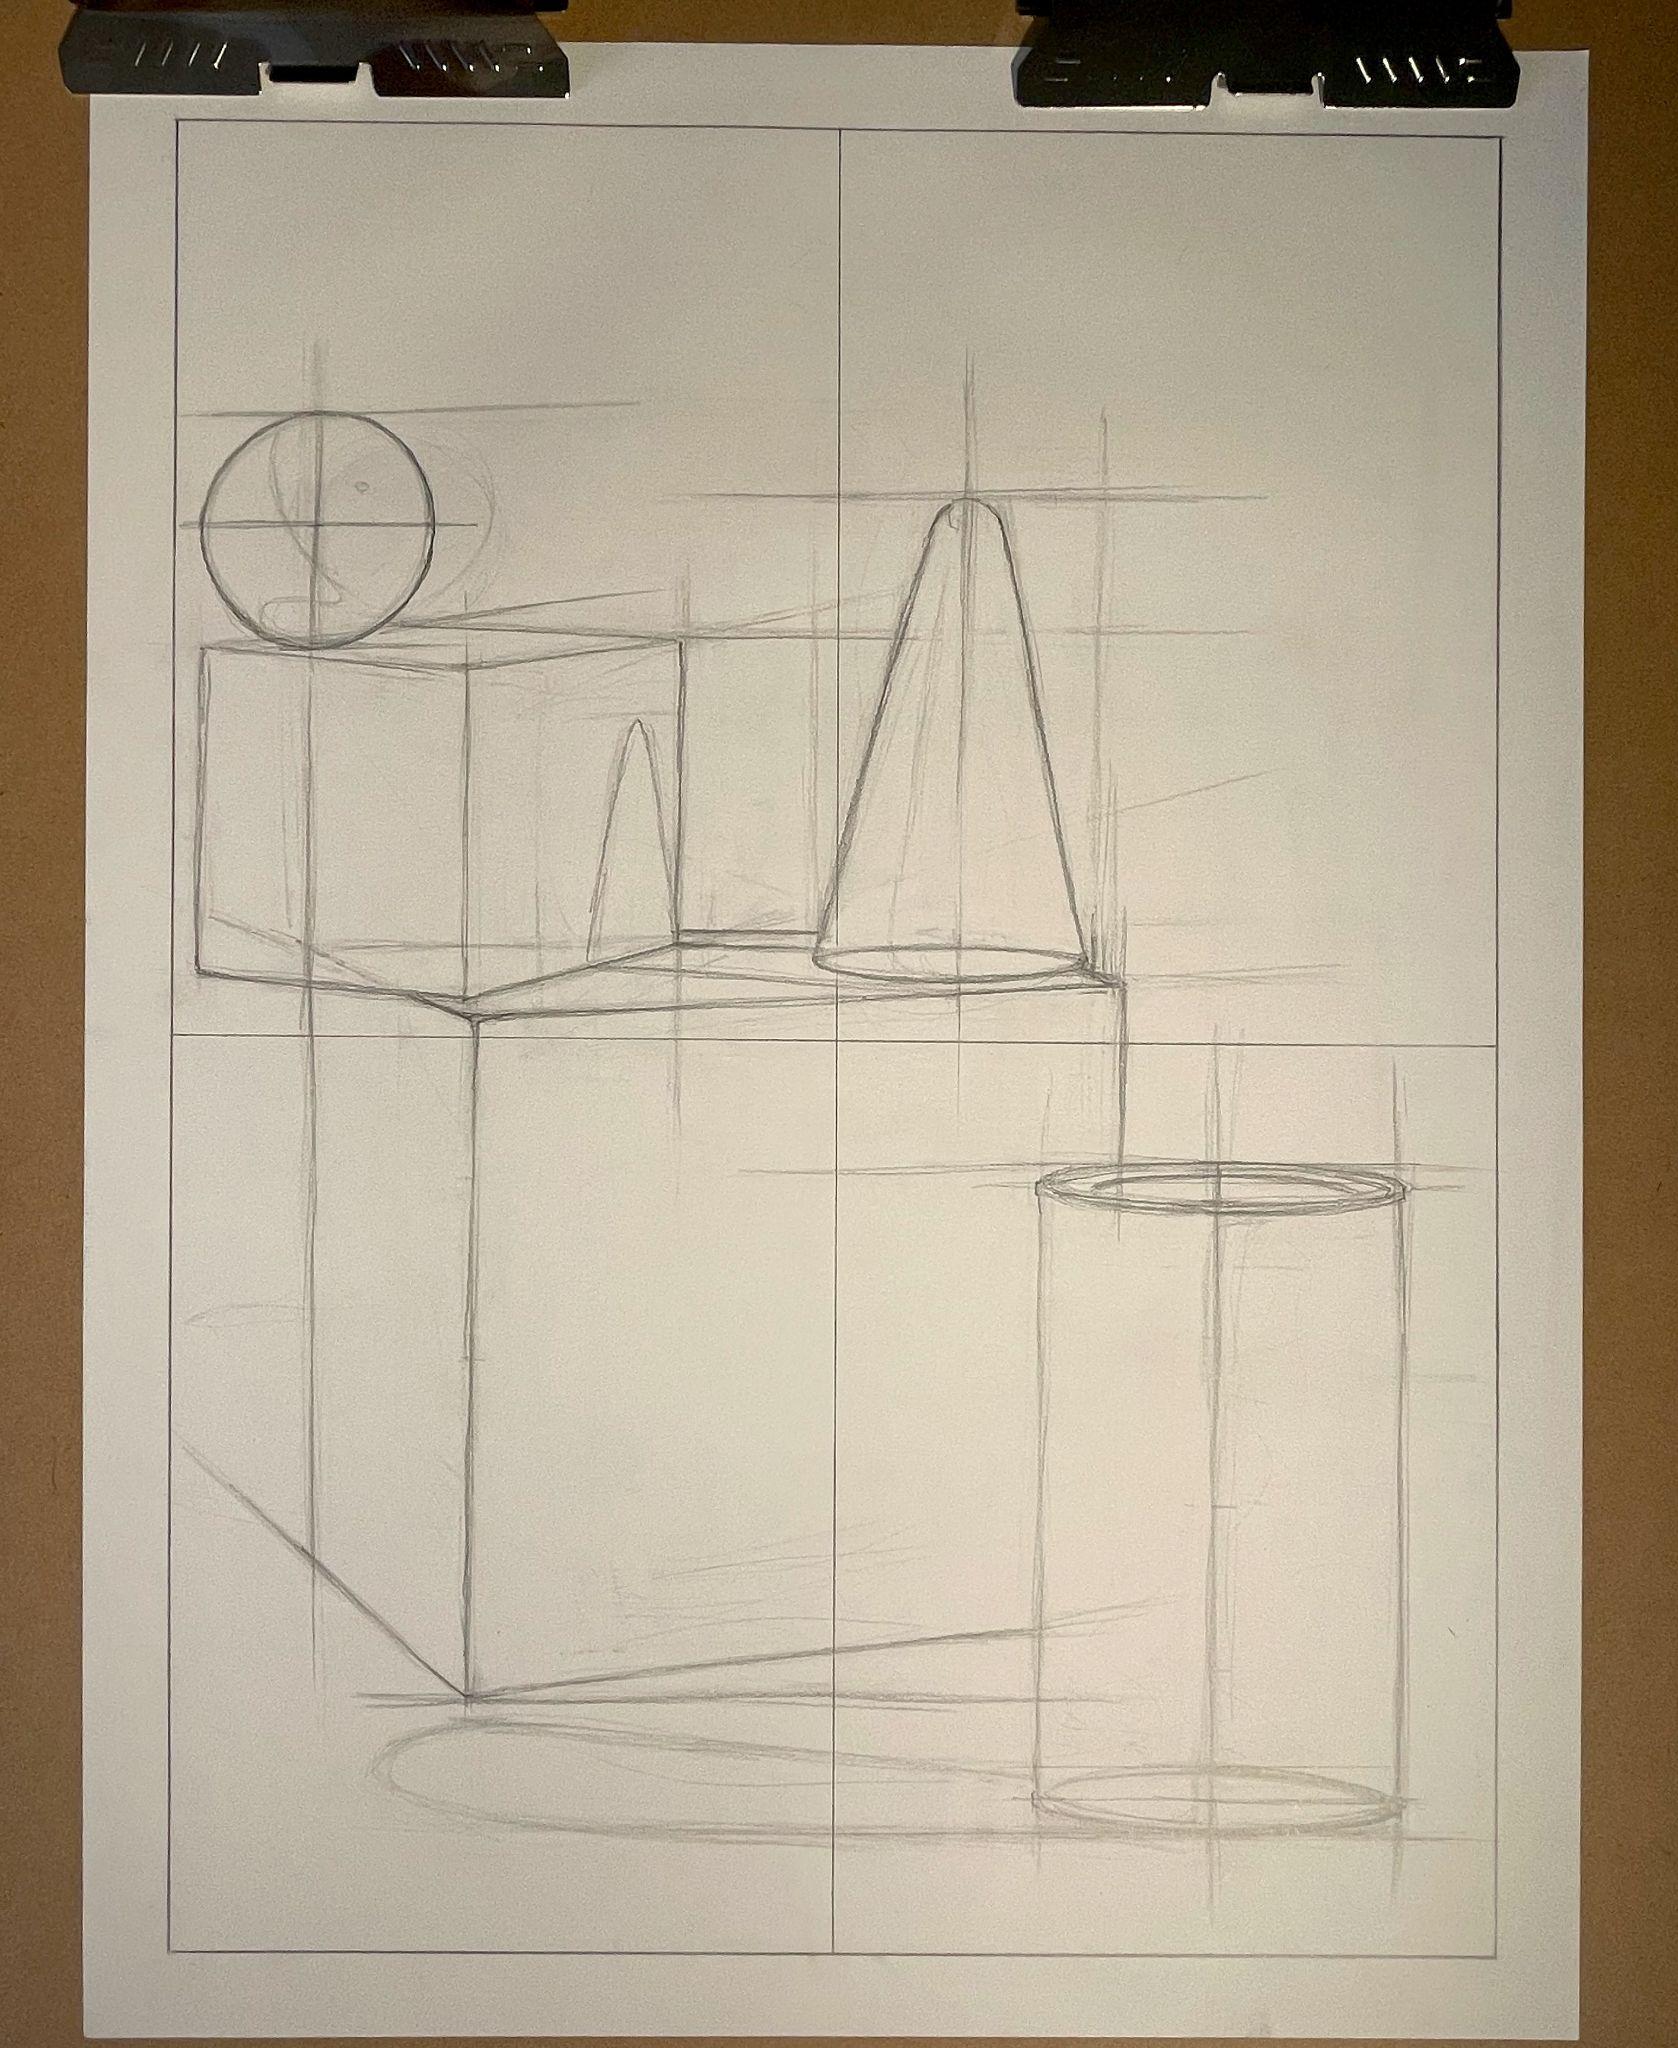
The simplest and most straightforward organizational lines are horizontal and vertical lines. Horizontal lines are used to align the tops or bottoms of objects in relation to each other and to measure the scale or size of one object in relation to another, according to perspective. For instance, in a still life, objects close to you appear lower and larger, and objects further away appear higher and smaller in the drawing.
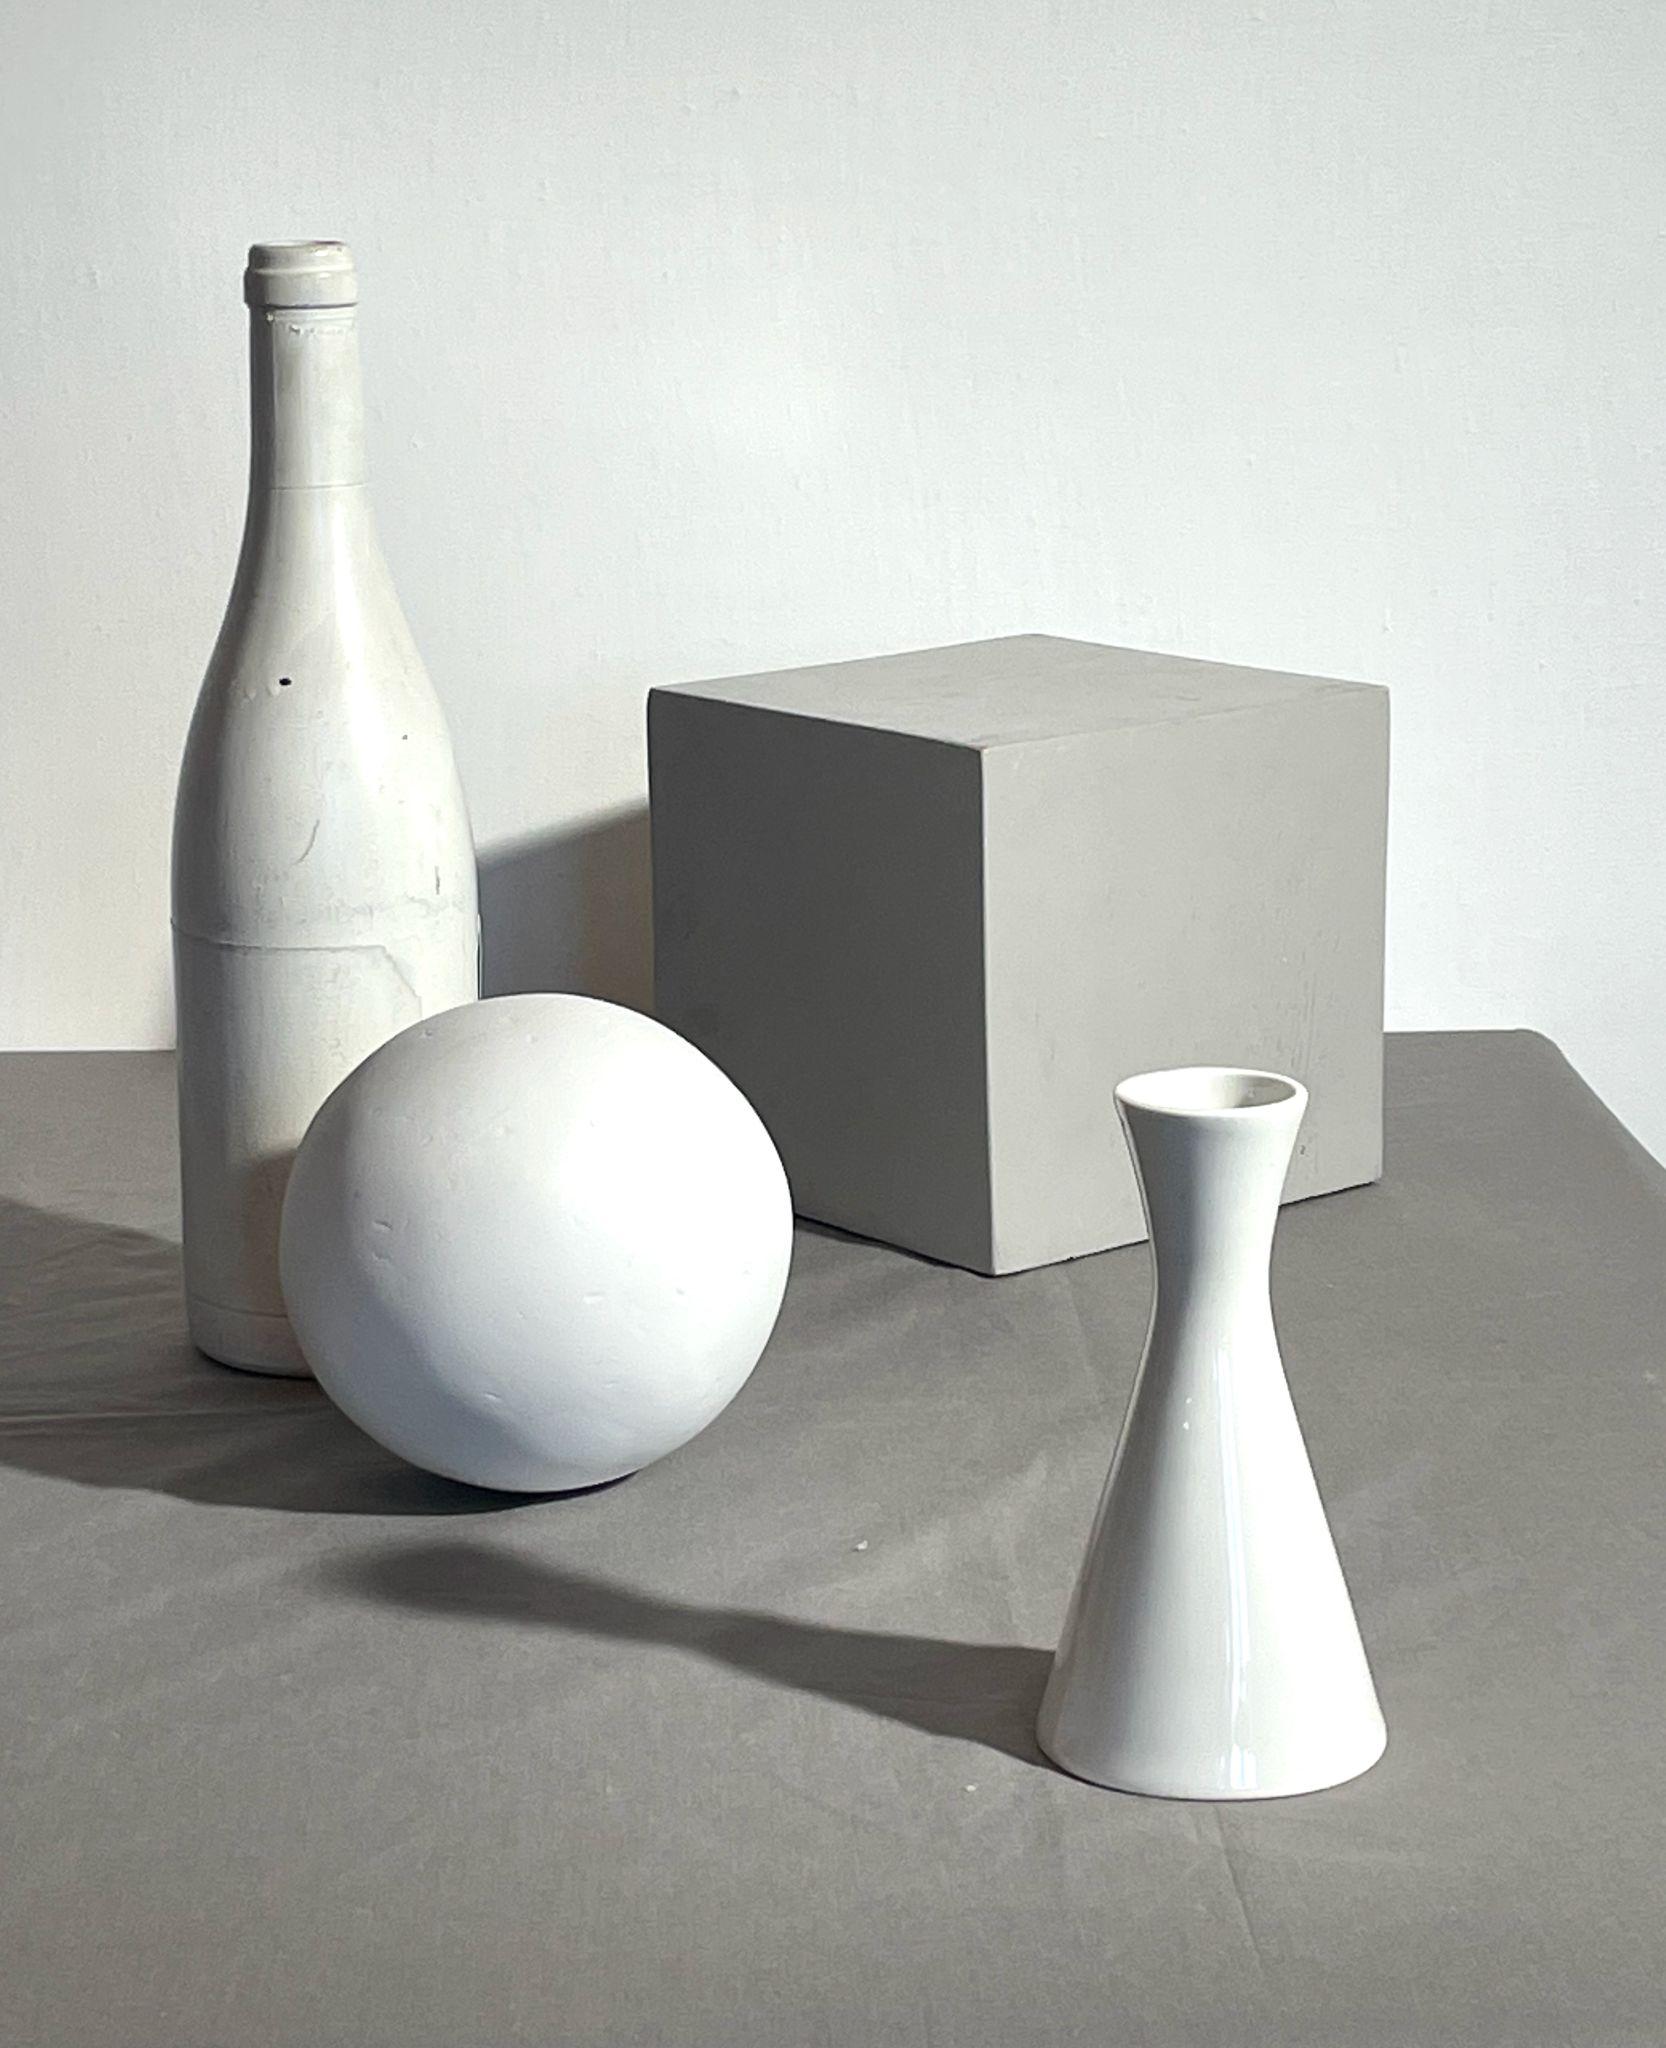
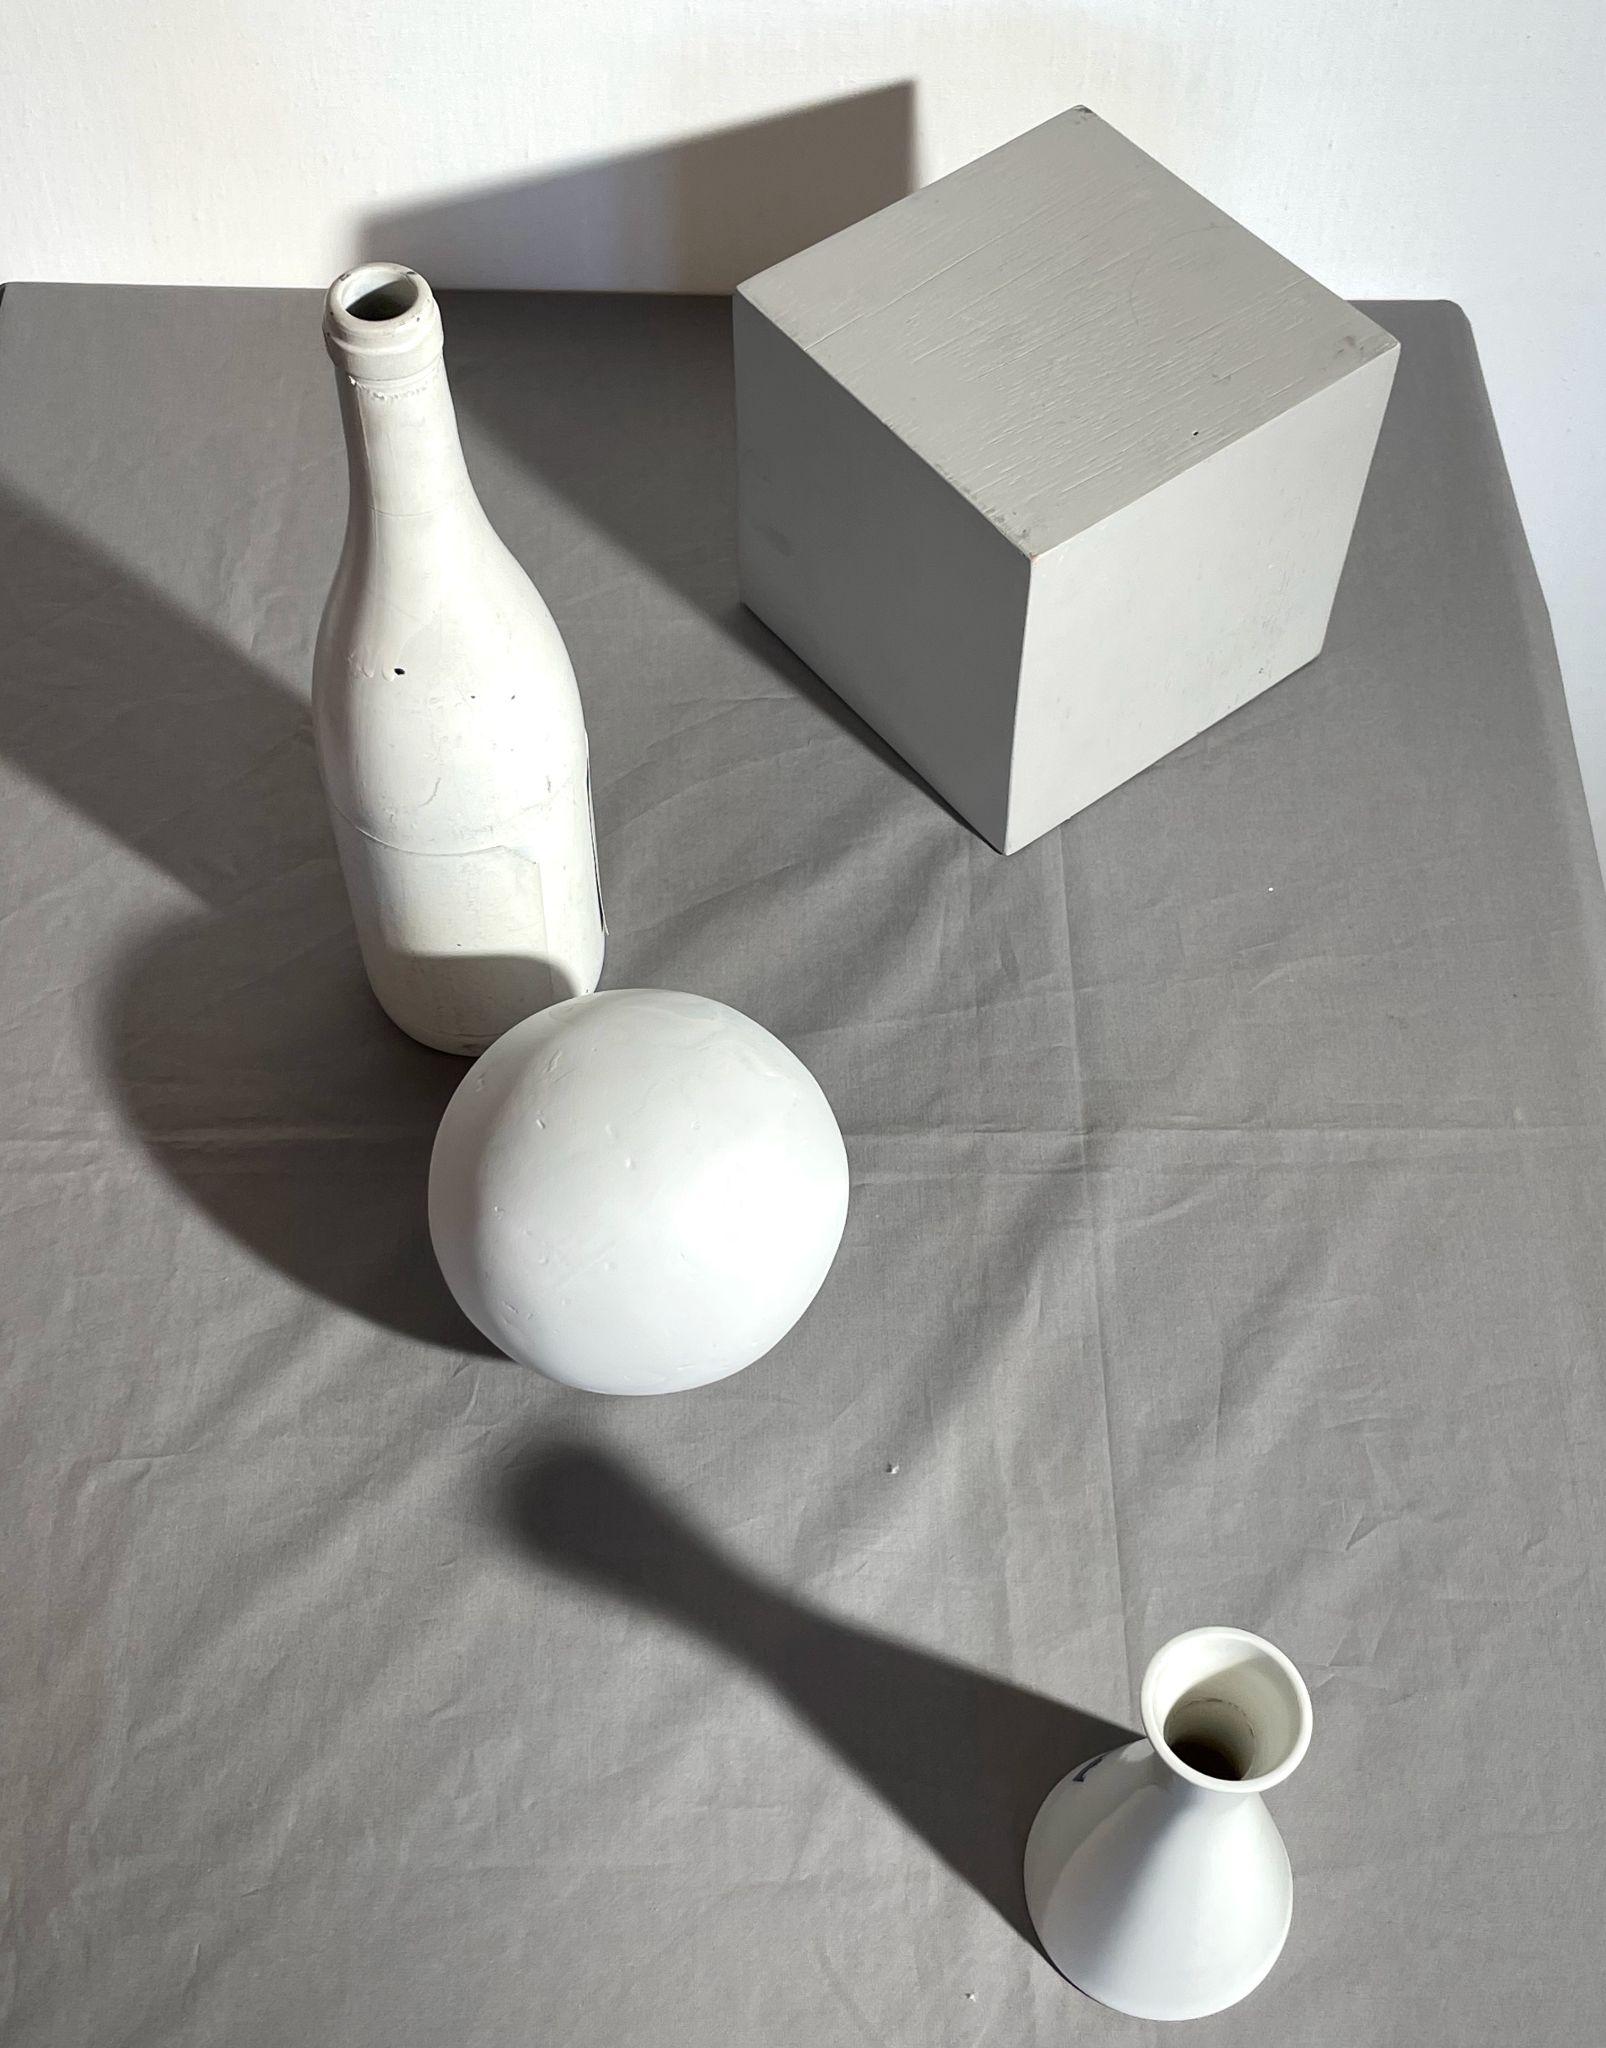
Photographic examples of how close objects and distant objects appear lower or higher respectively within the picture plane, Stephen P. Curry, digital photos, License: CC BY NC 4.0
Vertical lines are used to orient objects side to side or concerning the left and right edges of the picture plane. Vertical lines drawn through the center of an object are known as plumb lines, and can also be used to locate the center of a subject. They will be explained in more detail below. Vertical organizational lines can also be used to help sight or measure the correct spacing between objects. These spaces are referred to as negative space.
Diagonal lines can be trickier to use accurately when sighting with a drawing tool, but are still very useful examples of organizational lines. They are used to extend the flat horizontal edges of a shape towards a vanishing point according to perspective. For example, diagonal lines would be used when drawing something like a box or the edge of a tabletop. Diagonals can also be used to compare the height of two or more objects.
“Cross Hairs” are another valuable type of organizational line, which are created by using a straight edge and dividing the picture plane into equal quarters. This helps the artist locate the center of the drawing and initiates the thought process of composition.
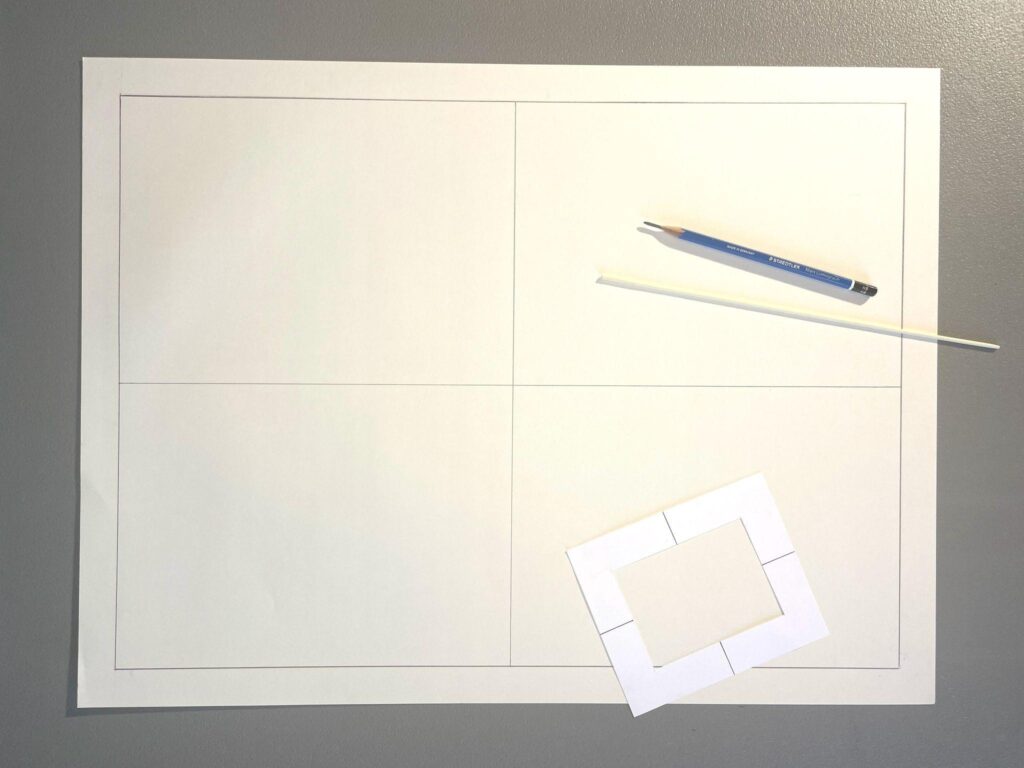
At first, drawing lots of extra lines all over the image may seem counterintuitive and maybe even a little confusing to the beginning artist, but with practice, organizational lines lead to a more efficient, accurate, and enjoyable drawing process that results in less erasing and correcting in the end. Overall, organizational lines are an essential tool in the drawing process, helping to exercise proper observational drawing skills and create balance and accuracy in the finished artwork.
Why use Organizational Lines?
Organizational lines are essential assistants in developing an accurate drawing by:
- Finding the proportion of an object’s height vs. its width.
- Understanding the scale of one object in relation to other objects.
- Finding the placement within the picture plane of objects to create a strong, balanced composition.
- Checking the angles of horizontal edges as they extend to a vanishing point in perspective.
- Helping with vertical and horizontal alignment.
Plumb Lines
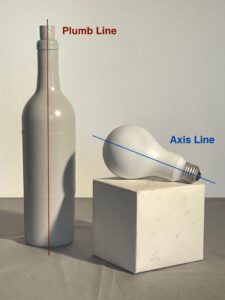
Plumb lines are straight vertical lines drawn through the center of an object or form, especially those with symmetrical shapes. Some examples are cylinders, spheres, bottles or a vase. They can be used to find an objects center and check whether it is straight up and down (plumb) or at an angle. They are also used to measure an object’s overall height and are invaluable for achieving symmetry, especially for objects with complex curves. Axis Lines, similar to plumb lines, are angled or horizontal lines drawn through the center or axis of an object. They are used to find the center of an object and its overall length. Axis lines are also important in helping to determine the angle of a form that is resting on its side.
Why use Plumb and Axis lines?
There are many practical reasons to use plumb lines when drawing objects, such as:
- Checking if an object is standing straight or leaning.
- Helping draw symmetrical objects.
- Finding the center of an object, especially rounded objects, like spheres and cylinders.
- Finding the tilt or angle of any subject.
Observation Videos
https://www.youtube.com/watch?v=OKEBddRMwqI
Conclusion
The techniques in this chapter—sighting, organizational lines, plumb lines, using a viewfinder, and the box method—are tools that help your drawings look more realistic and well-built. At first, they might feel awkward and slow you down, but keep practicing because they will be worth it in the end. Over time, they’ll become second nature, and your drawings will drastically improve.
Remember, observational drawing is all about learning to see things clearly while paying attention to how shapes, sizes, and angles interact with one another. It is not guesswork; be patient and take your time measuring, comparing, and adjusting your drawings.
Master Artist: Rachel Ruysch and Observational Drawing
Artists have long used the still life as subject matter to practice observational drawing and sighting techniques. Still life compositions can include a variety of natural or fabricated objects from fruit and flowers to books and vases. As a subject, still lifes offer artists ways to master techniques such as shading to build volume, awareness of positive and negative space, and balanced compositional arrangement. The still life allows artists to observe the underlying geometric structure of both natural and manmade objects. Rachel Ruysch, an artist from the 17th century Dutch Republic, mastered the art of observational drawing and sighting techniques in the subject of still lifes. In her piece, Fruit and Insects, Ruysch carefully observed the underlying geometric structure of each fruit: spheres, cylinders, and cones. Every piece of produce is rendered in meticulous detail and is the result of careful scientific study of proportions and the spatial relationship of one fruit to another. Painting for Christian patrons of the merchant middle class, Ruysch subtly embedded Christian iconography. The grapes and shafts of wheat symbolize the Eucharist or body and blood of Christ. In Fruit and Insects, Ruysch’s work is the result of time, persistence, and the power of keen observation.
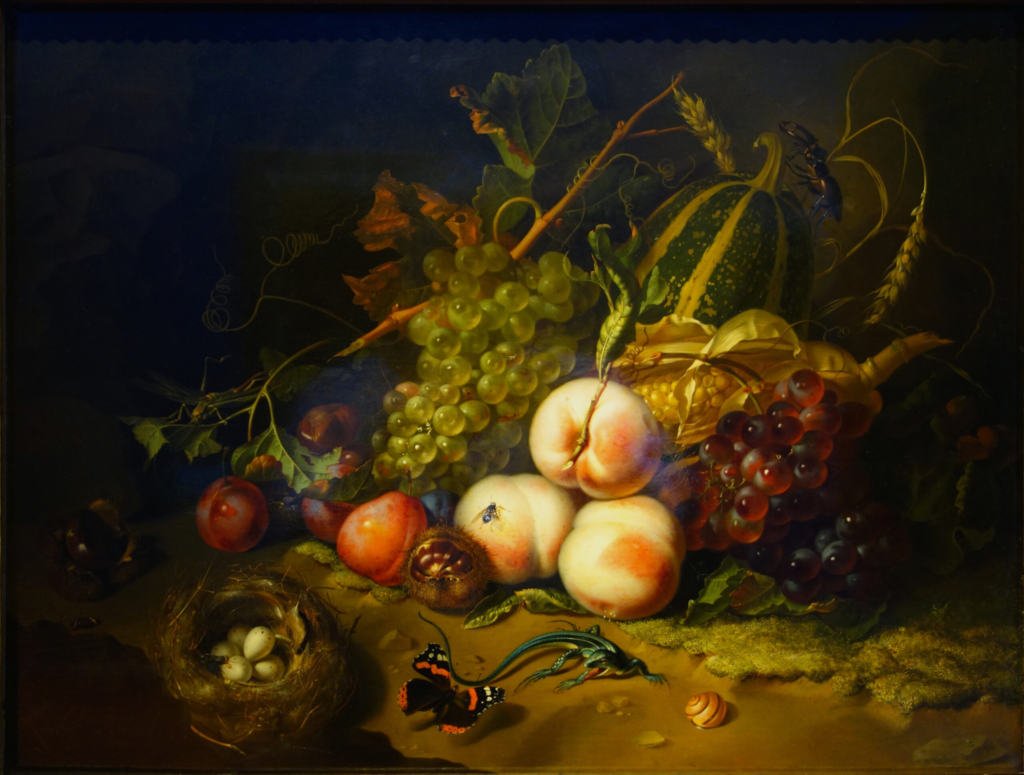
“Master Artist: Rachel Ruysch and Observational Drawing.” Written by Chelsea Wright. License: CC BY
Licensing and Attributions
“Observation Drawing.” Written by Stephen P. Curry. License: CC BY
“Proportion Box Method.” Written by Briana Miyoko Stanley. License: CC BY
Observation Activities
1. Simple Geometric Objects Drawing
Description
In this beginning observation drawing activity. Create a contour line drawing of simple geometric objects. Use the sighting techniques and apply all necessary observational, plumb, and axis lines. This is a linear drawing with no shading or value modeling. However, sight and show details, including the shapes of shadows, cast shadows, and highlights. Do not erase sighting, observational, or plumb lines.
Activity Parameters
Duration
1 – 2 hours
Size
18” x 24”
Subject
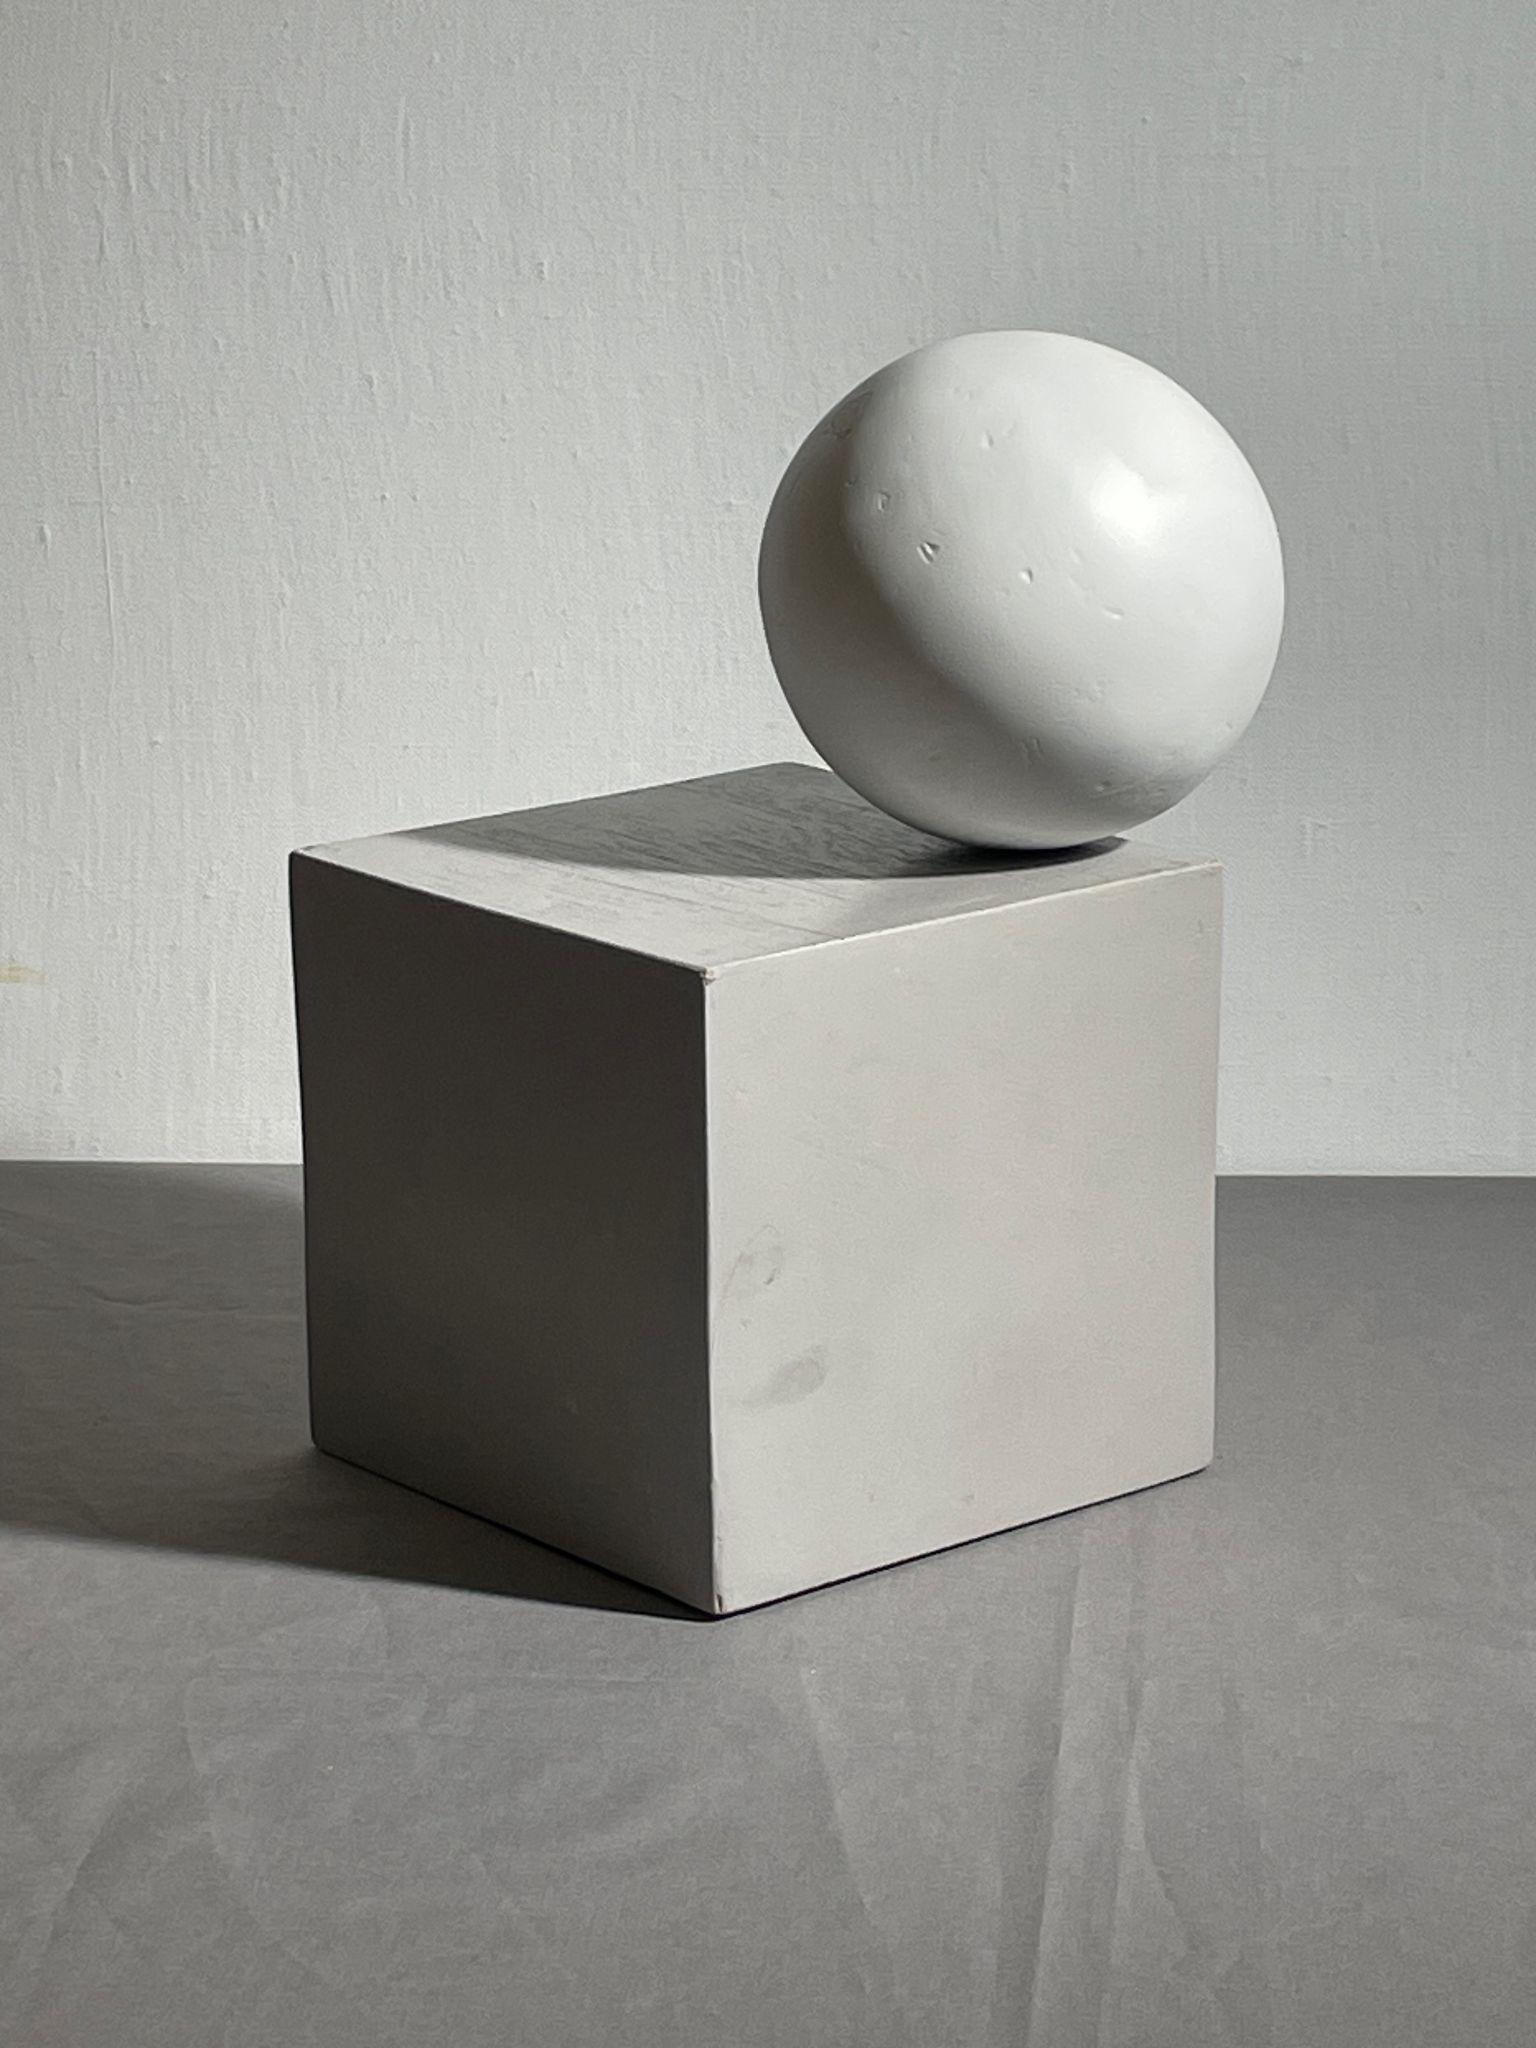
A composed arrangement of 1 or 2 simple geometric objects such as a cube and a sphere. Examples: a cardboard box and a ball.
Applied Techniques
Direct observational drawing in graphite pencil. Show accurate proportionality and the use of sighting, organizational line, plumb, and axis line. Use of a viewfinder and a sighting tool.
Materials
- One sheet of 18×24” paper
- Drawing Board
- Ruler
- Sighting Tool
- Graphite Pencils – 2H, HB, 2B, 4B
- Rubber Eraser
- Kneaded Eraser
- Mono Zero Eraser
- Pencil Sharpener
- Sighting tool
Student Learning Outcomes (SLOs)
Use graphite pencil to create an accurate and proportional line drawing of simple geometric shapes. Develop an understanding of the use of sighting, organizational, plumb, axis lines and how to use a sighting tool. Indicate cast shadows with line work only. Maintain and do not erase any of the preparatory lines, such as sighting, organizational lines, and plumb lines.
Method
Still-Life Setup
- Gather two simple geometric objects.
- Building Materials
- Backdrop – paper or fabric
- Tabletop or platform for arrangement
- Plain fabric or paper for tabletop.
- Objects
- Box or cube
- Sphere or cylinder – such as a ball or a coffee can.
- Lighting
- A simple single light source is best for a strong, distinct cast shadow. (You will not use value in this drawing to describe shadows.)
- Building Materials
- Still-Life Setup
- Arrange the objects so that the sphere or cylinder sits on top of the box, as shown in the image below.
- Drawing Process
- Clip a sheet of your drawing paper onto a drawing board.
- Consider whether the drawing should be a vertical or horizontal orientation.
- Make light marks on the paper to indicate the placement of the highest, lowest, leftmost, and rightmost shapes within the overall composition. This helps with planning how large you draw the two objects. For this first sighting activity, consider drawing the box 6 to 8 inches tall.
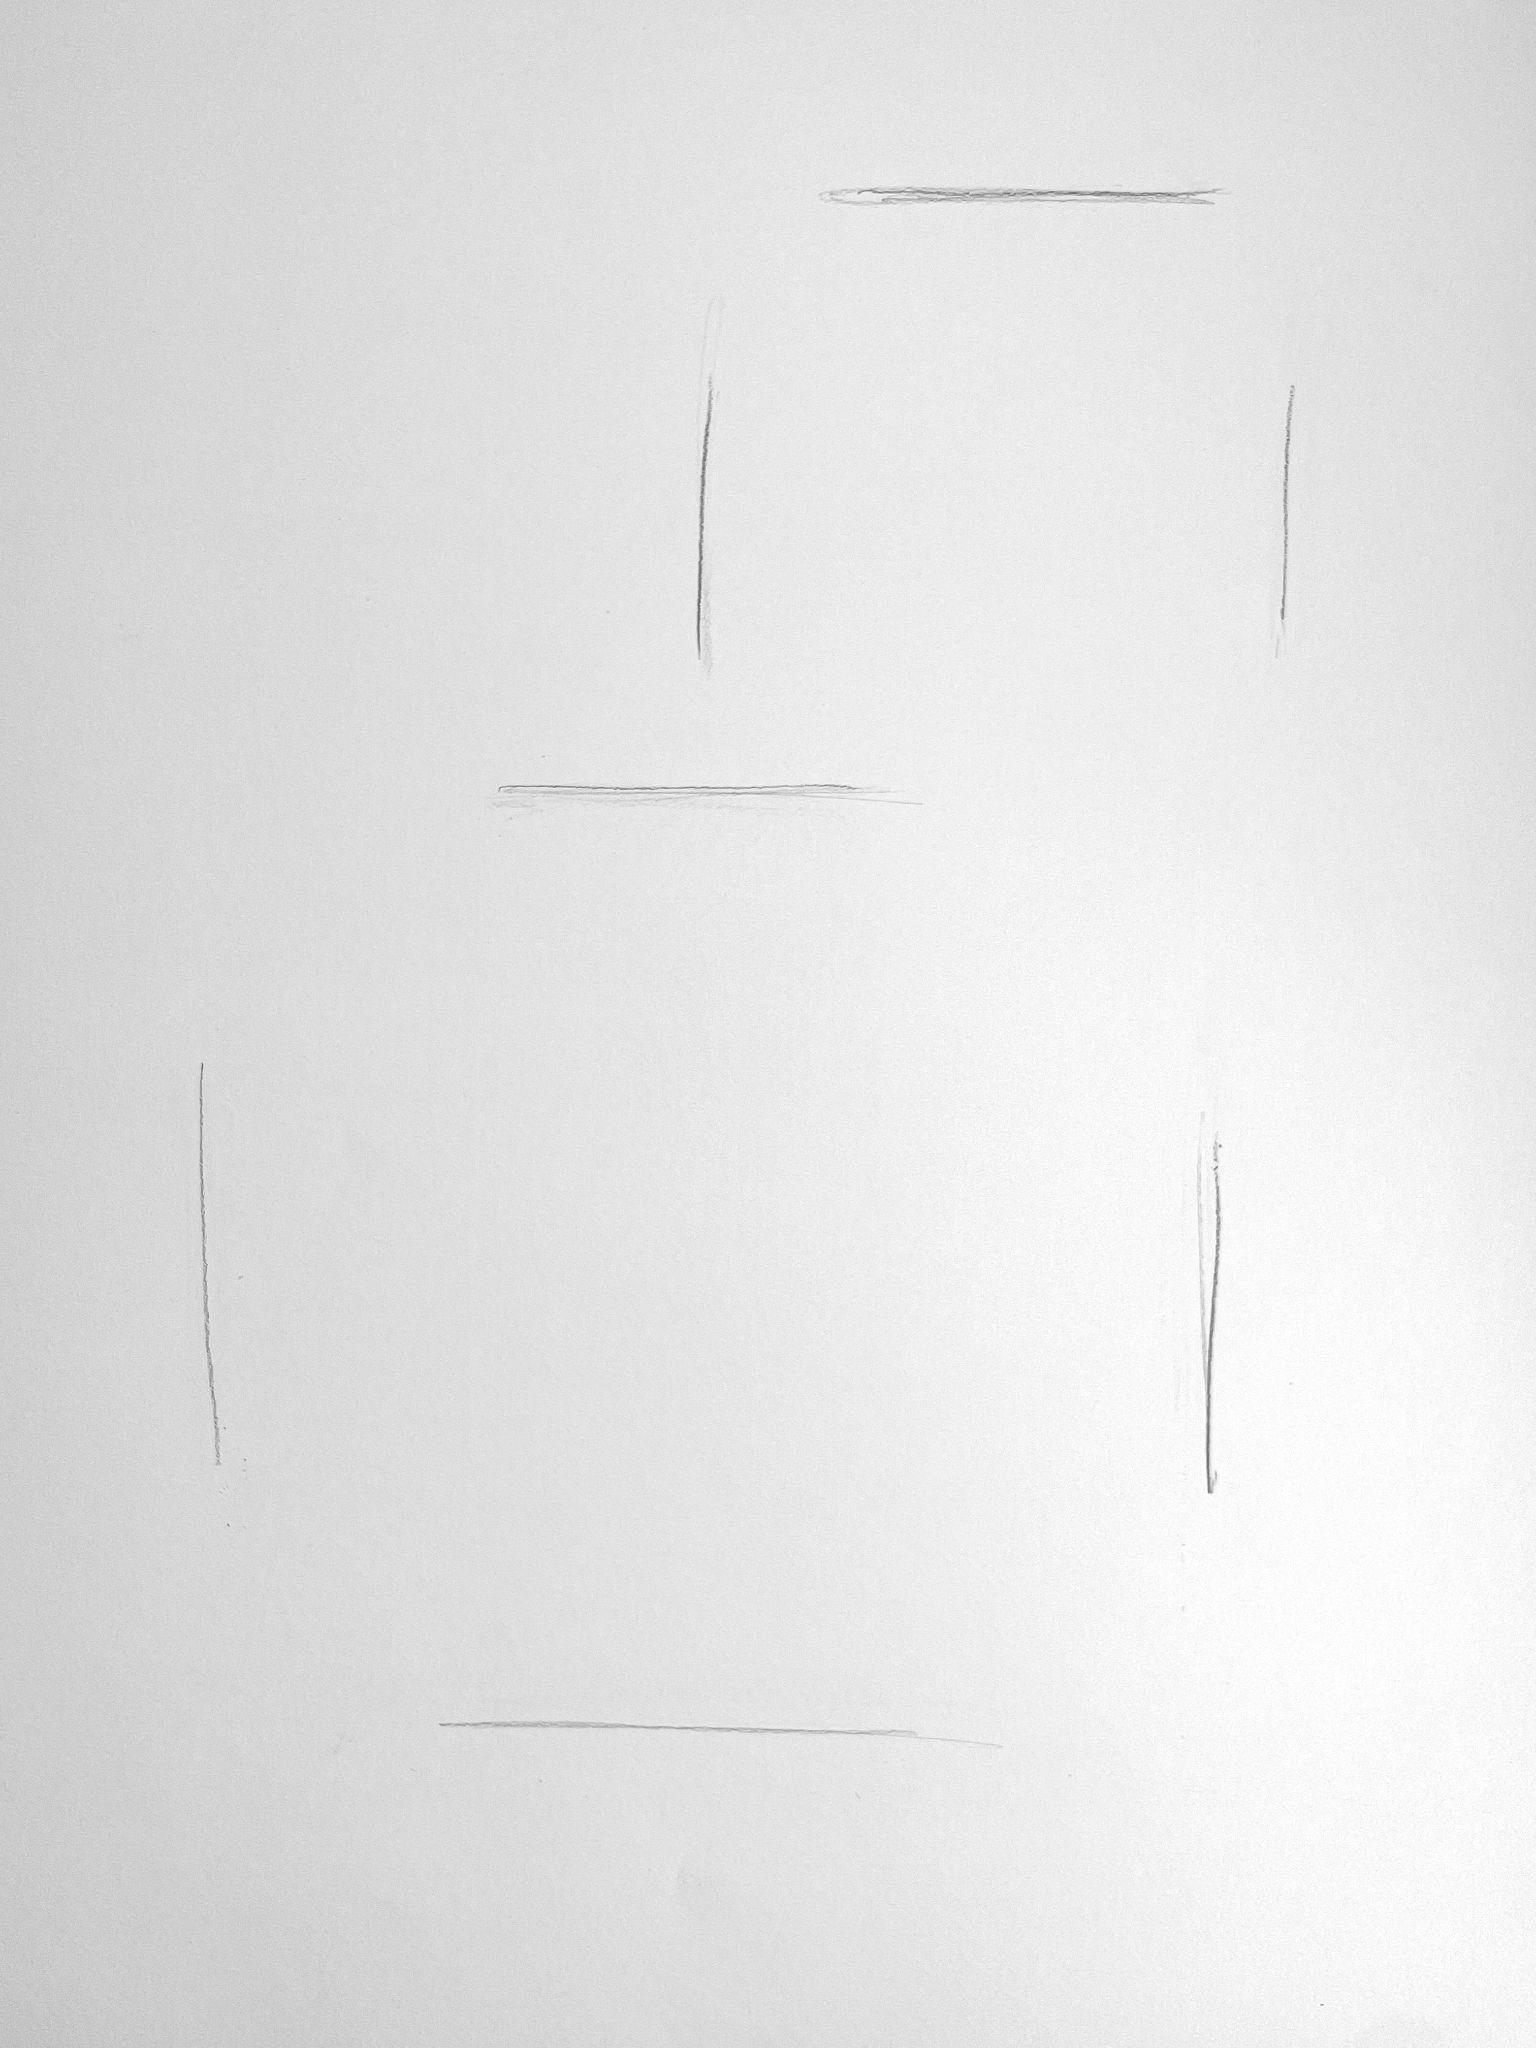
- Lightly gesture the composition, using the initial marks to place the still life composition within the picture plane. When gesturing, consider both objects as a whole, rather than two individual components. The gesture should only take 1 to 2 minutes.
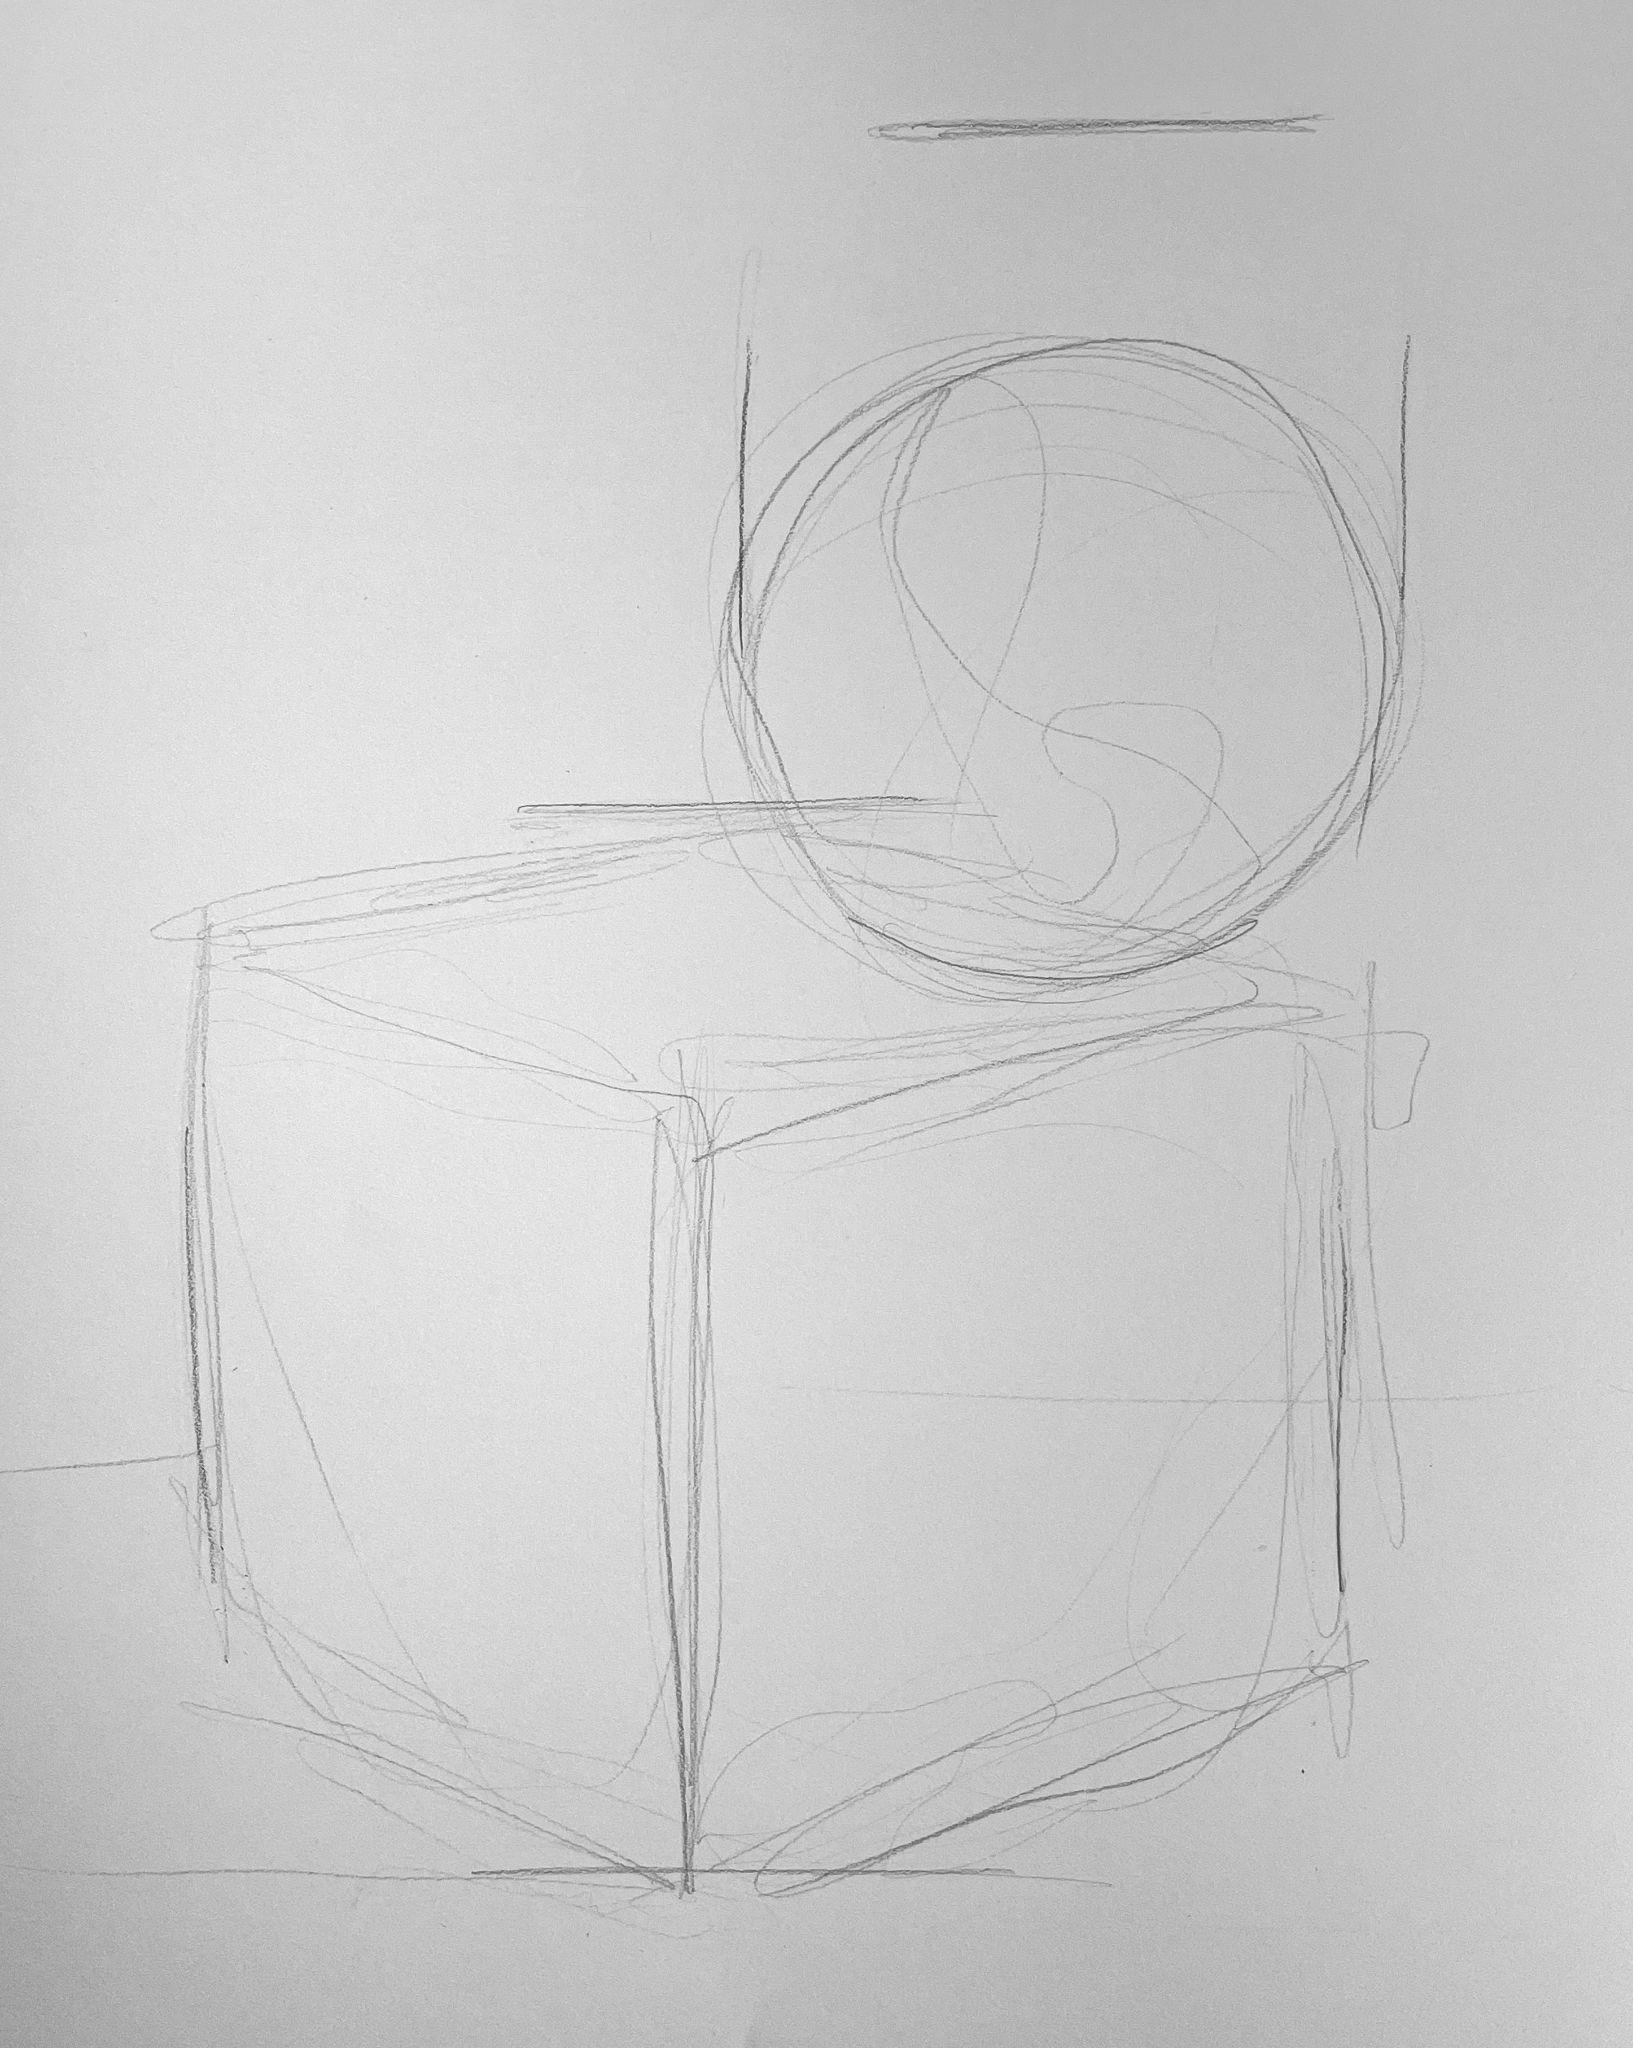
- Begin with the box in your arrangement. You will use it to measure the scale, proportion, and placement of the second object, whether it is a cylinder or sphere.
- Use the vertical edge as a straight line to measure the height and compare that to the width as well as the proportion of the second object in your grouping.
- Sight by holding your sighting tool (skewer or pencil) out at arm’s length in your non-dominant hand with the elbow locked. Close the corresponding eye, look down the length of your arm, and use the sighting tool to measure from the tip of the sighting tool to your thumb.
- Hold the sighting tool vertically to sight/measure the height of the front corner of the box. Then compare that measurement to the width of either the left or right side of the box.
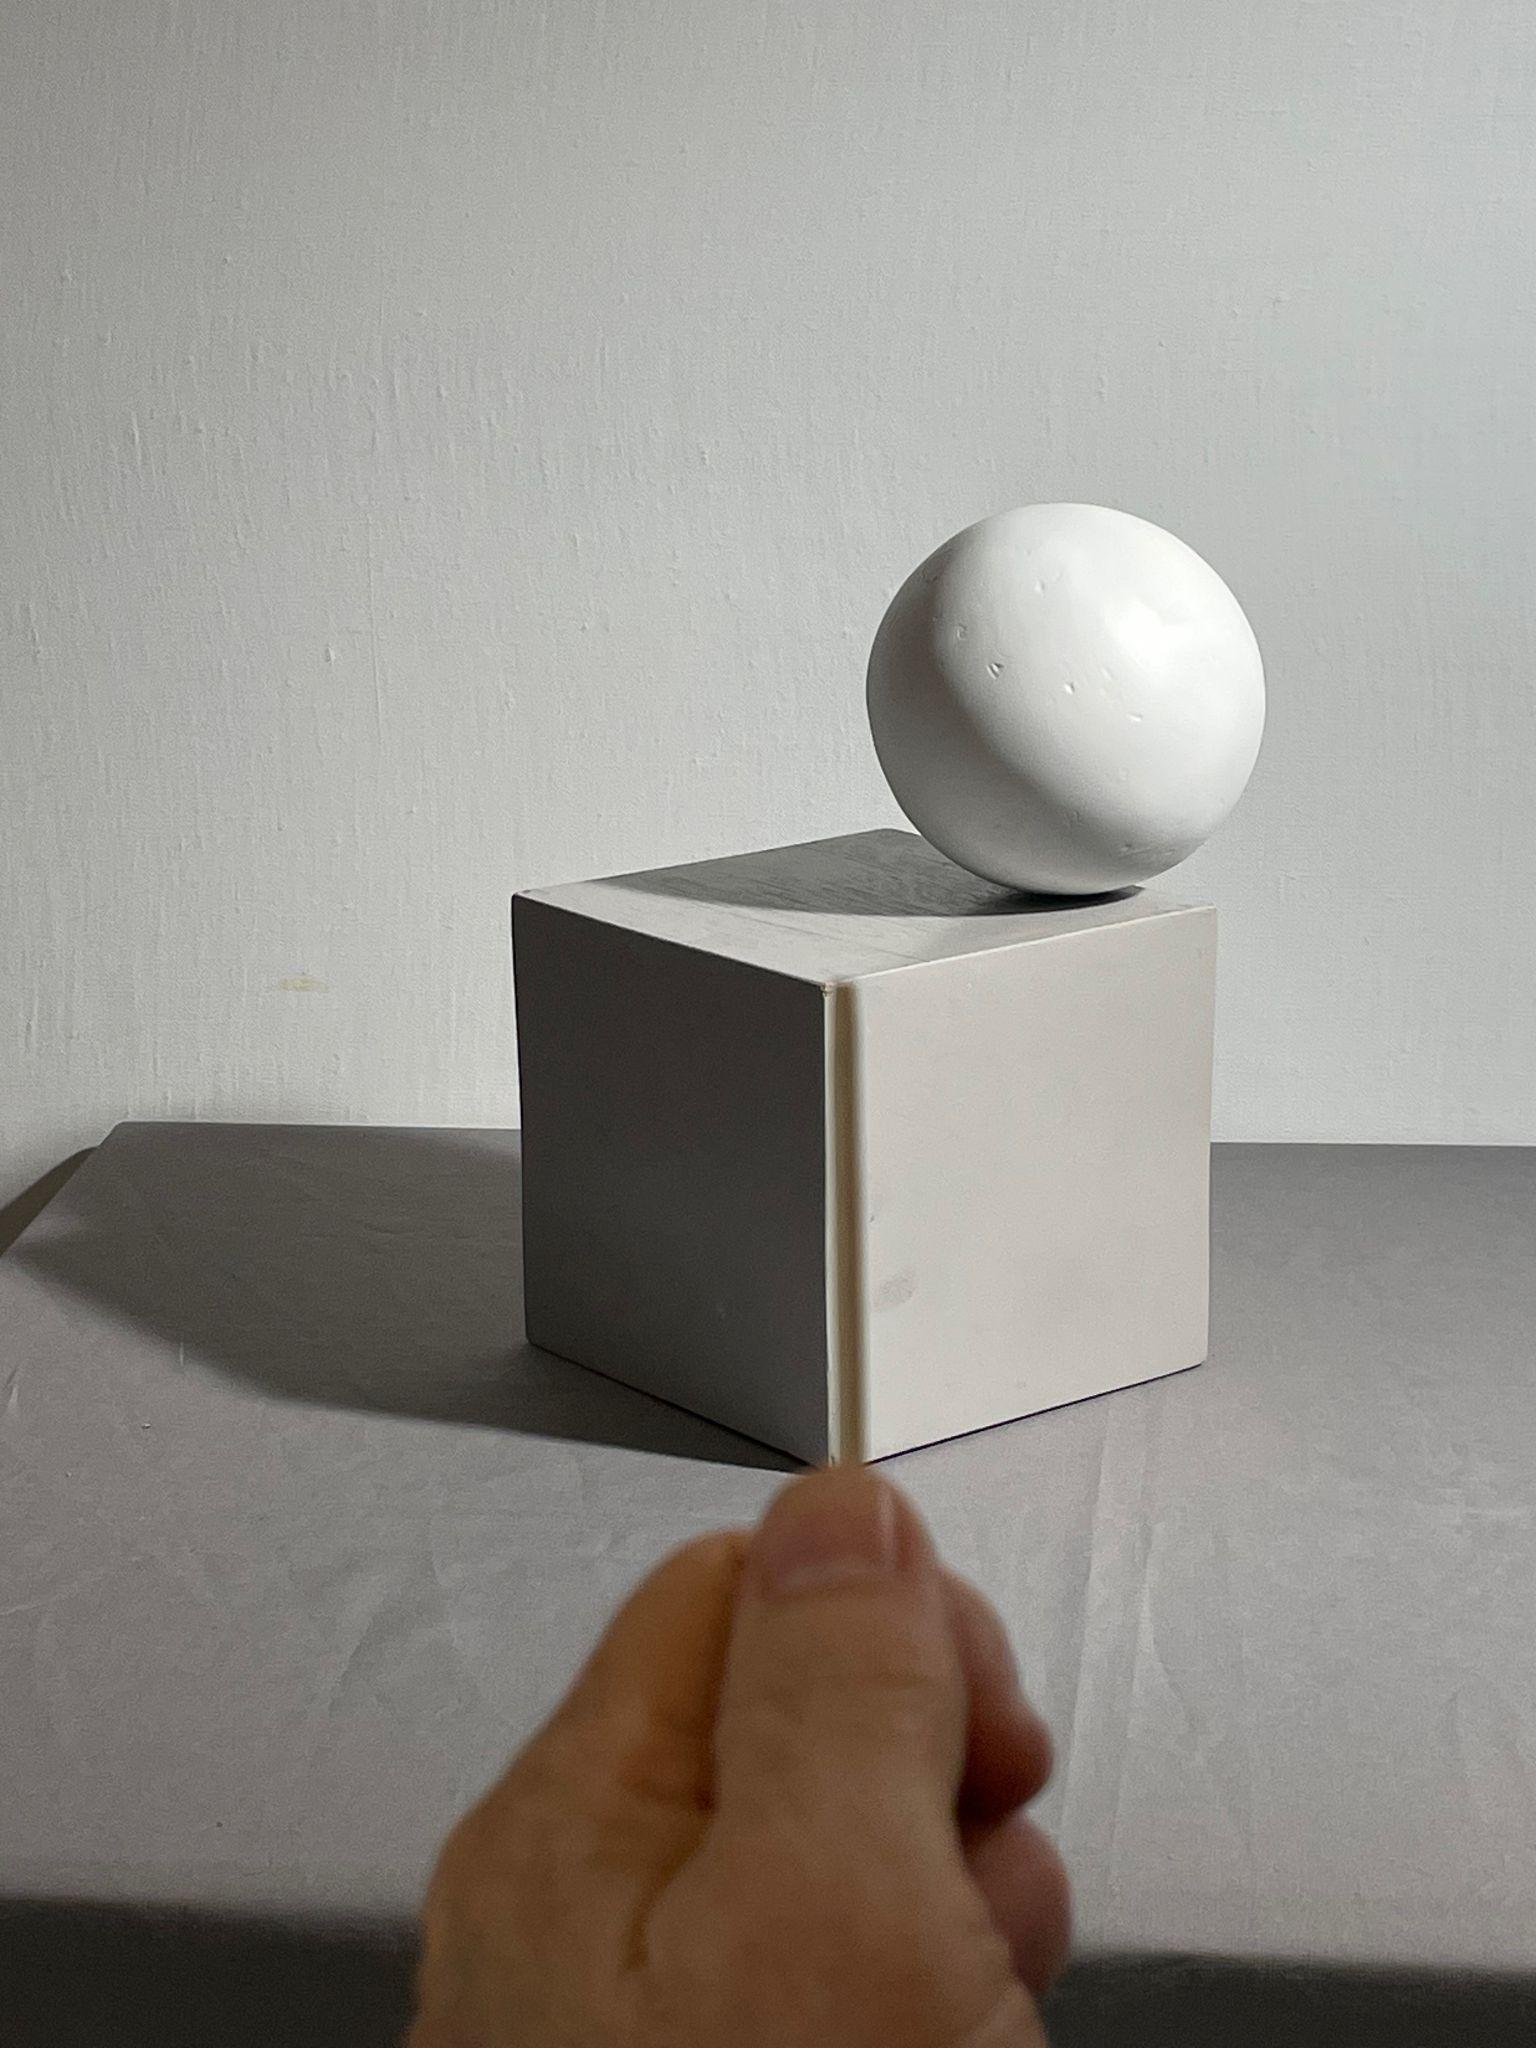
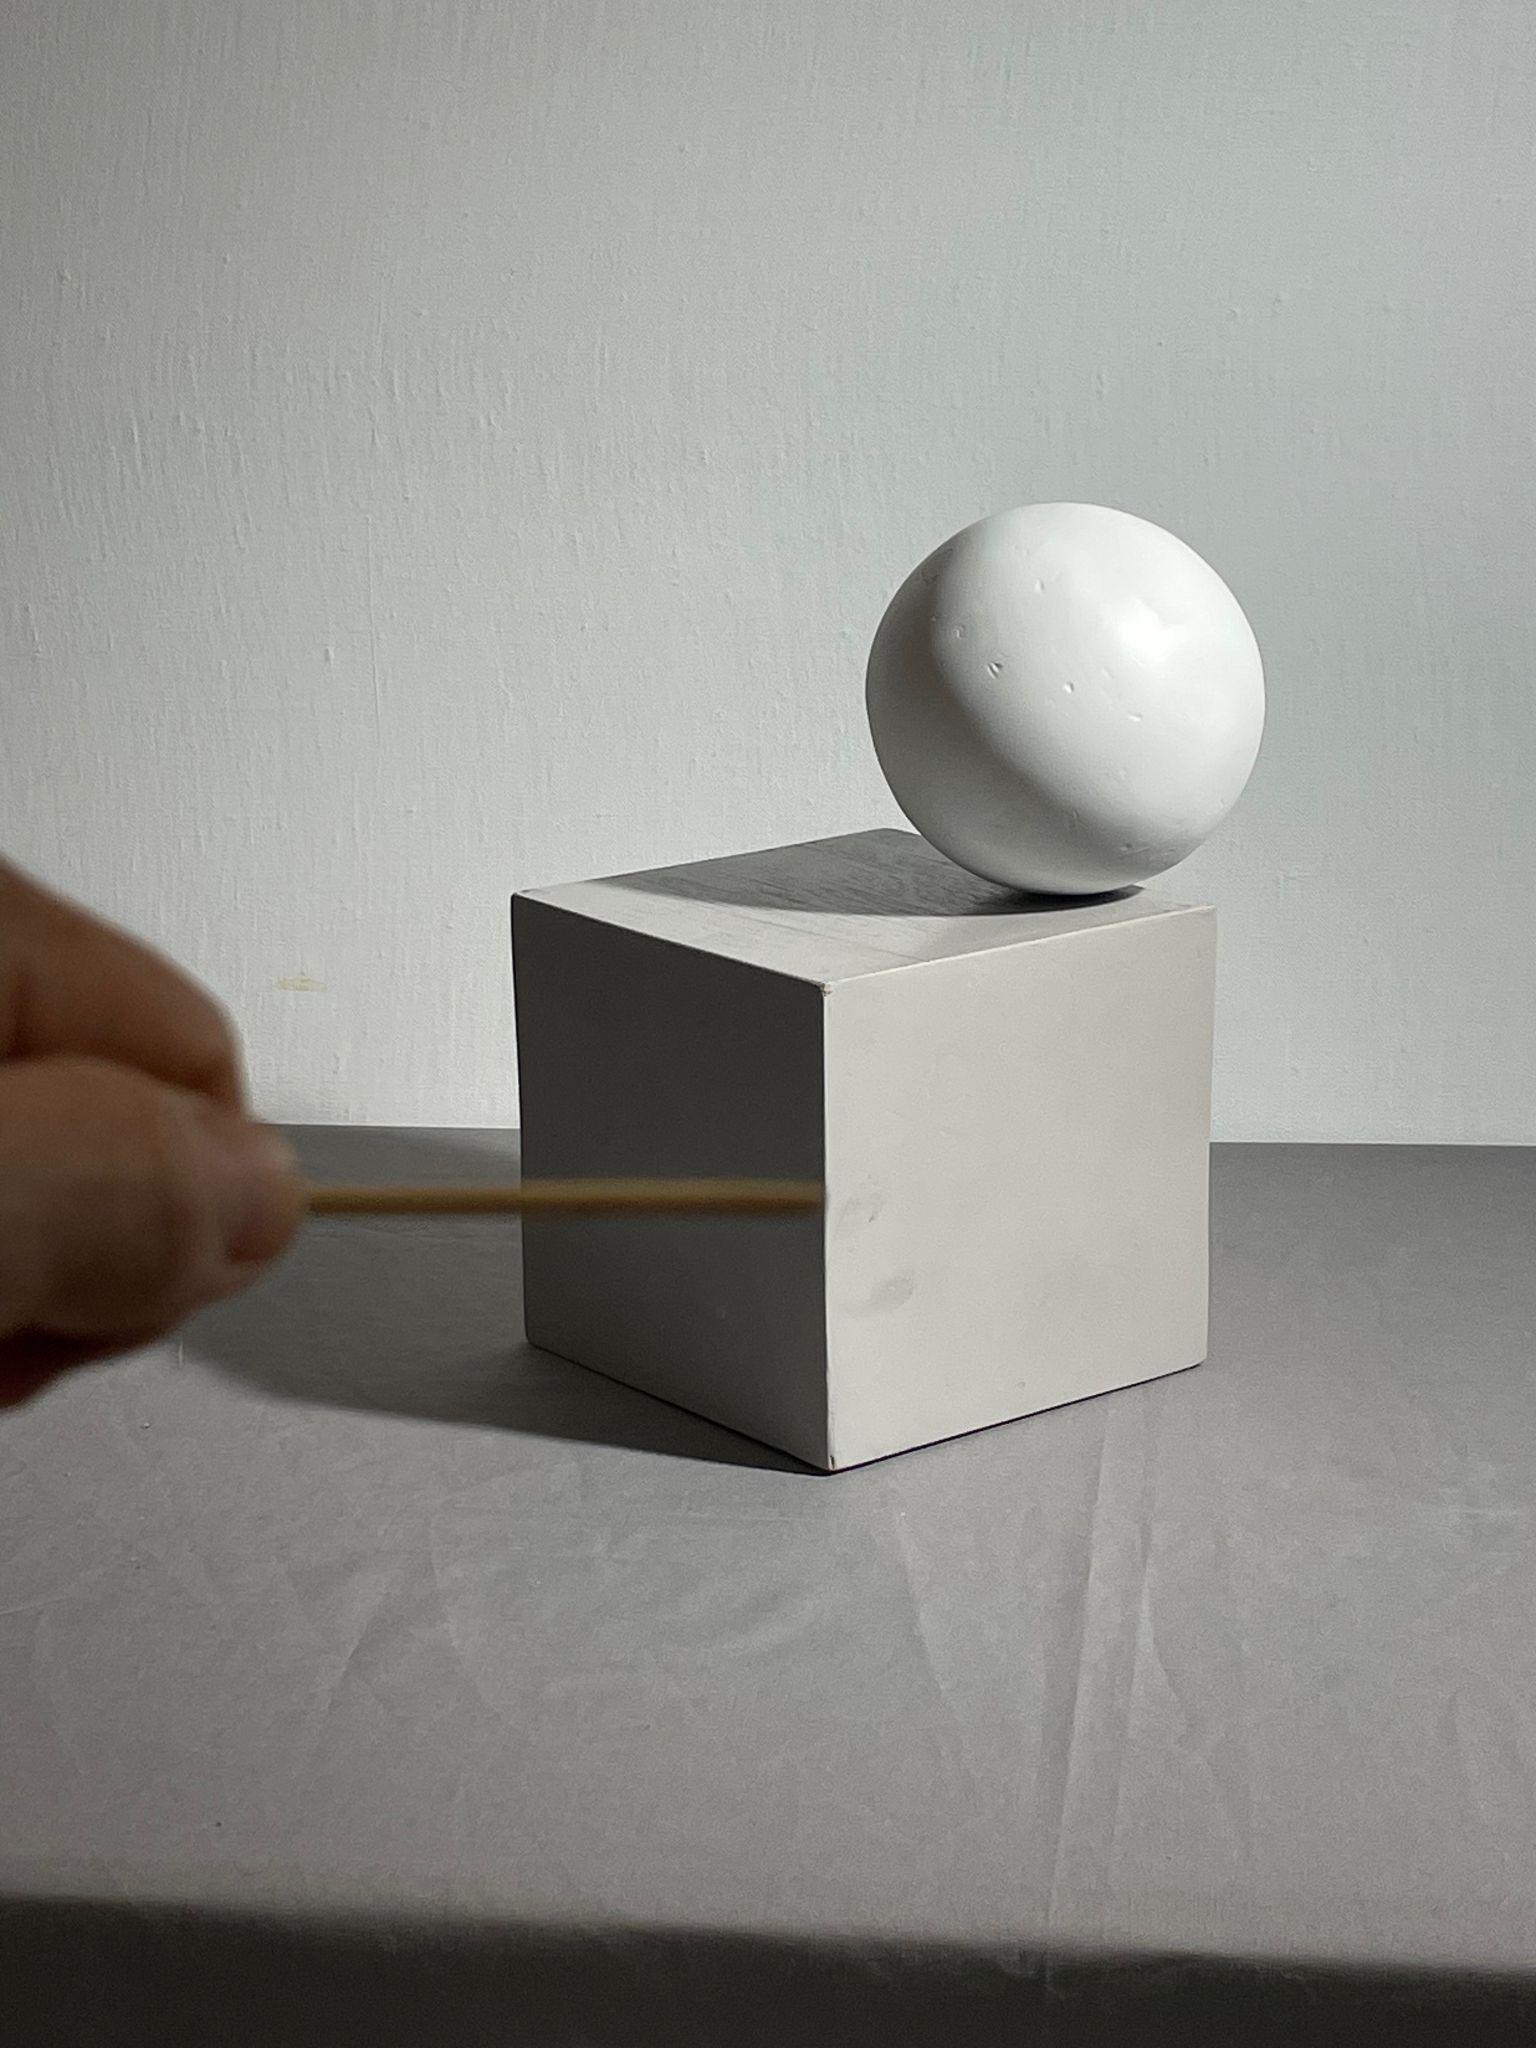
Sighting vertical and horizontal measurements of reference objects example, Stephen P. Curry, digital photos, License: CC BY NC 4.0
- Make a mark with your pencil to indicate the bottom and top of the object. Rotate the sighting tool horizontally and compare the measured height to the width. Make two marks to indicate the left and right sides of the object based on the difference in height compared to the width.
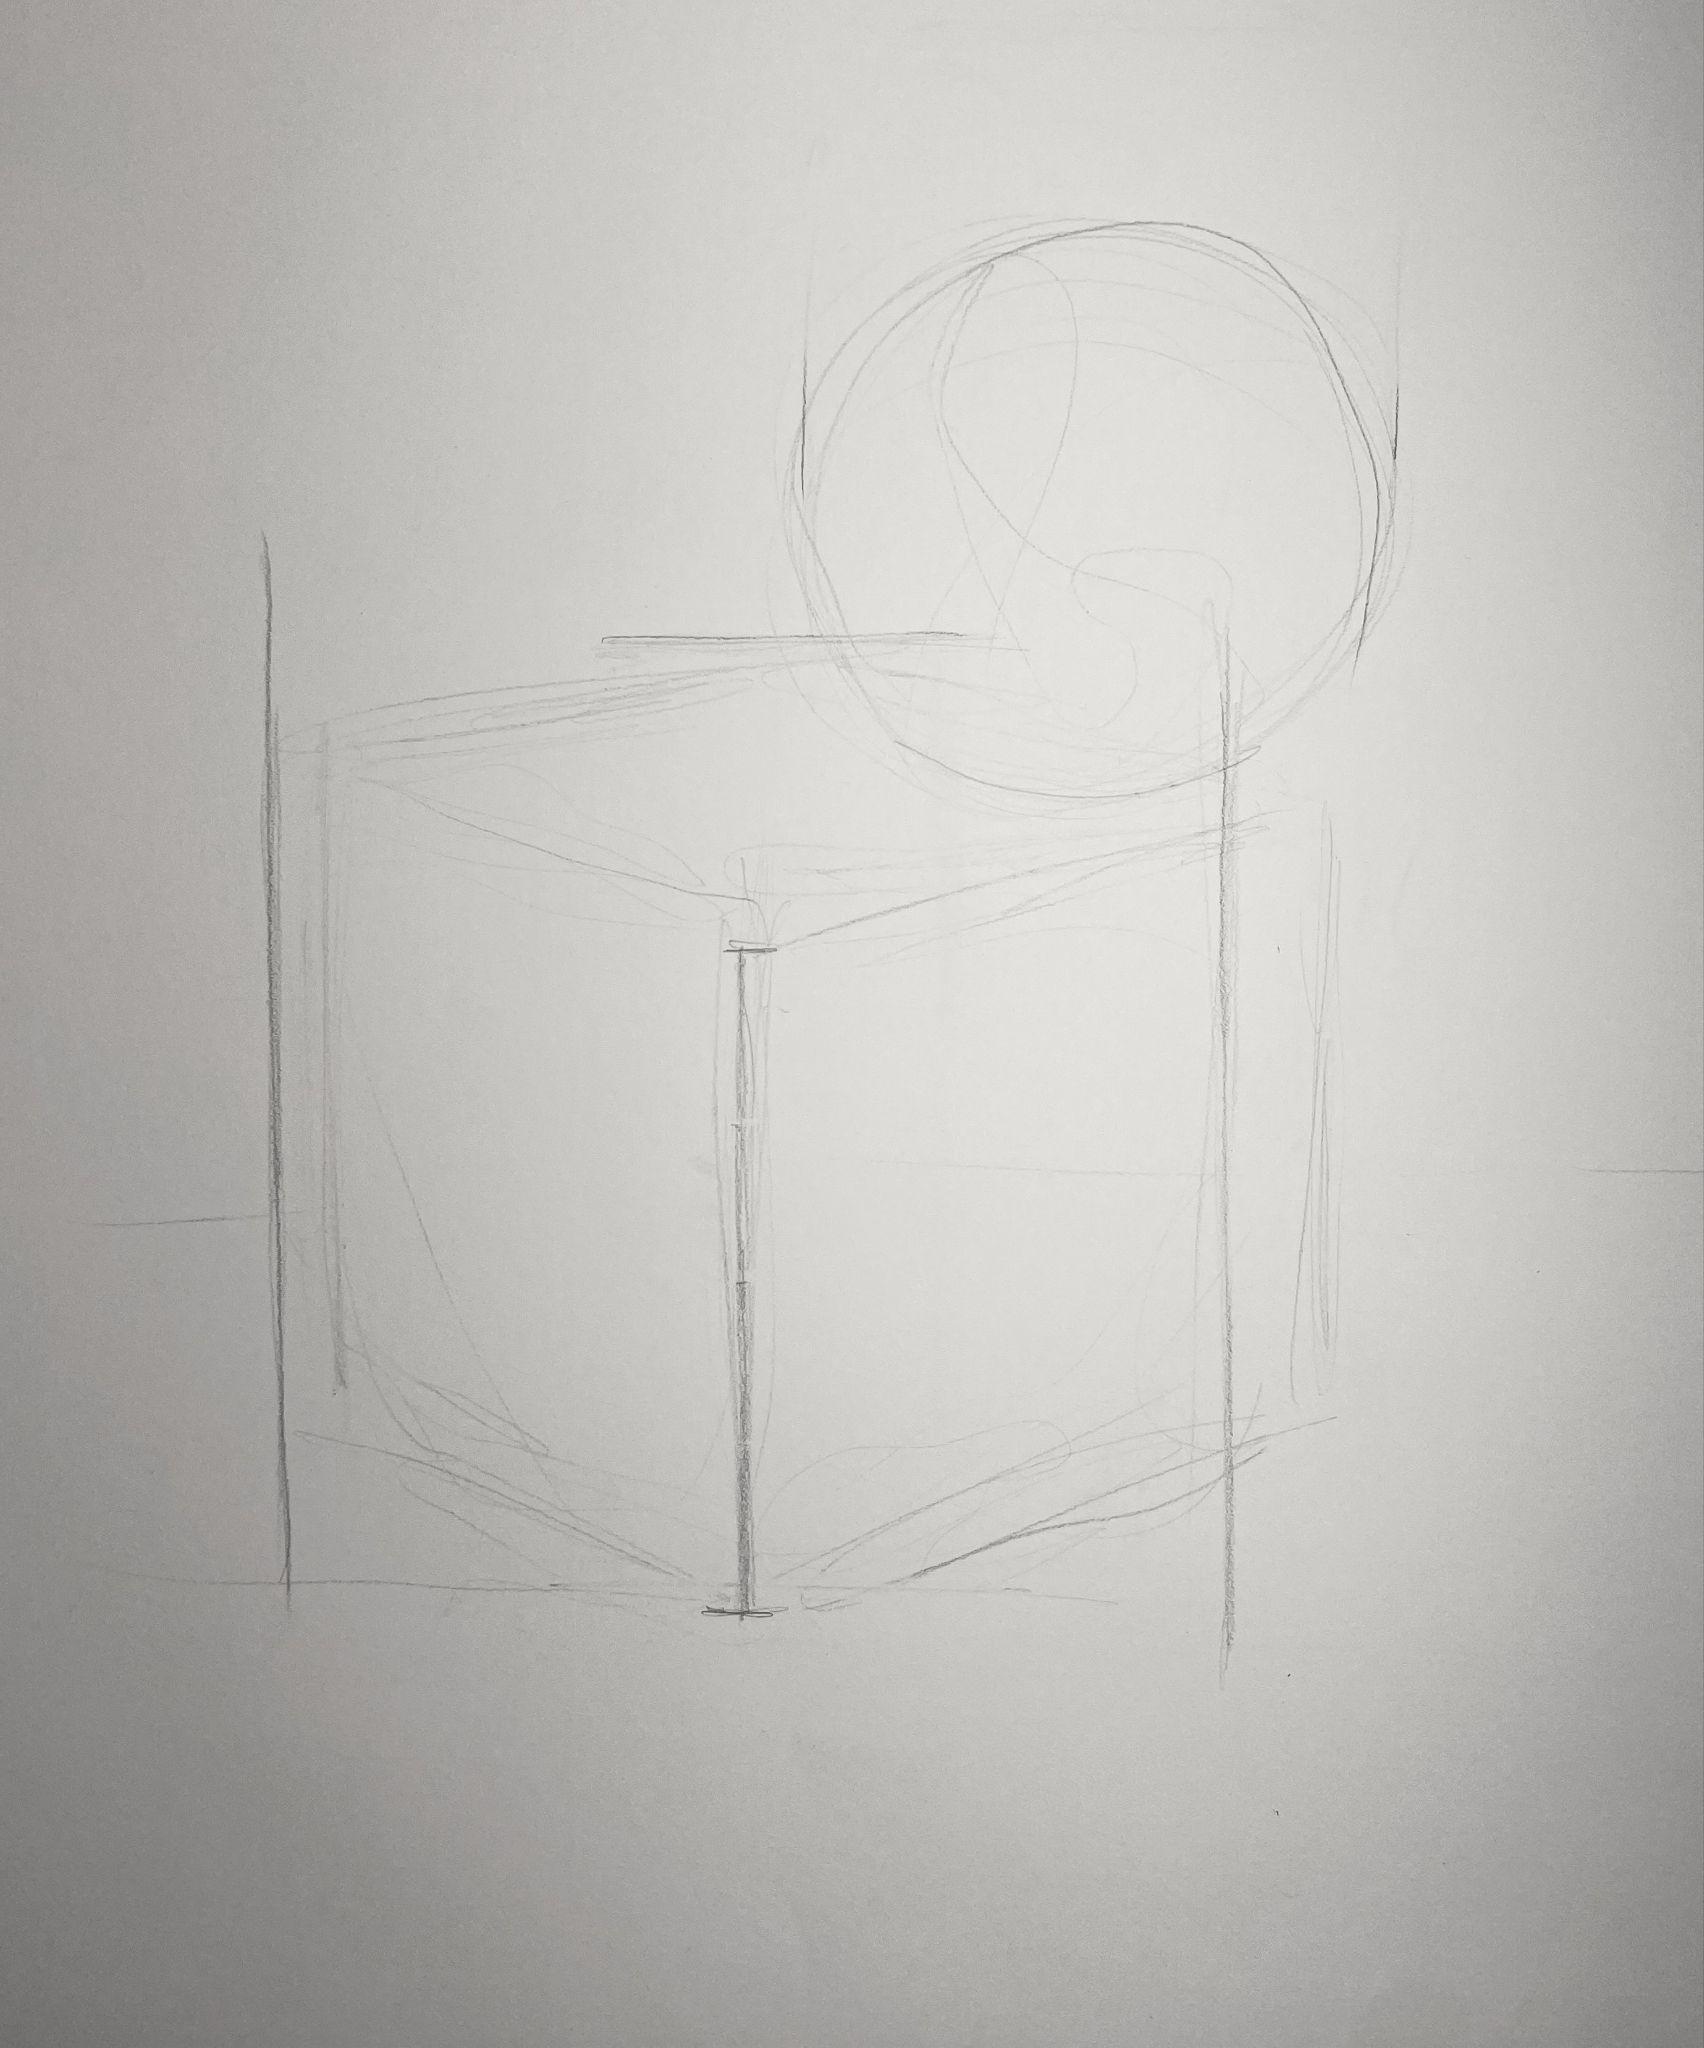
- To determine the angles of the horizontal edges of the box top and bottom, align your sighting tool with those edges to find the angles. Horizontal edges will appear to converge, or get closer together, as they extend away from you. If they appear to diverge or grow further apart, recheck the angles with your sighting tool or a pencil.
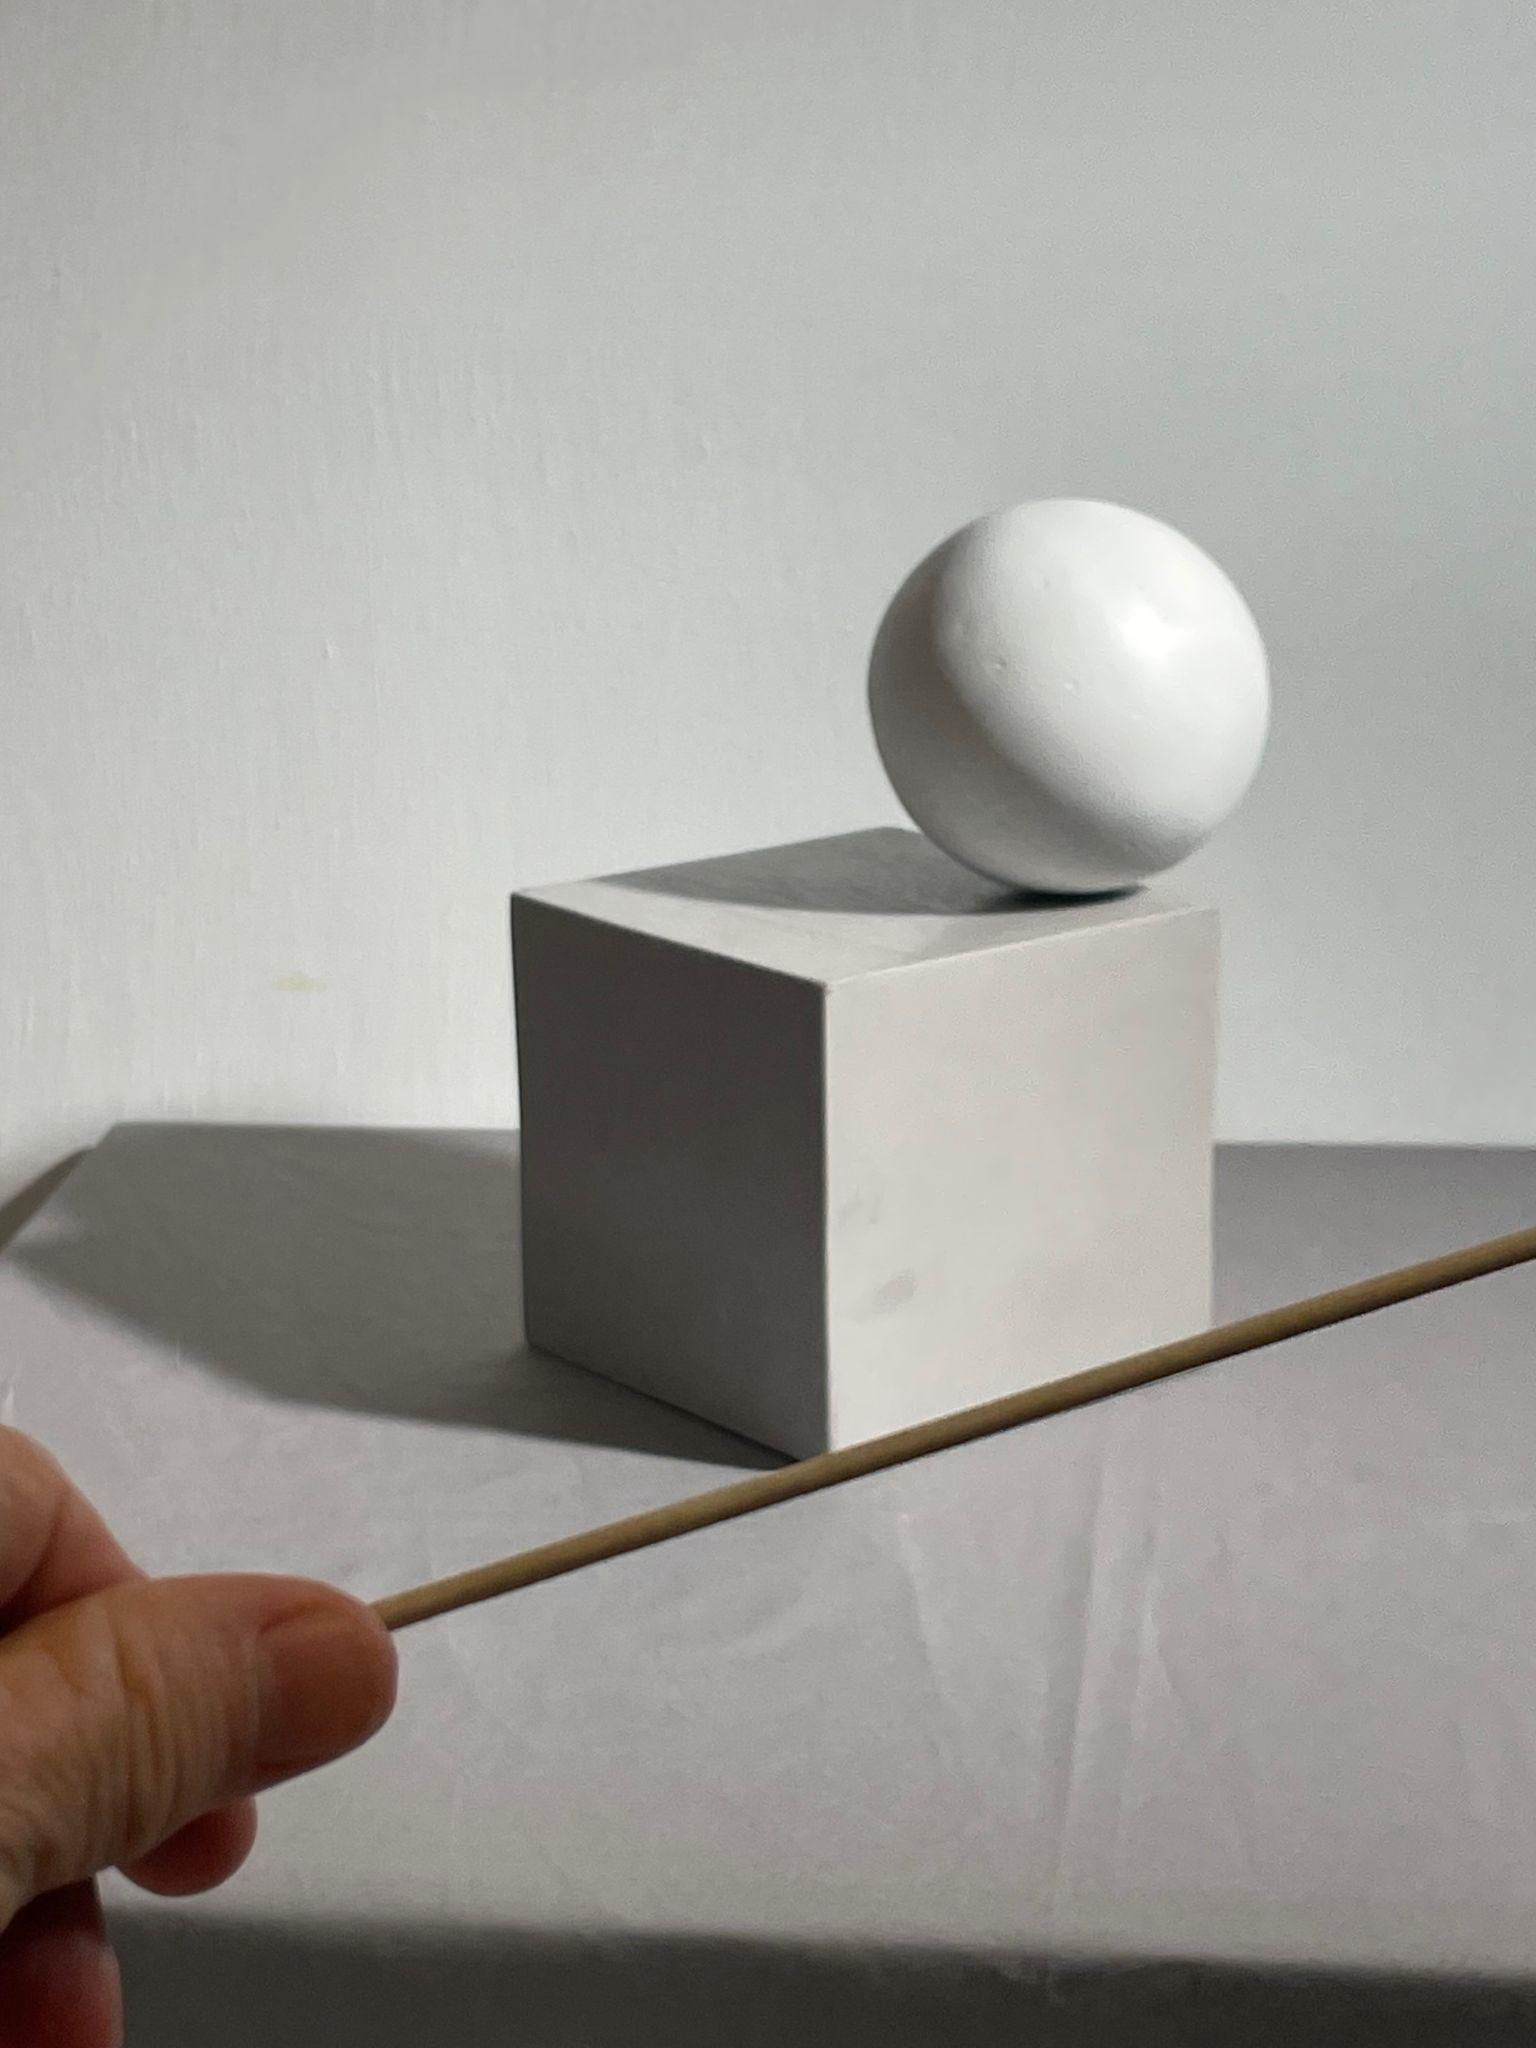
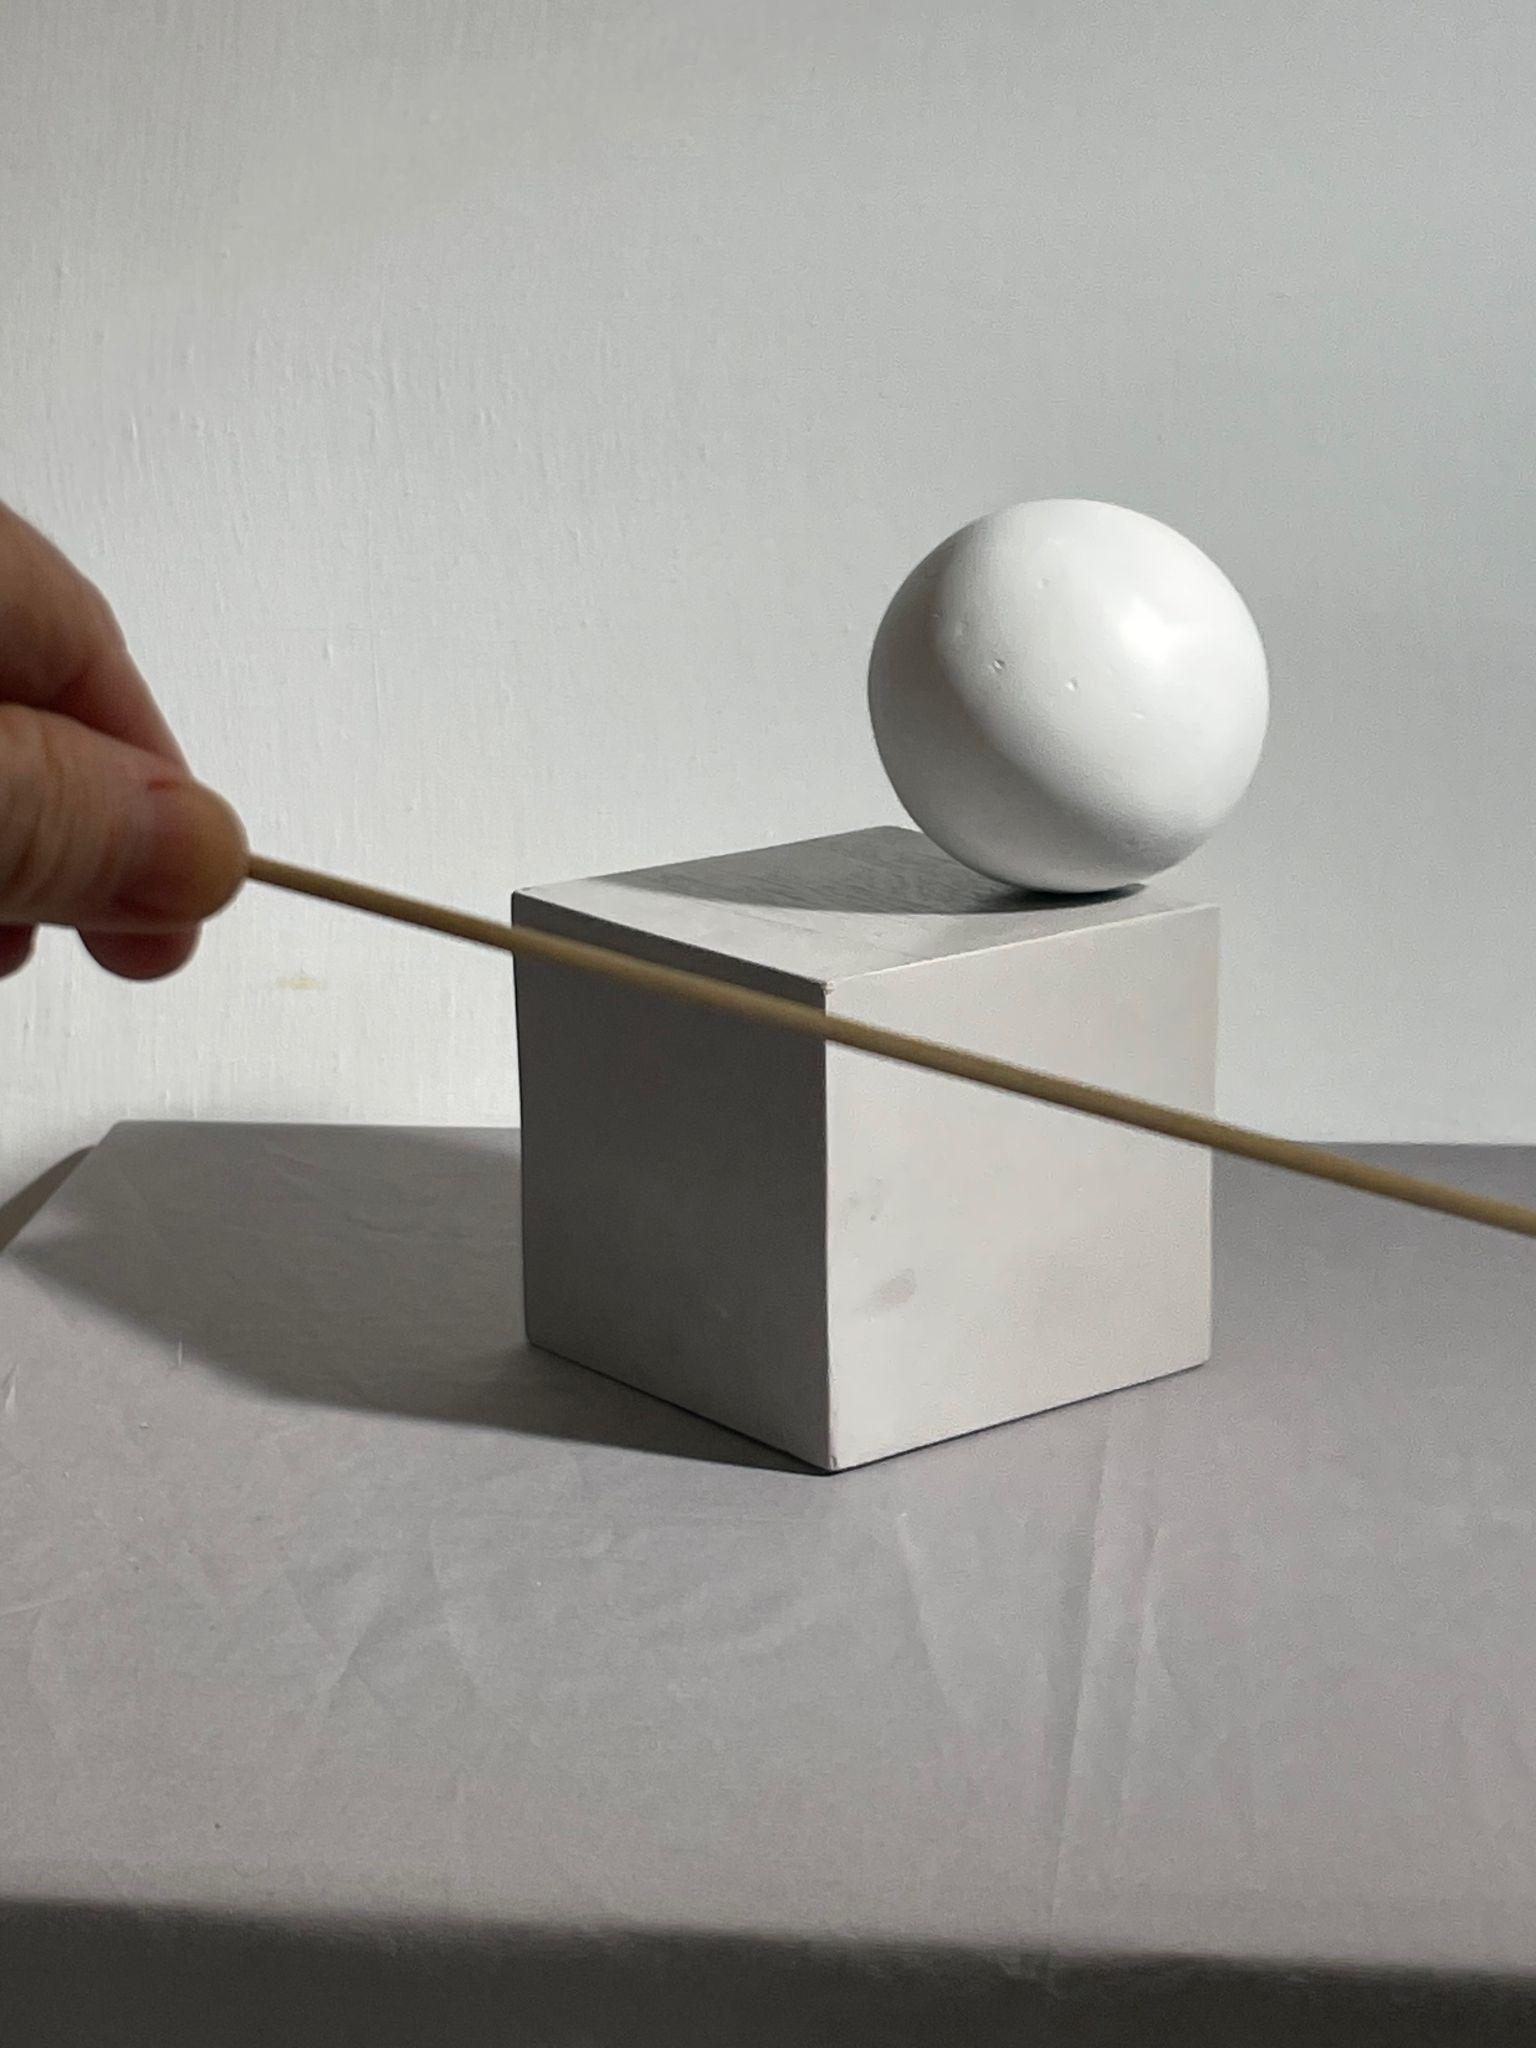
Example of sighting horizontal edge angles of reference objects, Stephen P. Curry, digital photos, License: CC BY NC 4.0
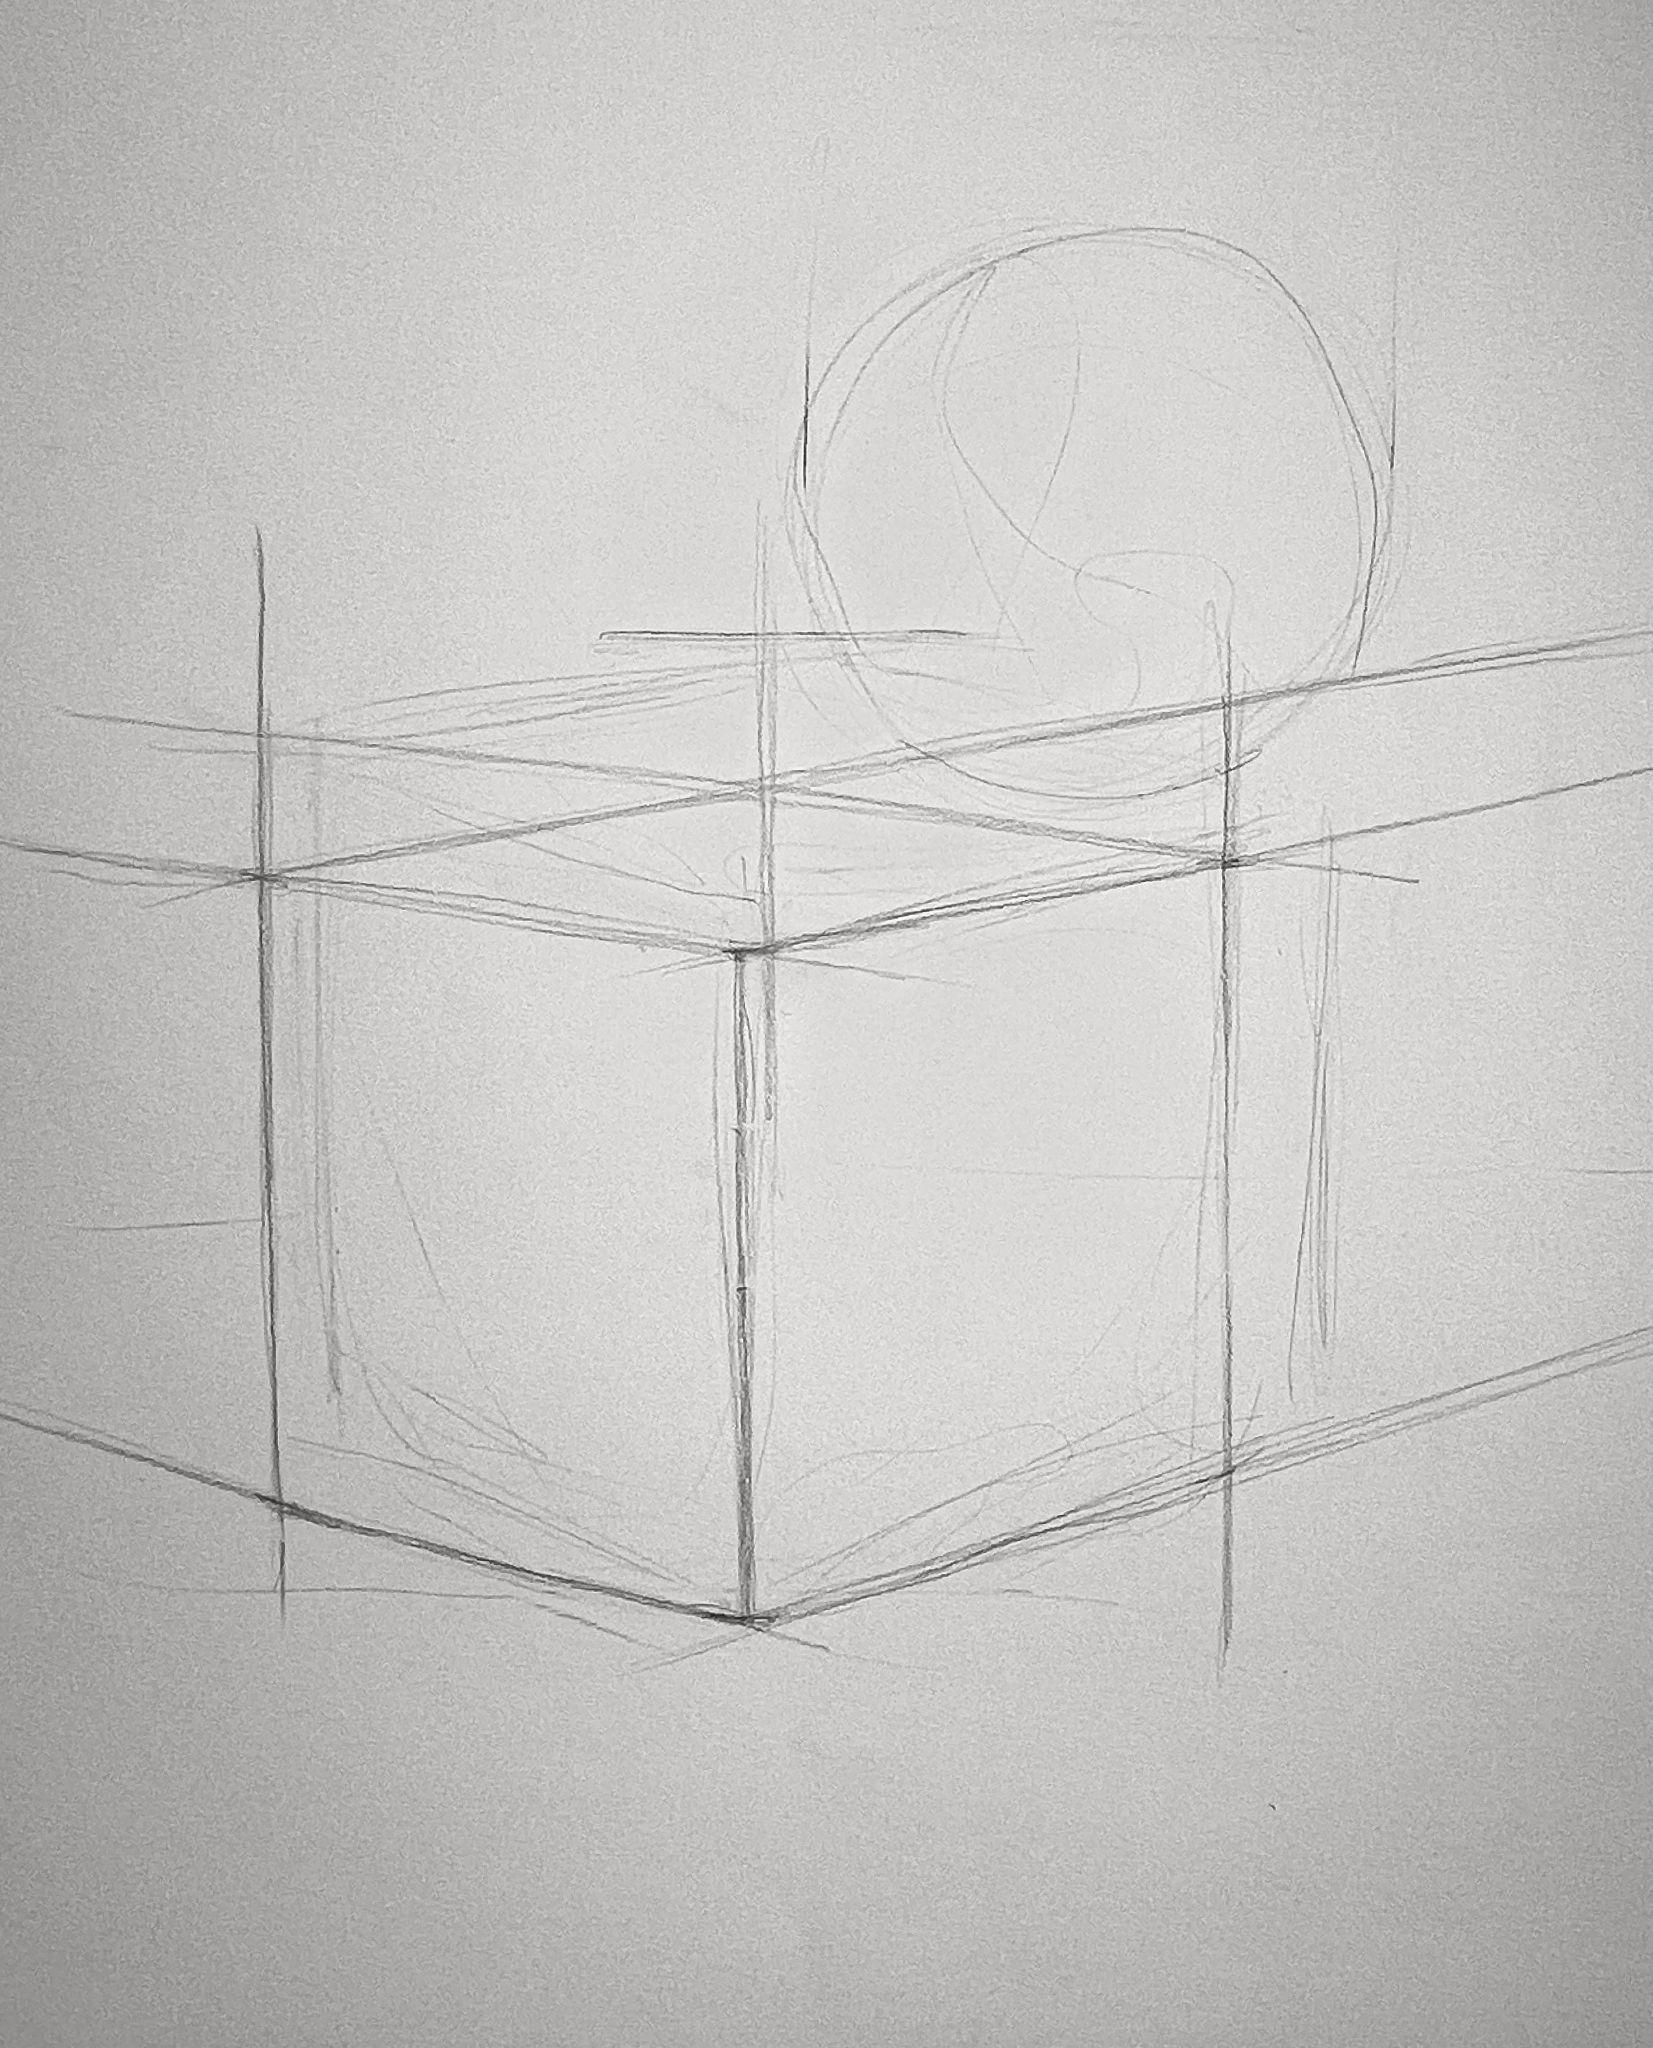
- Extend organizational lines horizontally across the picture plane to compare the tops and bottoms of objects in relation to each other. Do the same with vertical organizational lines to determine the placement of objects between the left and right edges of the composition and to measure any spaces between forms.
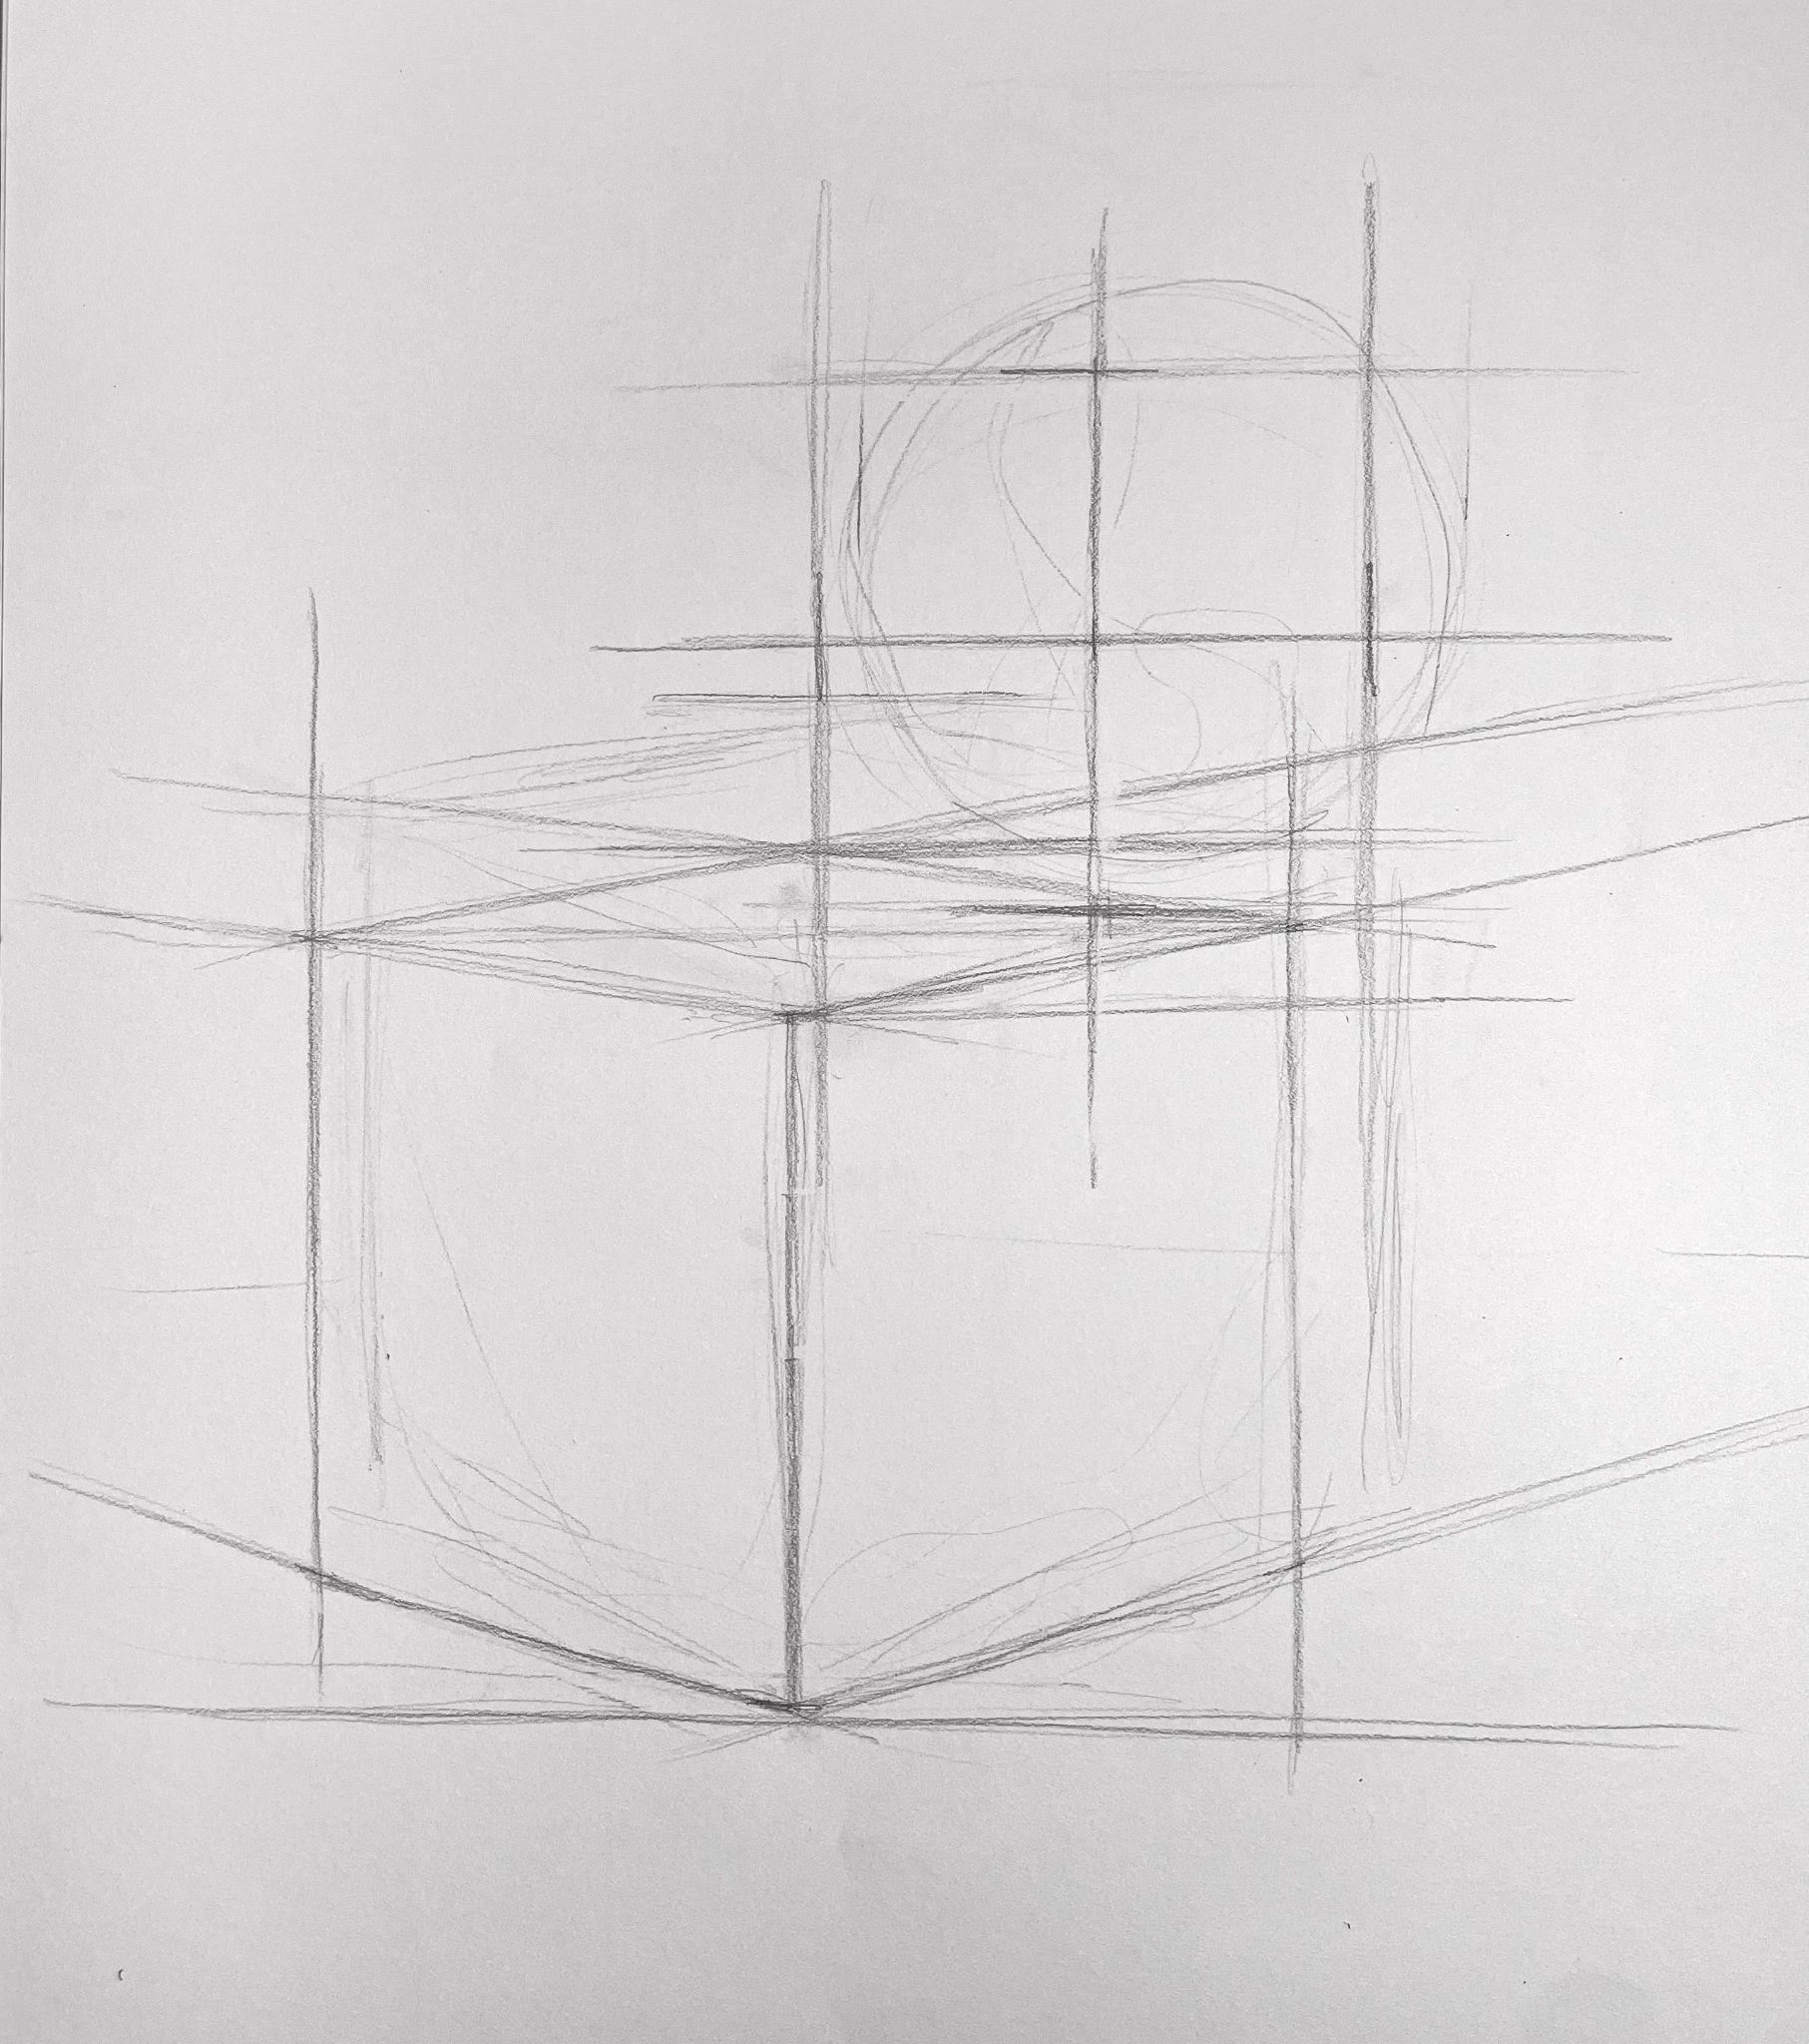
- To draw the sphere.
- Sight a plumb line through the center of it in relation to where it sits on top of the box. The plumb line aids in placement and helps with symmetry.
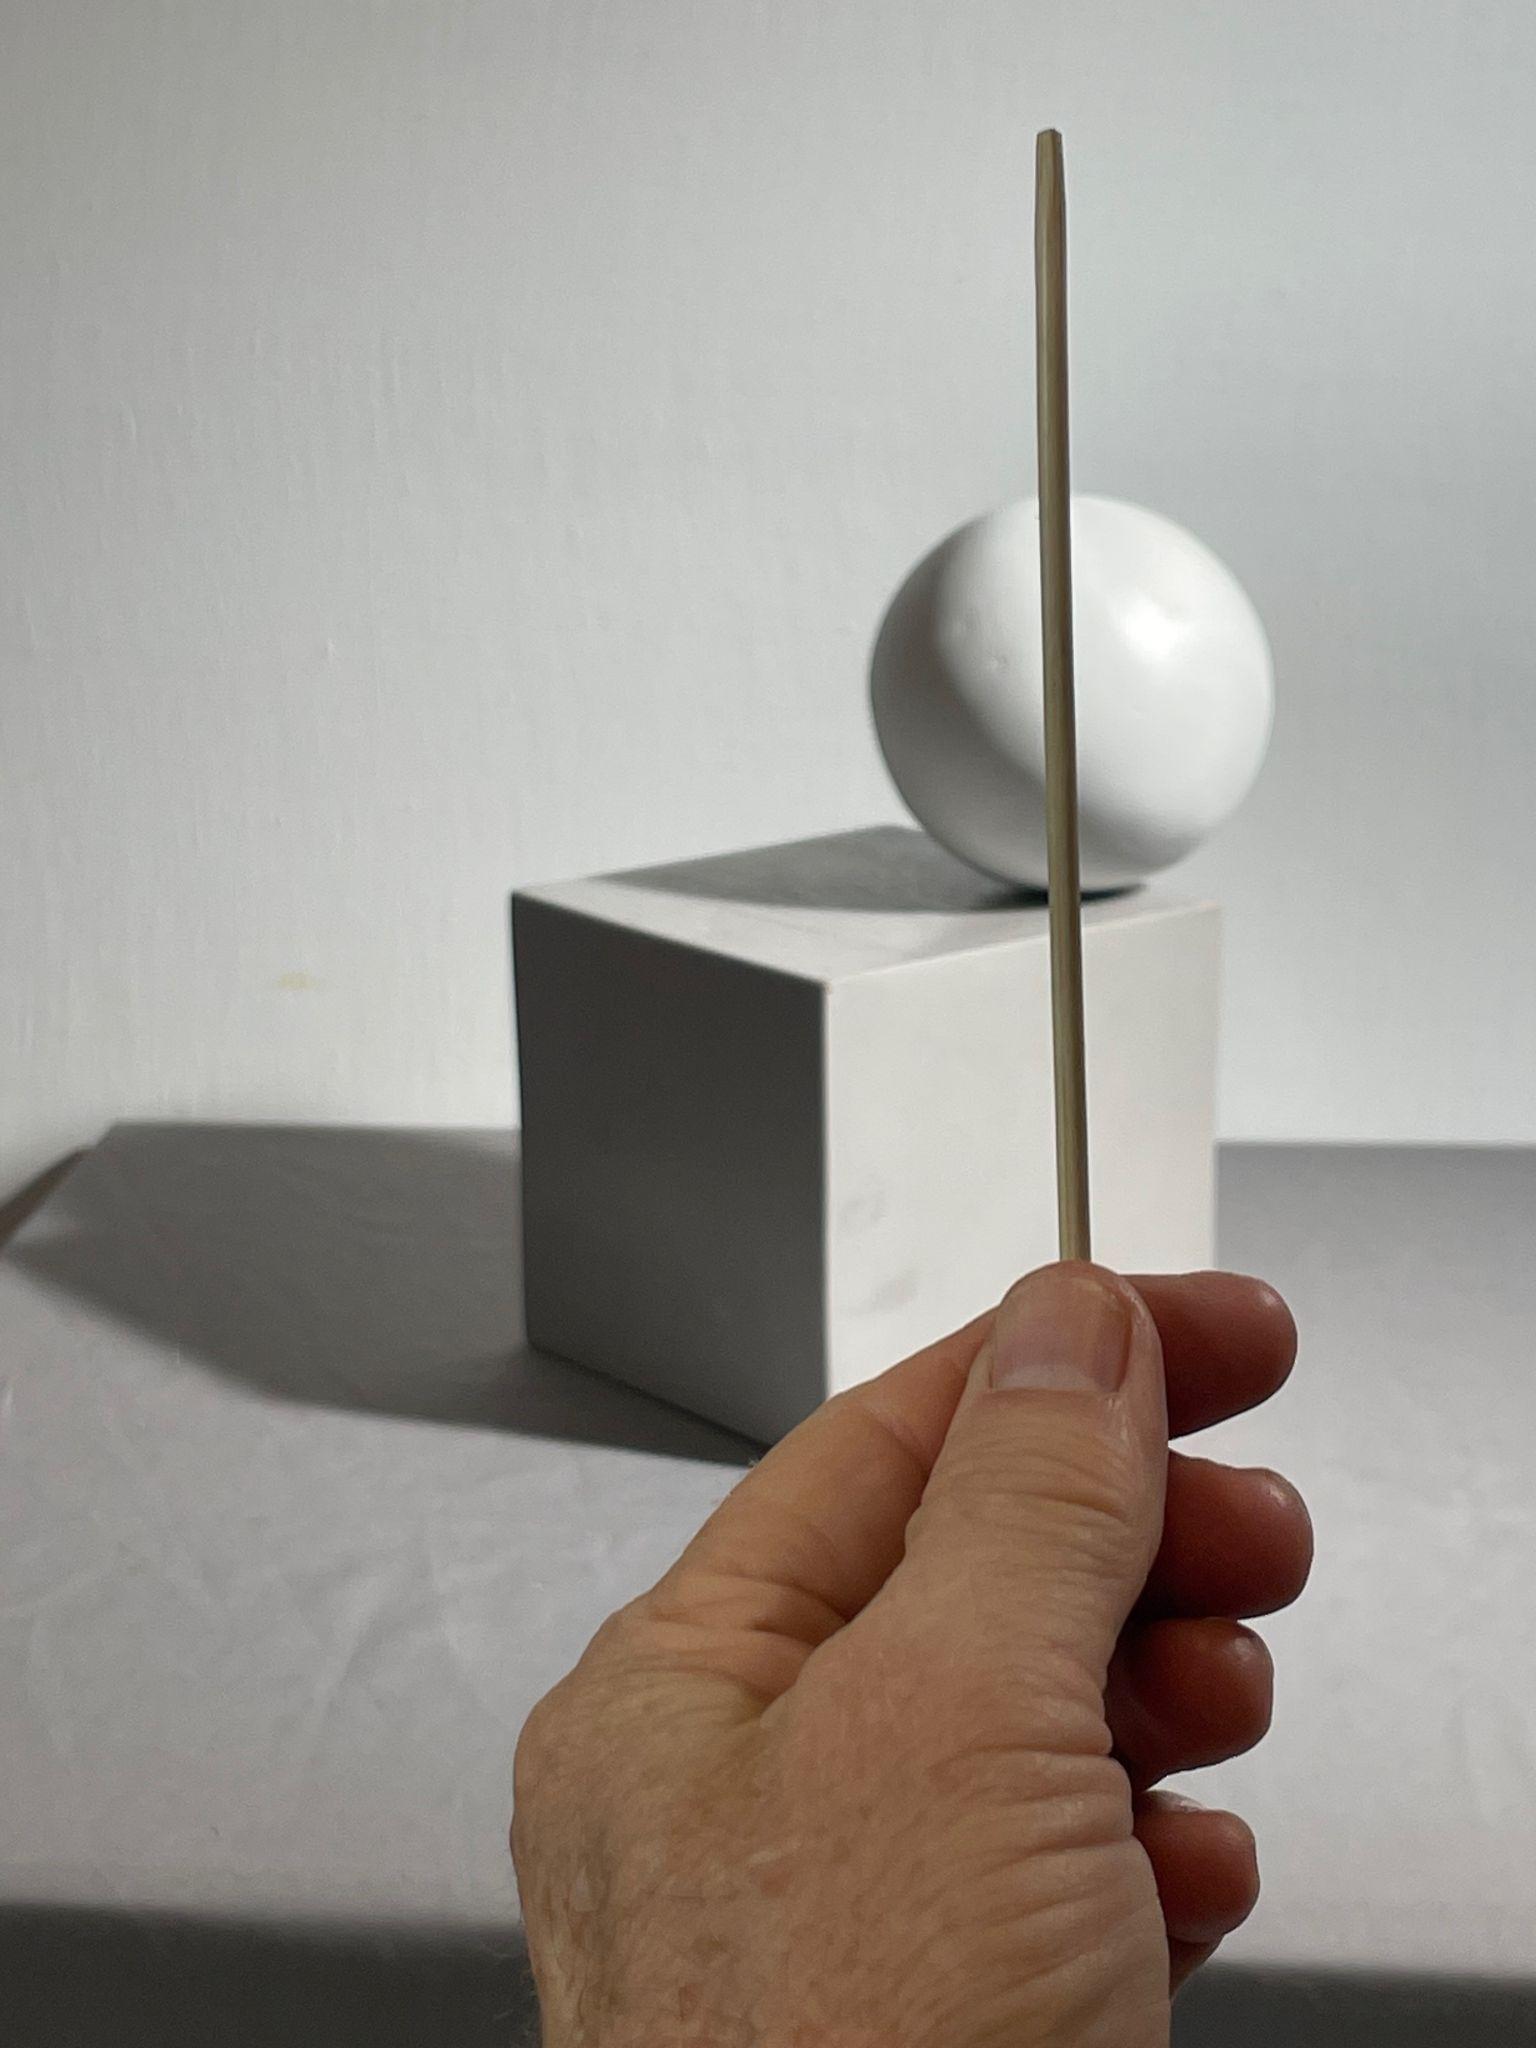
- With your sighting tool, measure its height.
- Compare its height to the height of the box to determine the proportion.
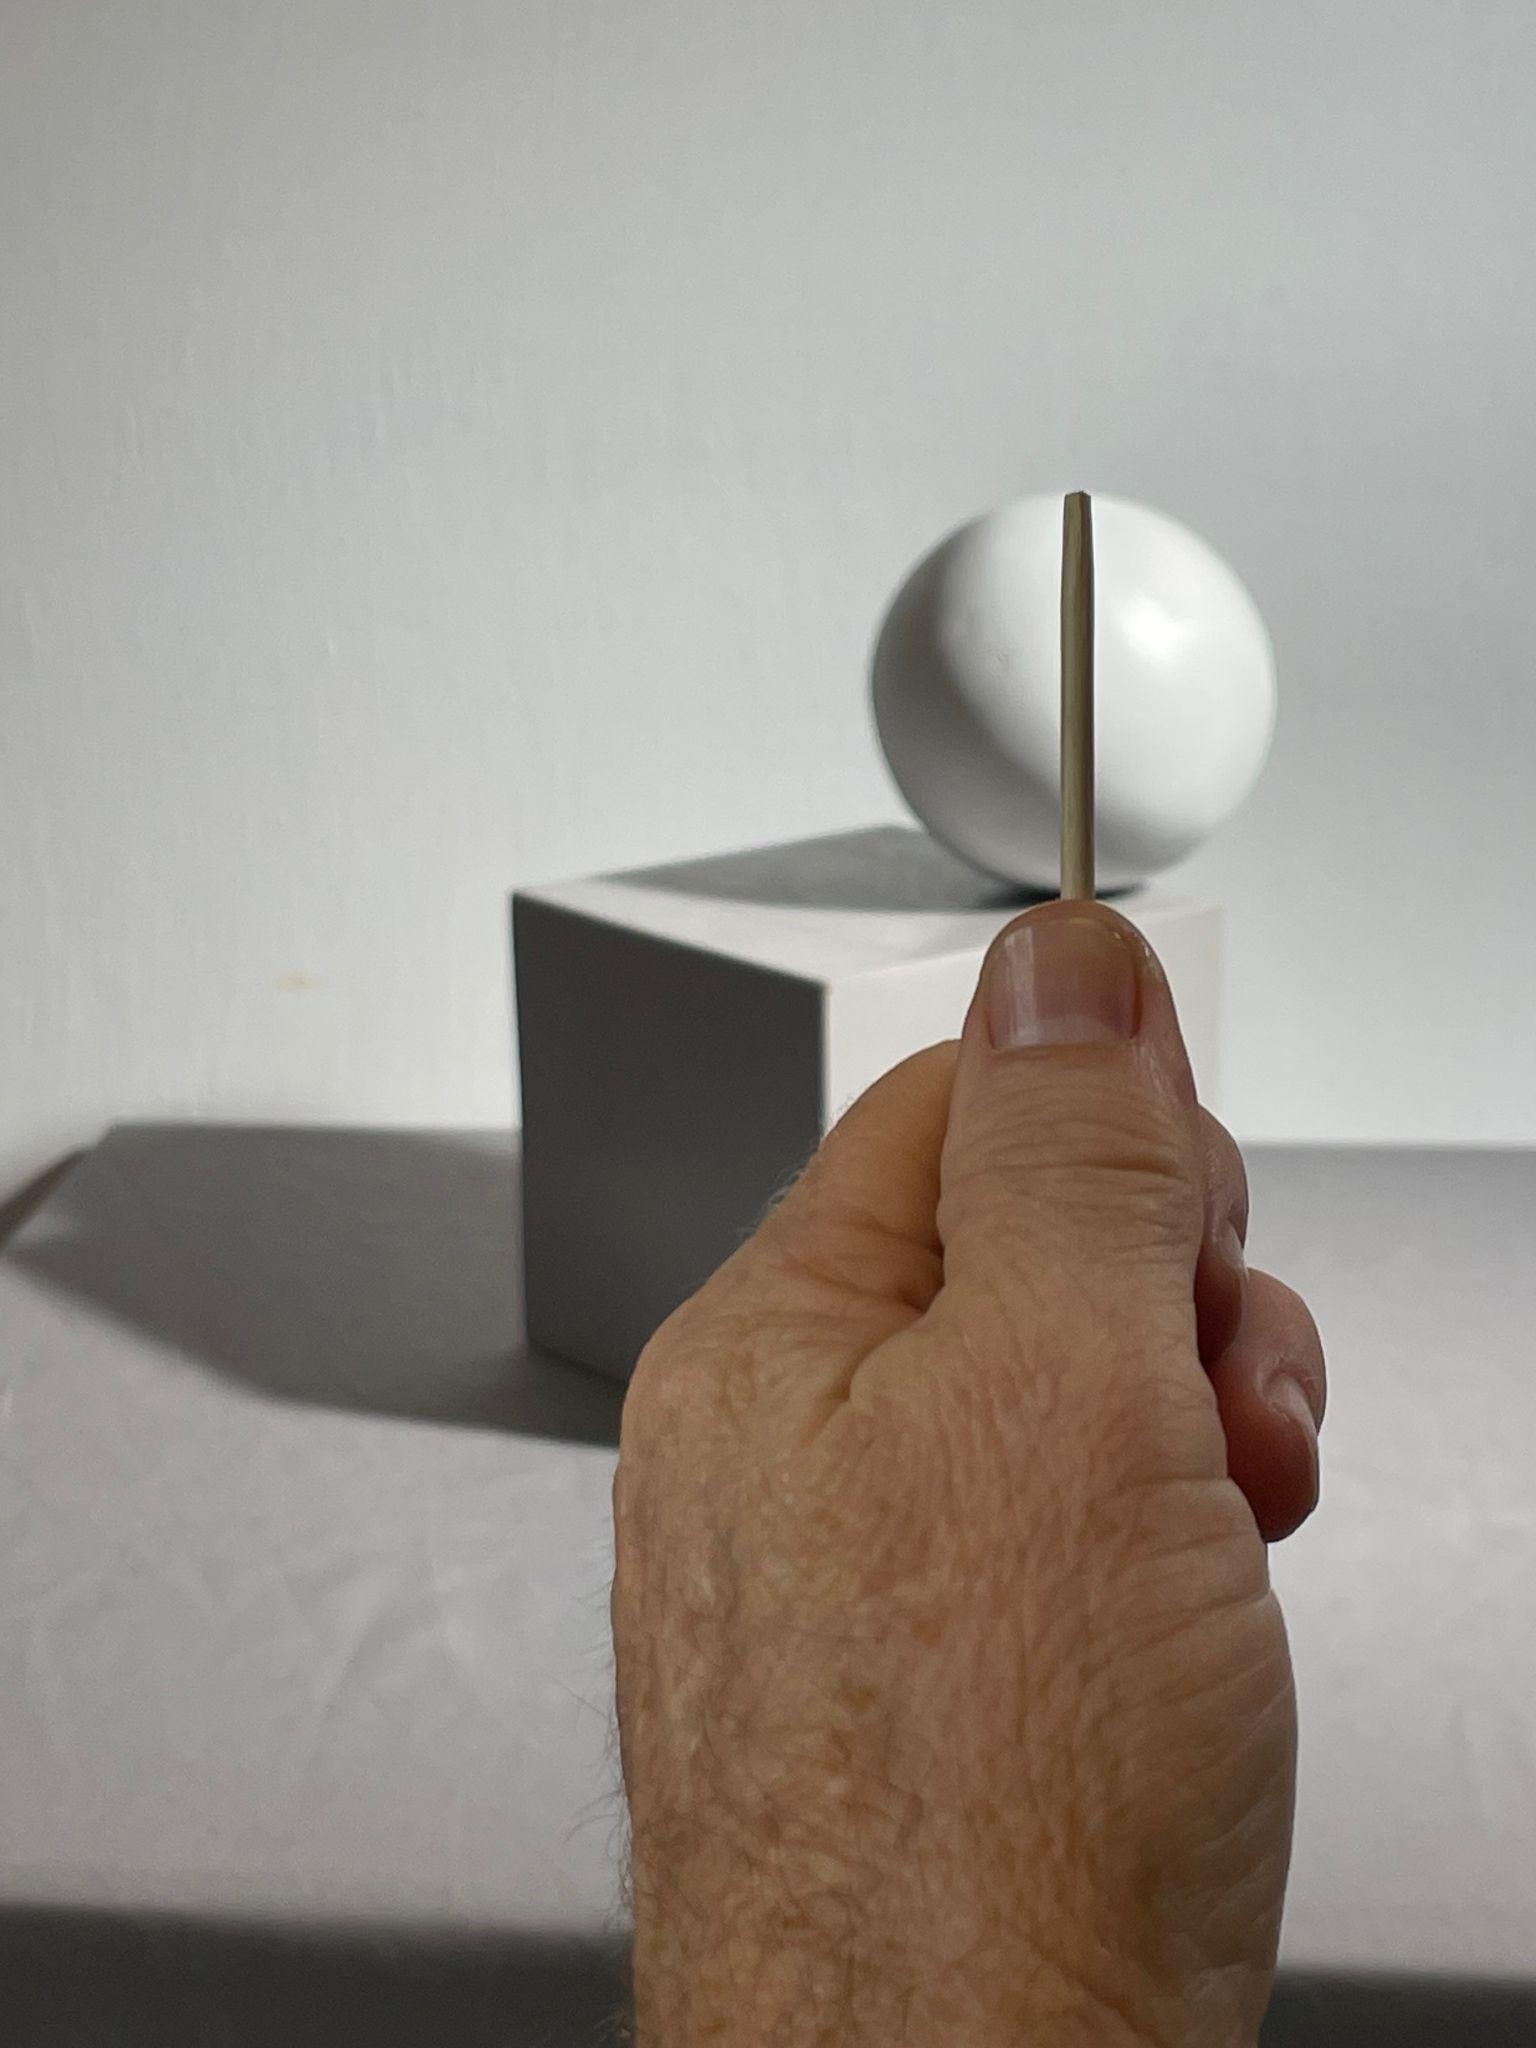
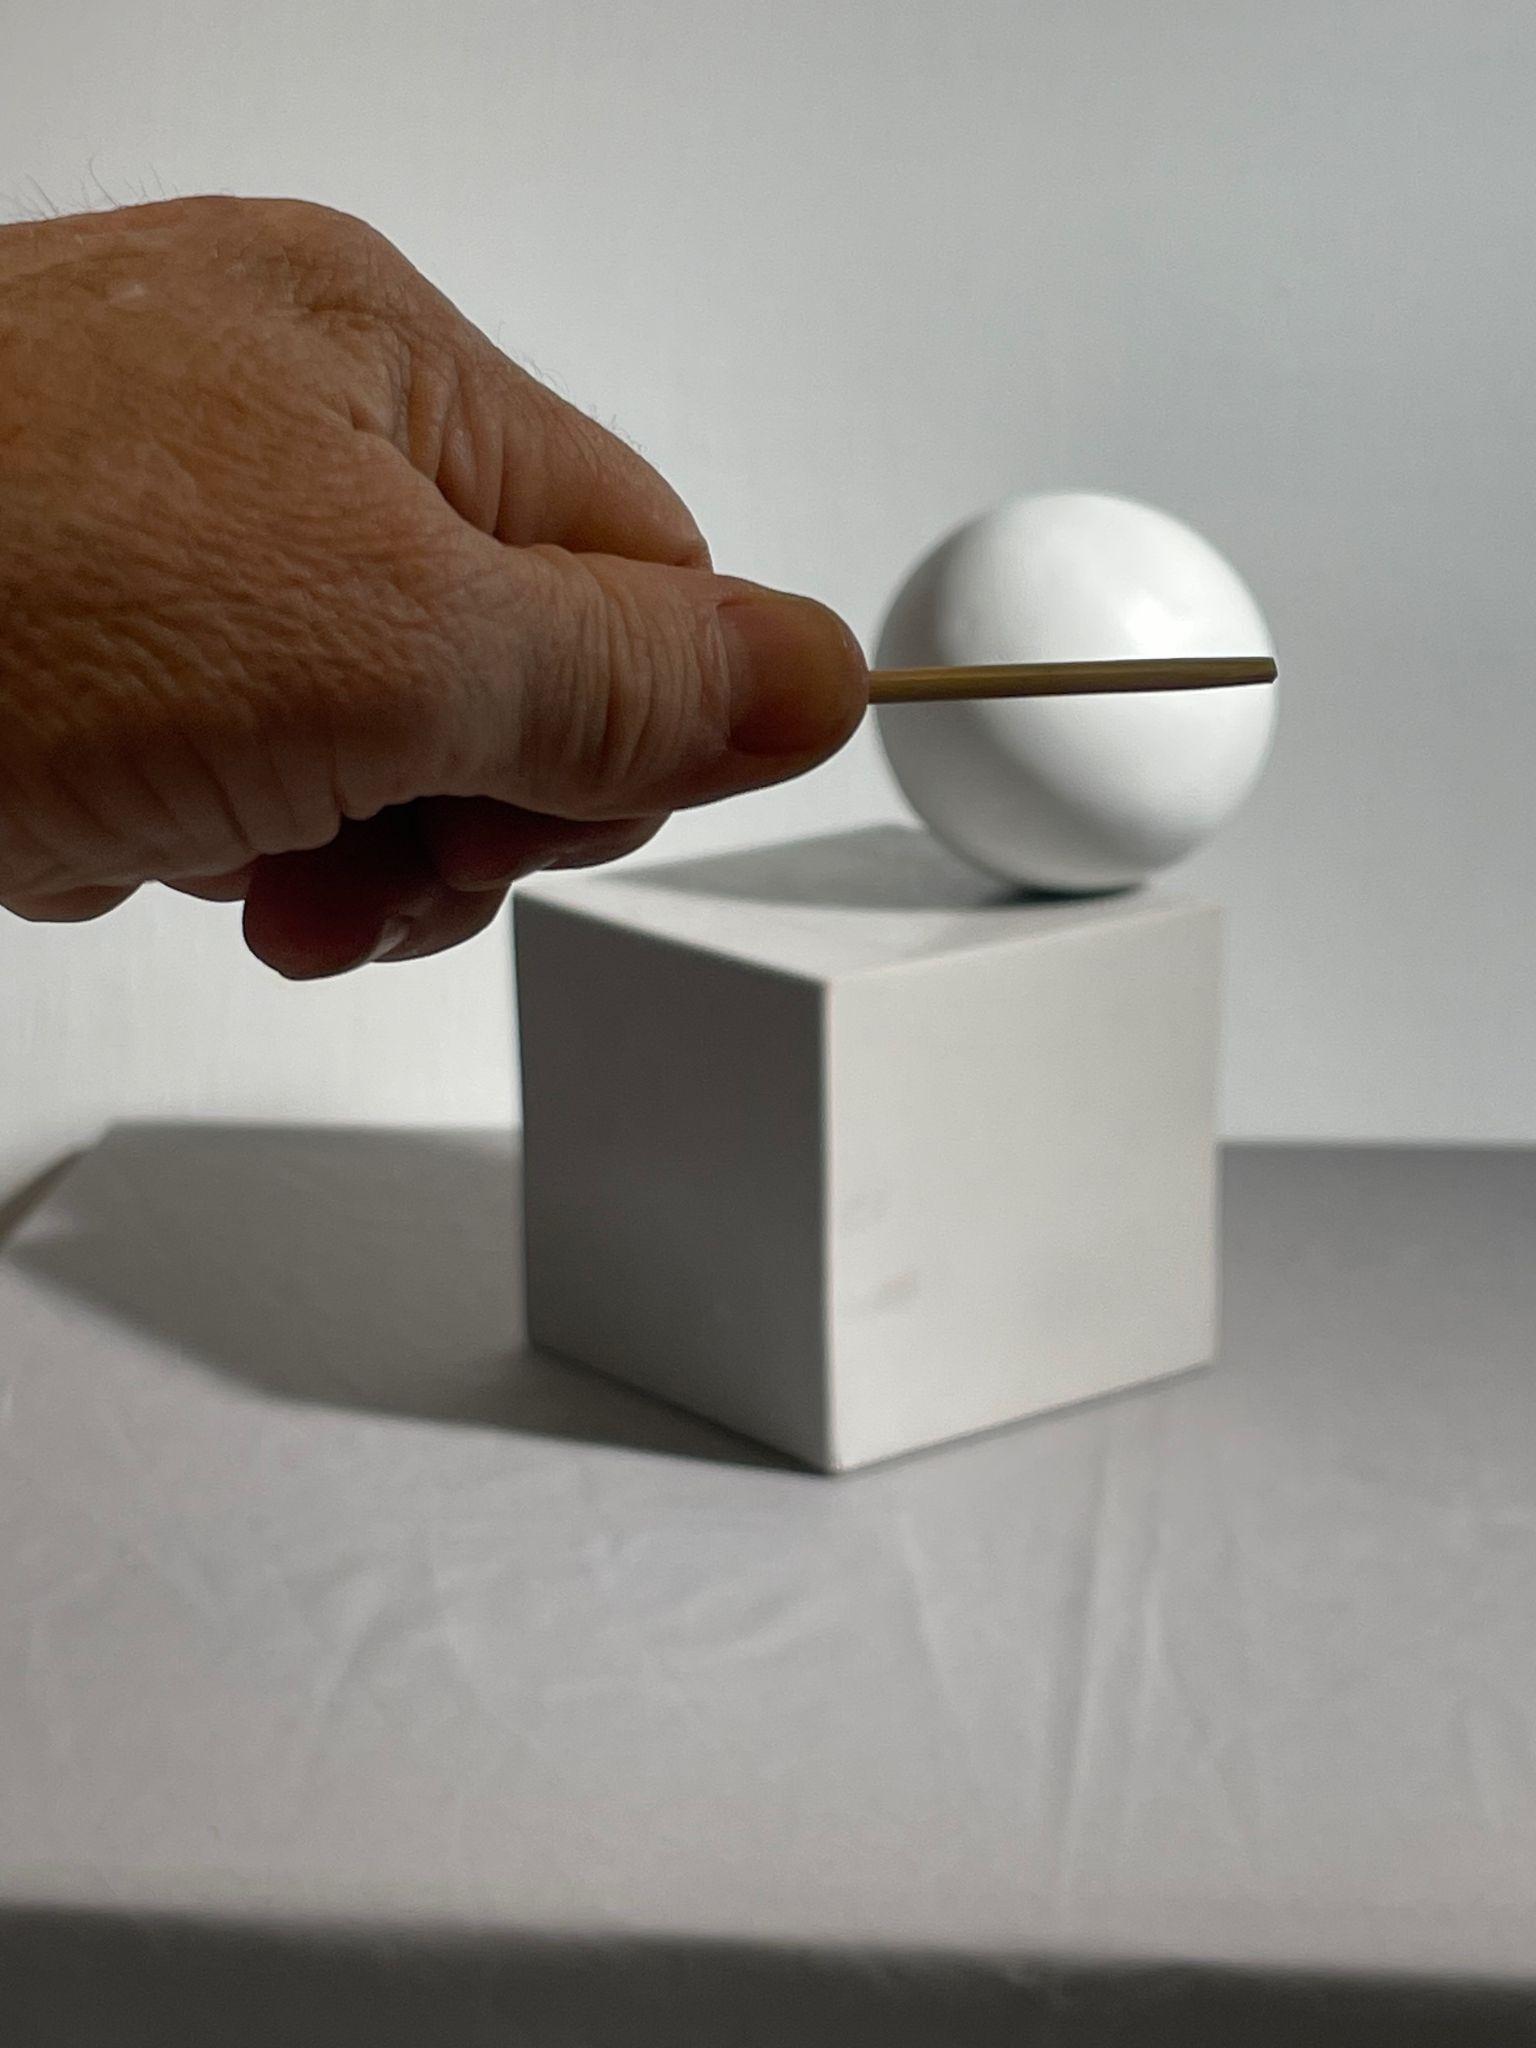
Sight measuring of vertical and horizontal proportion examples, Stephen P. Curry, digital photo, License: CC BY NC 4.0
- Make a mark where it sits on top of the box and a corresponding mark to indicate its overall height.
- Draw a plumb line to indicate the center of the sphere.
- Next, draw an axis line horizontally through the center of the sphere.
- Mark the width, which will be the same as the height. Use the sighting tool to compare and confirm if each side is drawn the same size.
- Within the square you have created based on the sighting measurements and plumb and axis line, draw a circle.
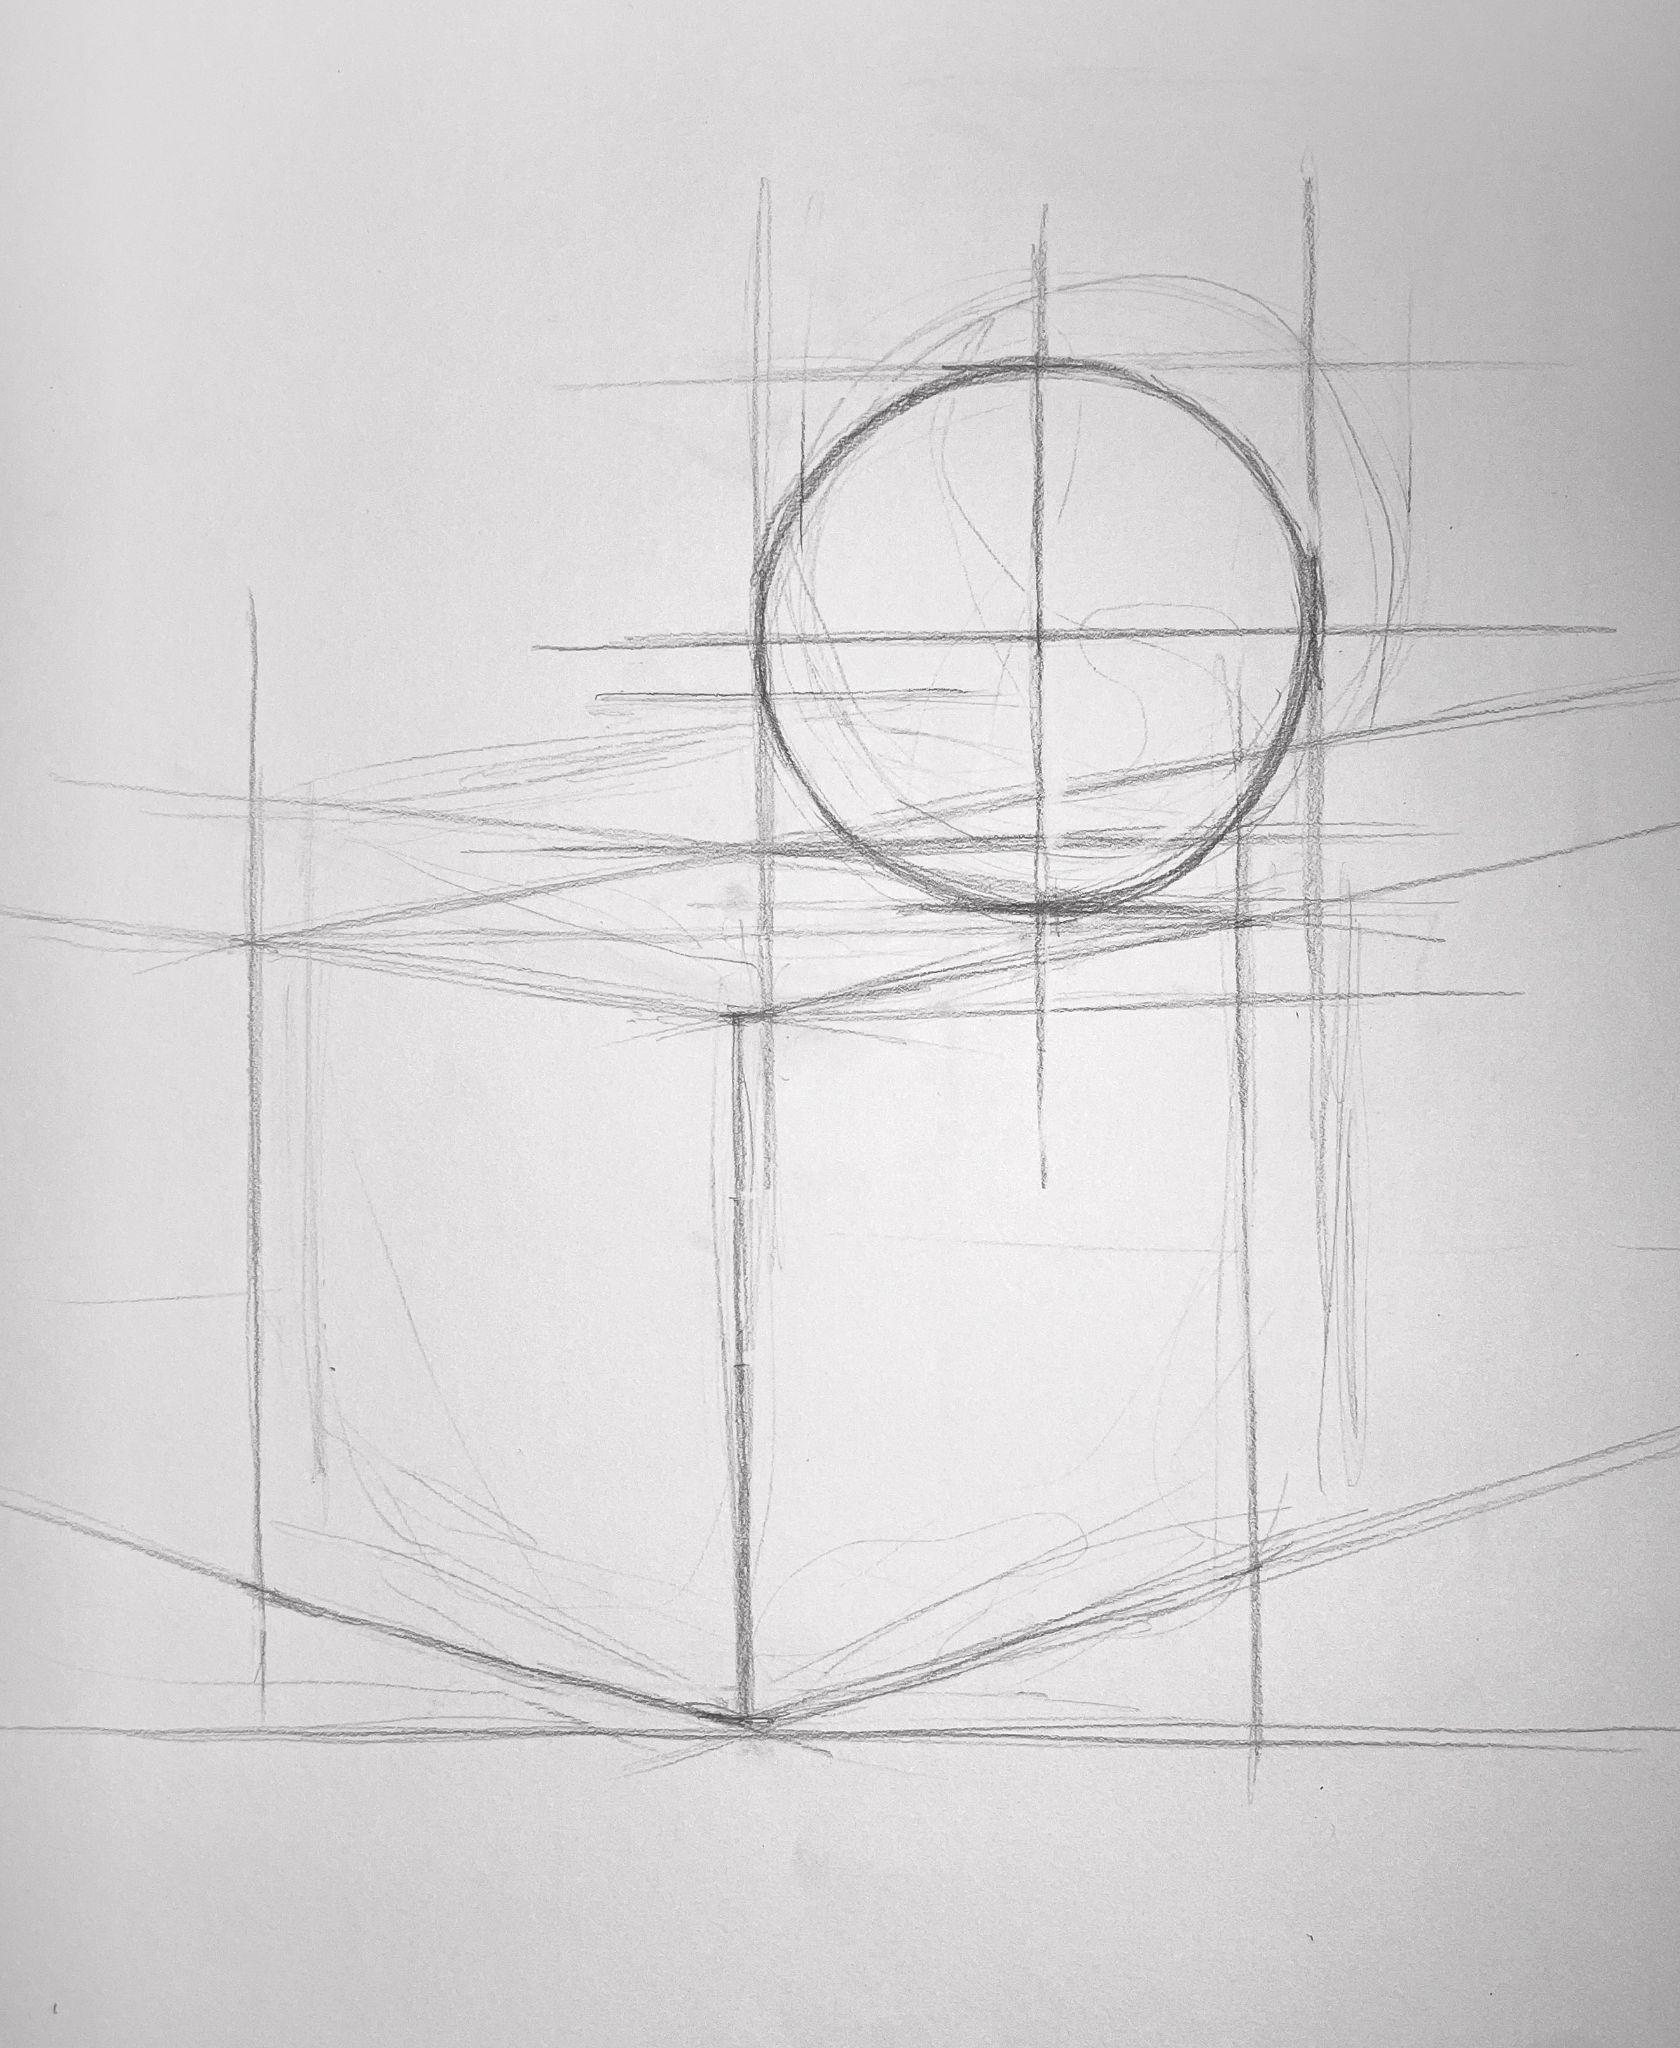
- Step back from your drawing a few feet to see it from a slight distance. Compare it to your reference and make note of what needs to change, is missing, or needs to be refined.
- Make the observed changes.
- As the final step, darken, widen, thin out, and lighten lines as needed with 2B or 4B pencils and your erasers to finish the drawing. Continually refer to the reference for guidance on where to apply or remove emphasis.
- Use a ruler if you need to clean up straight lines.
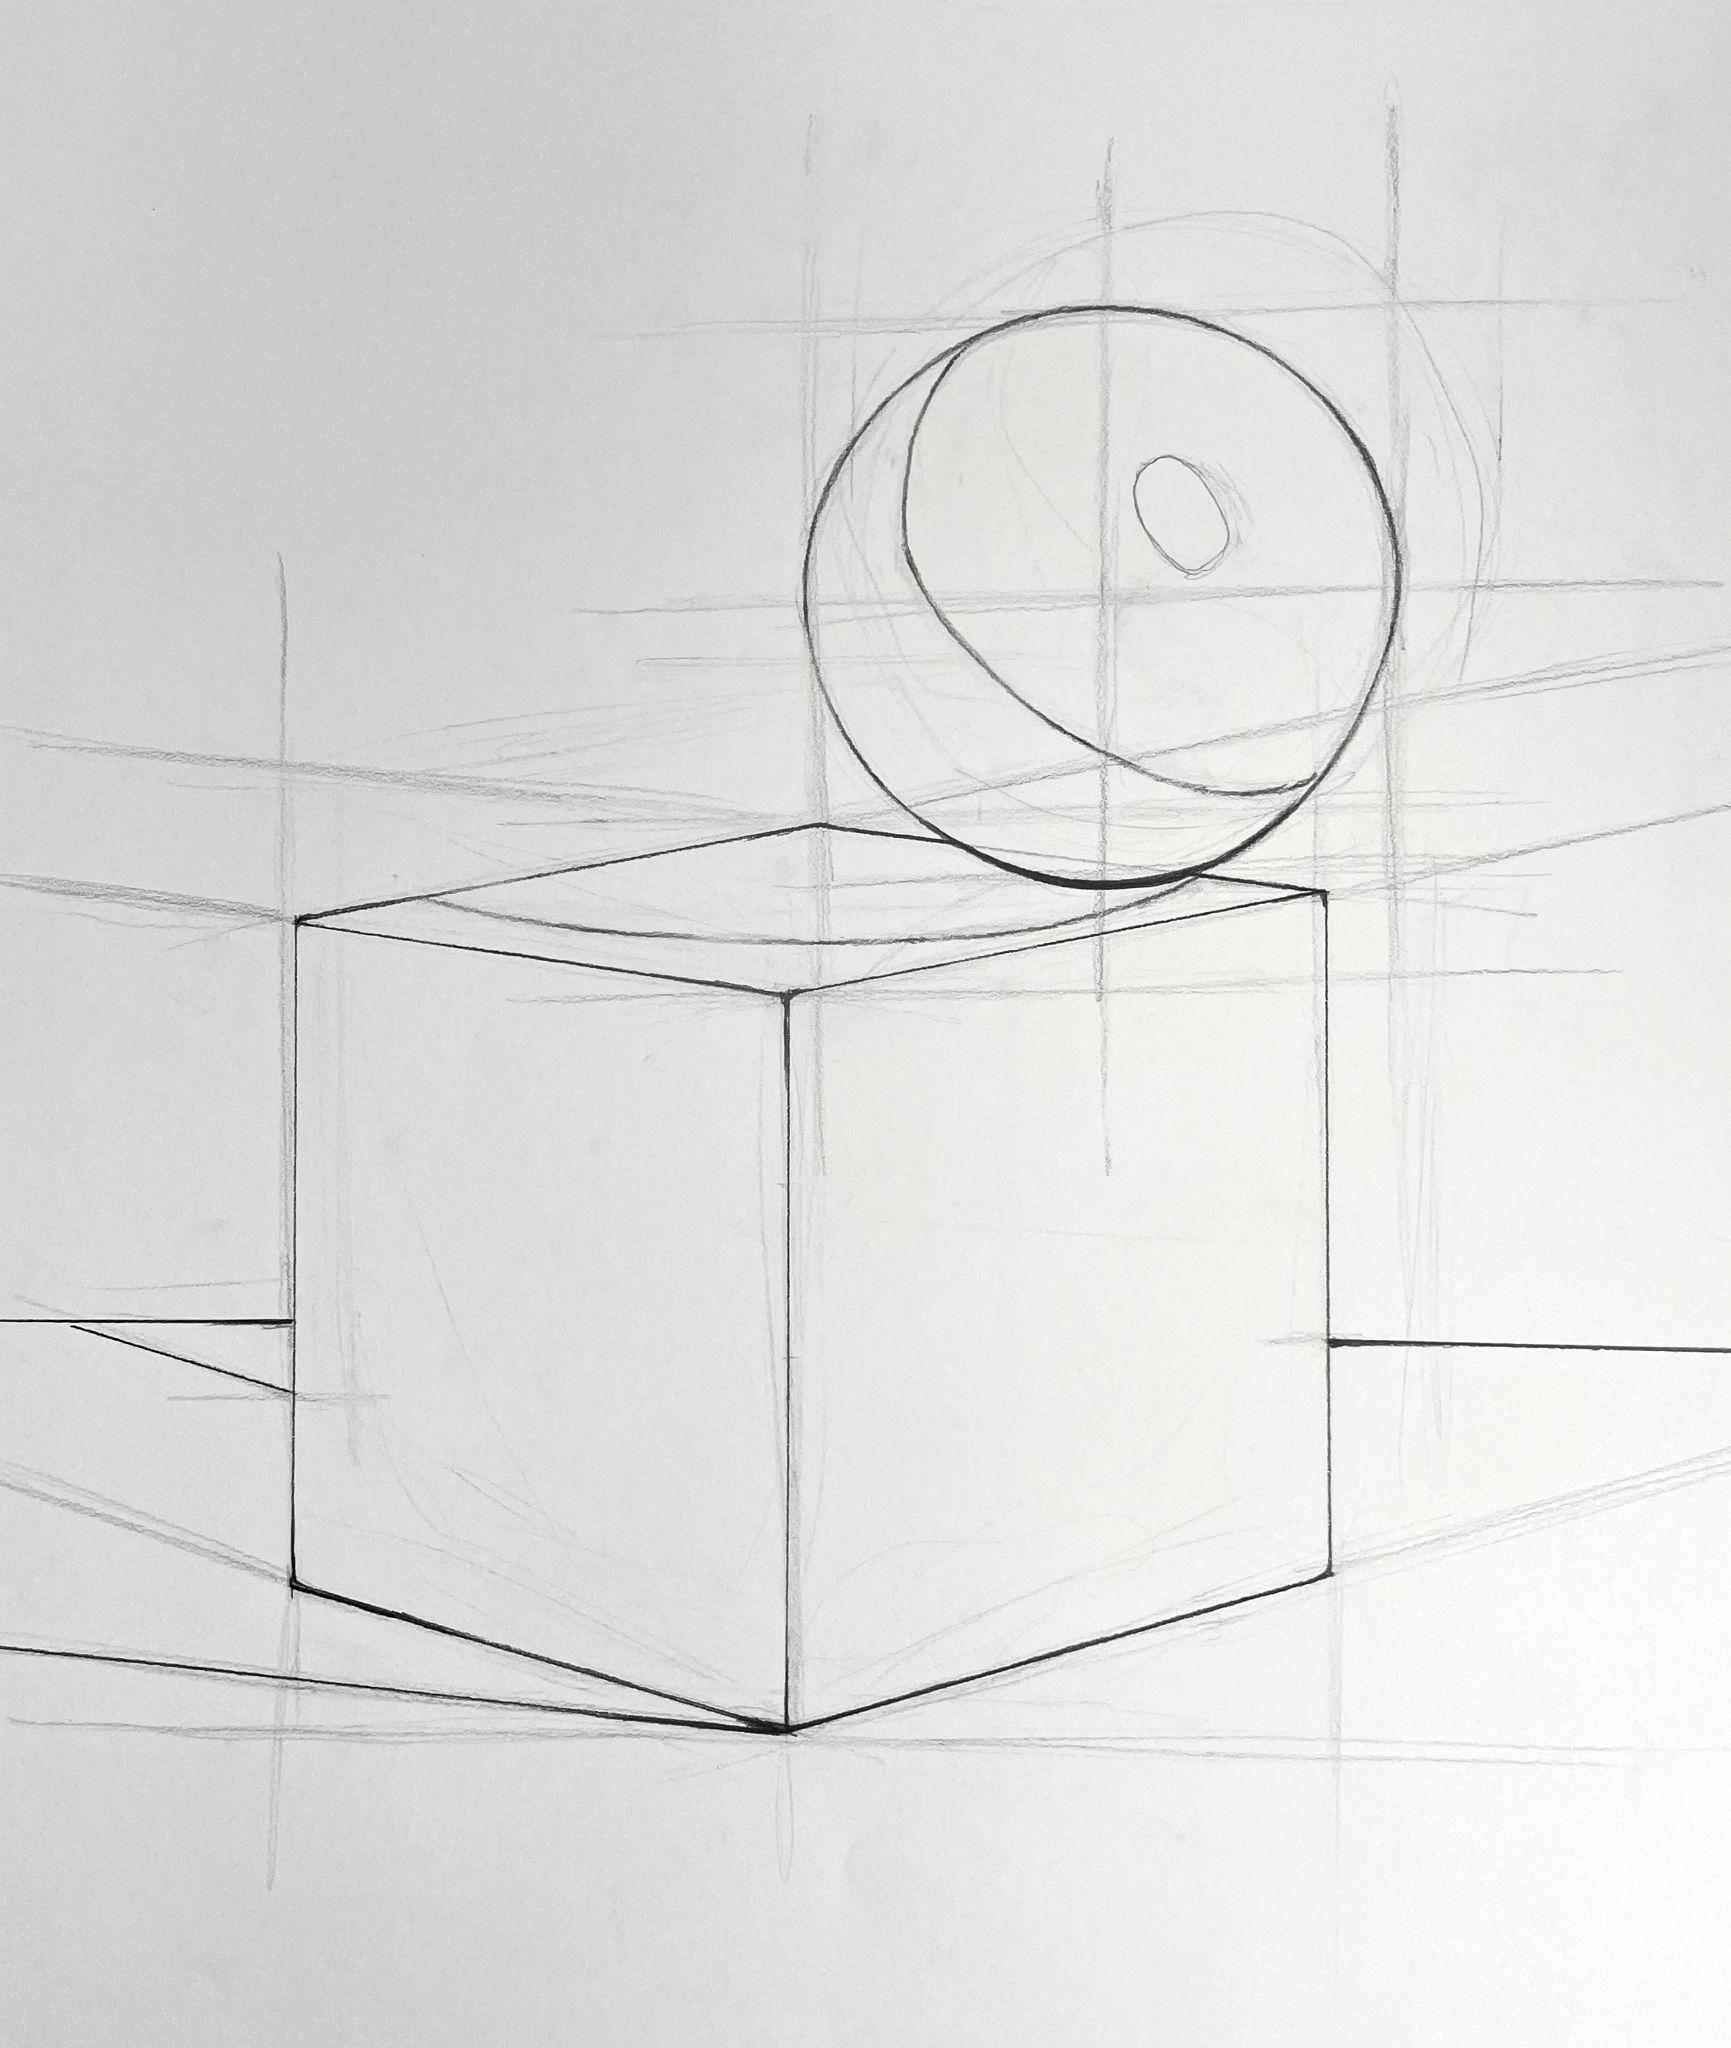
Results
The results will be a direct- observation drawing with graphite pencil of two basic geometric objects. It will show an understanding of sighting and the use of organizational, plumb, and axis line in an accurate display of basic shapes drawn in perspective.
2. Geometric Object Still Life Project
Description
This is an intermediate observation drawing activity. Create a contour line drawing of a composed arrangement of a basic geometric objects still life. Use the sighting techniques and tools explained in the chapter and apply all necessary observational, plumb, and axis lines. This is a linear drawing with no shading or value modeling. However, sight and show as much detail as possible, including the shapes of cast shadows, highlights, and any other details. Do not erase sighting, observational, or plumb lines.
Activity Parameters
Duration
3 – 6 hours
Size
18” x 24”
Subject
A composed arrangement of 5 to 7 simple geometric objects such as cubes, cylinders, spheres, and cones. Examples: cardboard boxes of different sizes, a ball, a coffee or soup can, a paper towel roll, and a cone shape, such as a funnel.
Applied Techniques
Direct observational drawing in graphite pencil. Show accurate proportionality and the use of sighting, organizational line, plumb, and axis line. Use of a viewfinder and a sighting tool.
Required Materials
- One sheet of 18×24” paper
- Drawing Board
- Ruler
- Sighting Tool
- Graphite Pencils – 2H, HB, 2B, 4B
- Rubber Eraser
- Kneaded Eraser
- Mono Zero Eraser
- Pencil Sharpener
- Viewfinder
- Sighting tool
Student Learning Outcomes (SLOs)
Use graphite pencil to create an accurate and proportional line drawing observationally using sighting, organizational, plumb, and axis lines. Include details of shadow, highlight, and cast shadows with line work only. Do not erase any preparatory lines, such as sighting, organizational, and plumb lines.
Method
Still-Life Setup
- Gather a selection of simple geometric objects that vary in size.
- Building Materials
- Backdrop – paper or fabric
- Tabletop or Platform for still-life arrangement
- Plain fabric or paper for the tabletop.
- Object Categories – at least 1 of each
- Box or cube
- Cylinder such as a coffee can or paper towel roll
- Sphere – ball, etc.
- Cone such as a funnel
- Lighting
- A simple single light source is best for strong, distinct cast-shadow and highlight shapes, but it’s not required. (You will not use value in this drawing to describe shadows or highlights, but a good light source will aid in composition and details)
- Building Materials
- Still-Life Setup
- Arrange the objects in an interesting and balanced composition. Consider the foreground, middle-ground, and background.
- Try placing objects to create overlap, with some closer and others farther away.
- Try stacking some forms on top of others to create interesting composition and space.
- Make interesting use of both negative and positive space.
- Form connections that lead the eye around the composition.
- Arrange the objects in an interesting and balanced composition. Consider the foreground, middle-ground, and background.
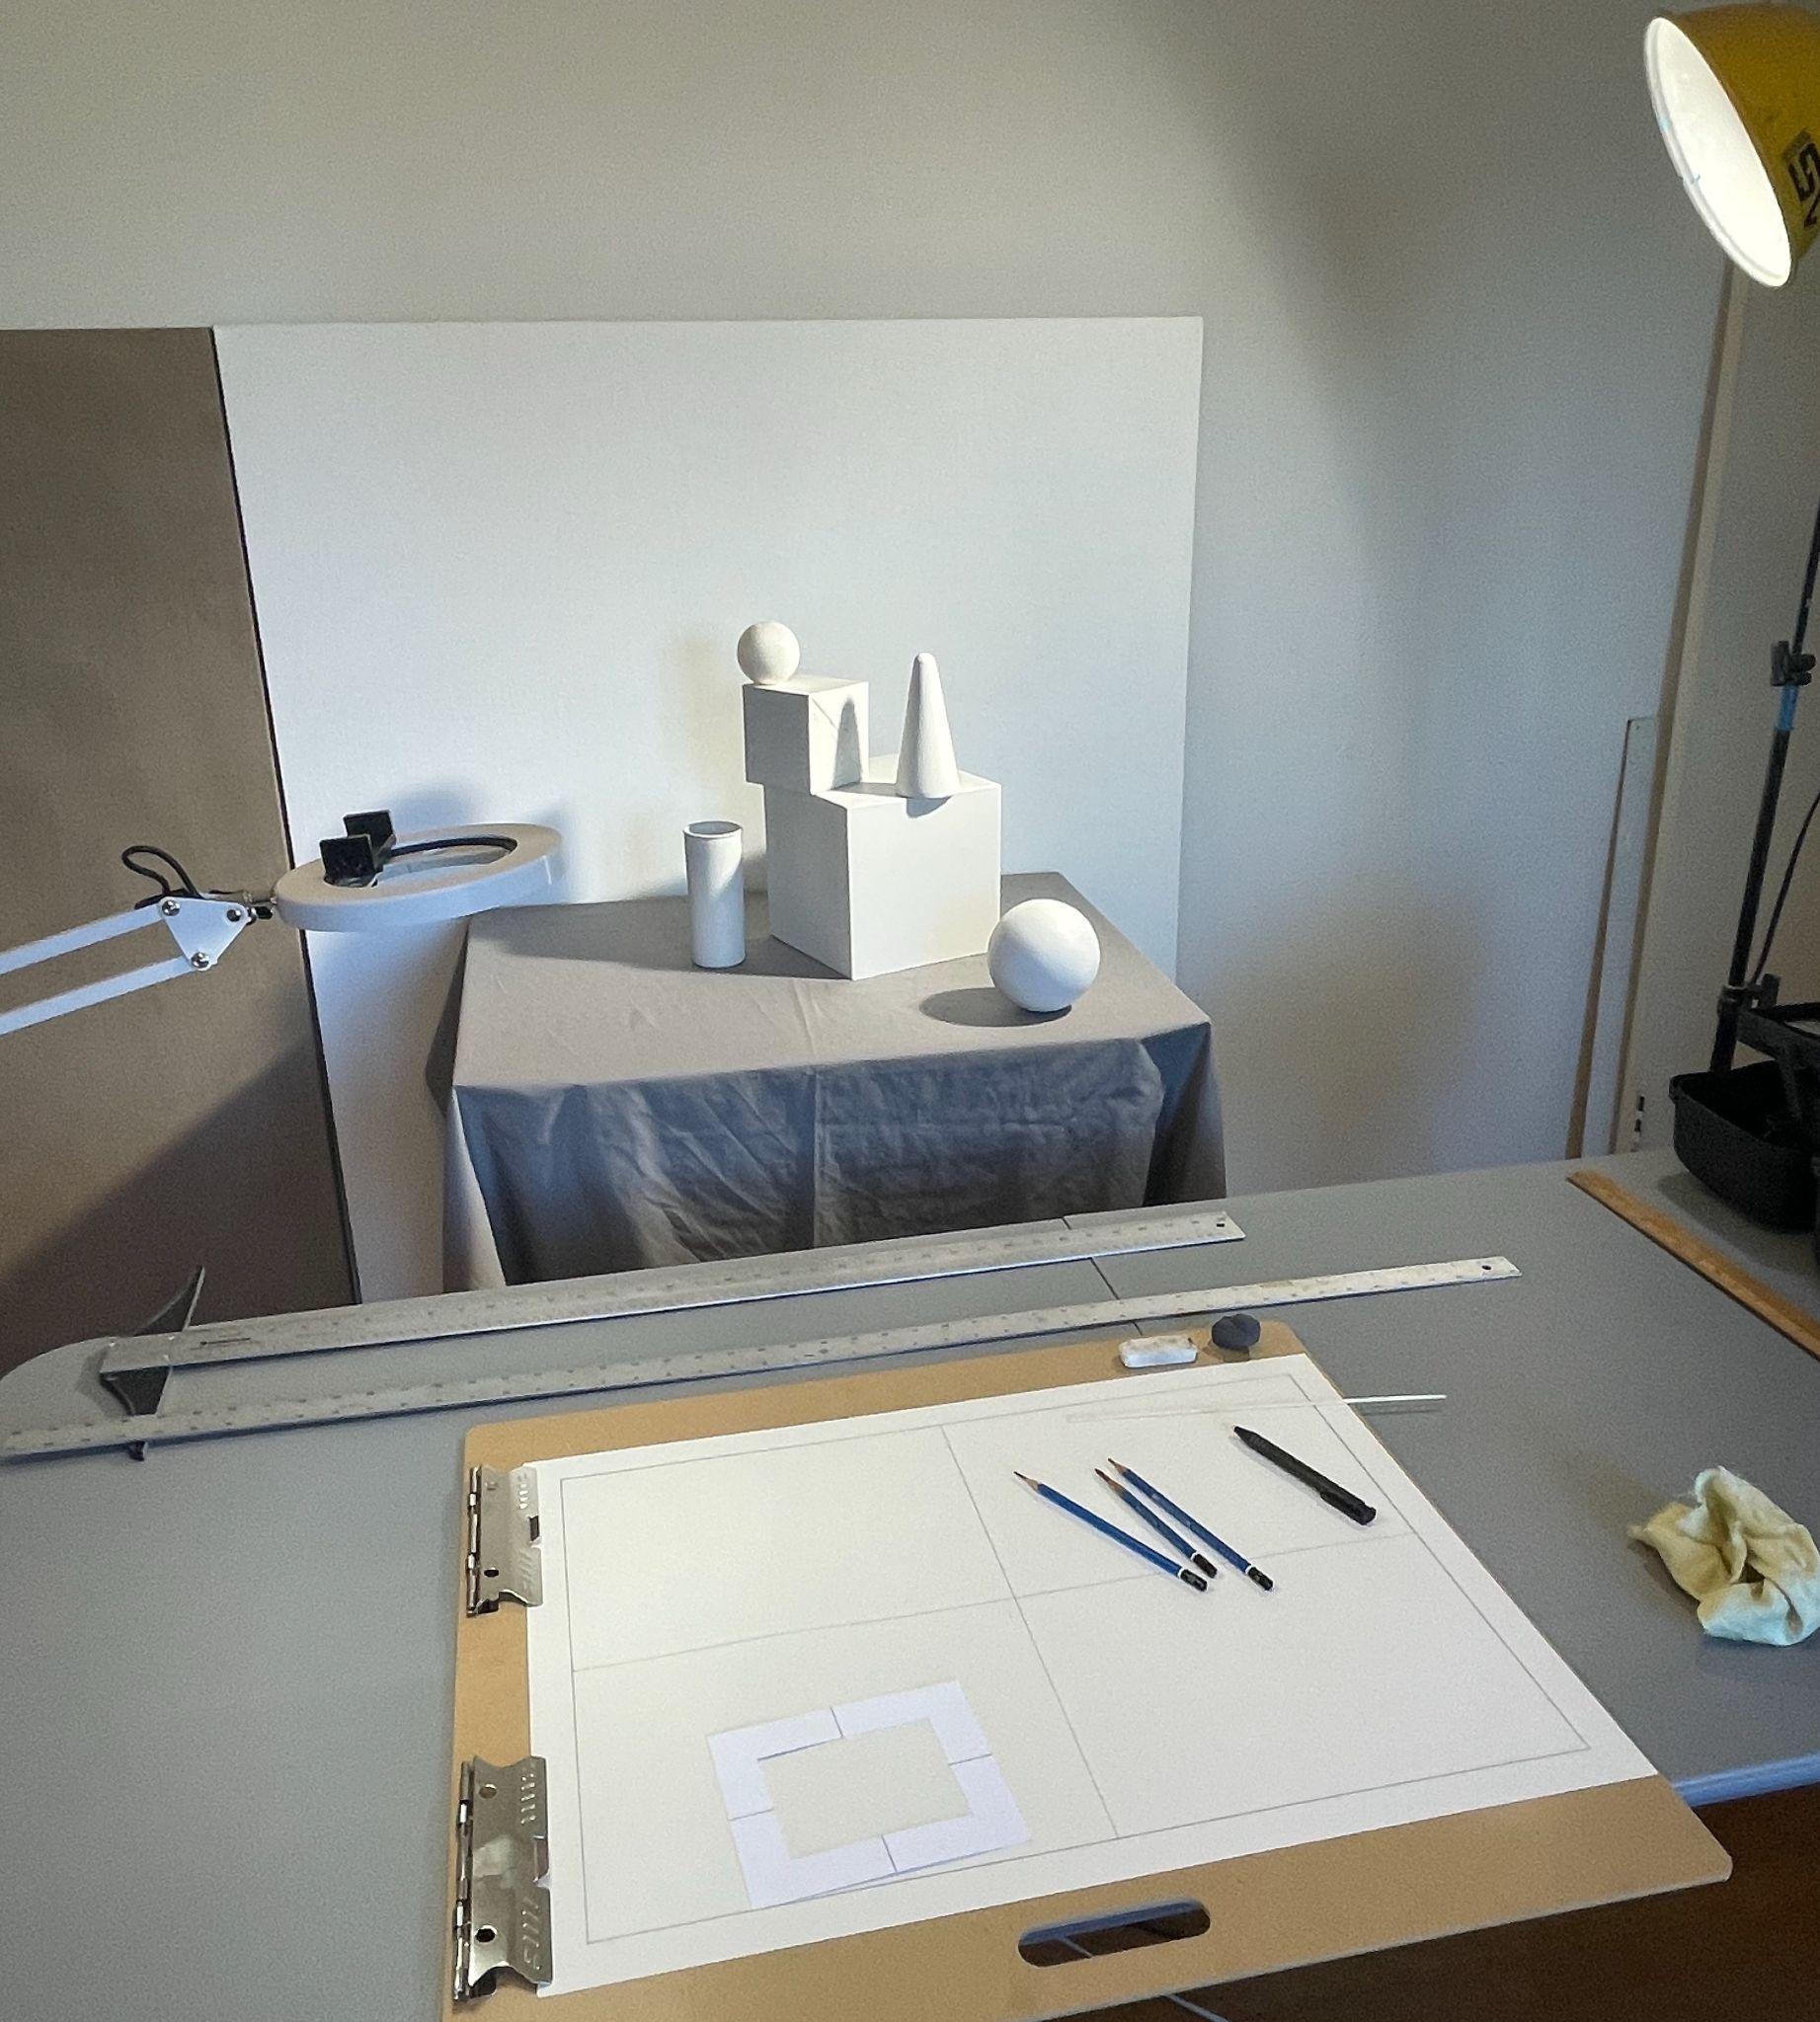
- Drawing paper preparation
- On 18” x 24” drawing paper, use a ruler to measure in 1” and draw a frame around the edge of the sheet to make a 16” x 22” picture plane.
- Draw crosshairs by dividing your paper into quarters with a very light line using your straight-edge ruler and 2H or HB pencil.
- Drawing Process
- Using the viewfinder, spend time looking through it to visually compose the arrangement of objects. Consider whether the drawing should be a vertical or horizontal orientation. (Example images of these terms below.) Try to memorize the placement of key shapes in relation to the edges of the viewfinder to help you find the composition repeatedly as you observe through the viewfinder.
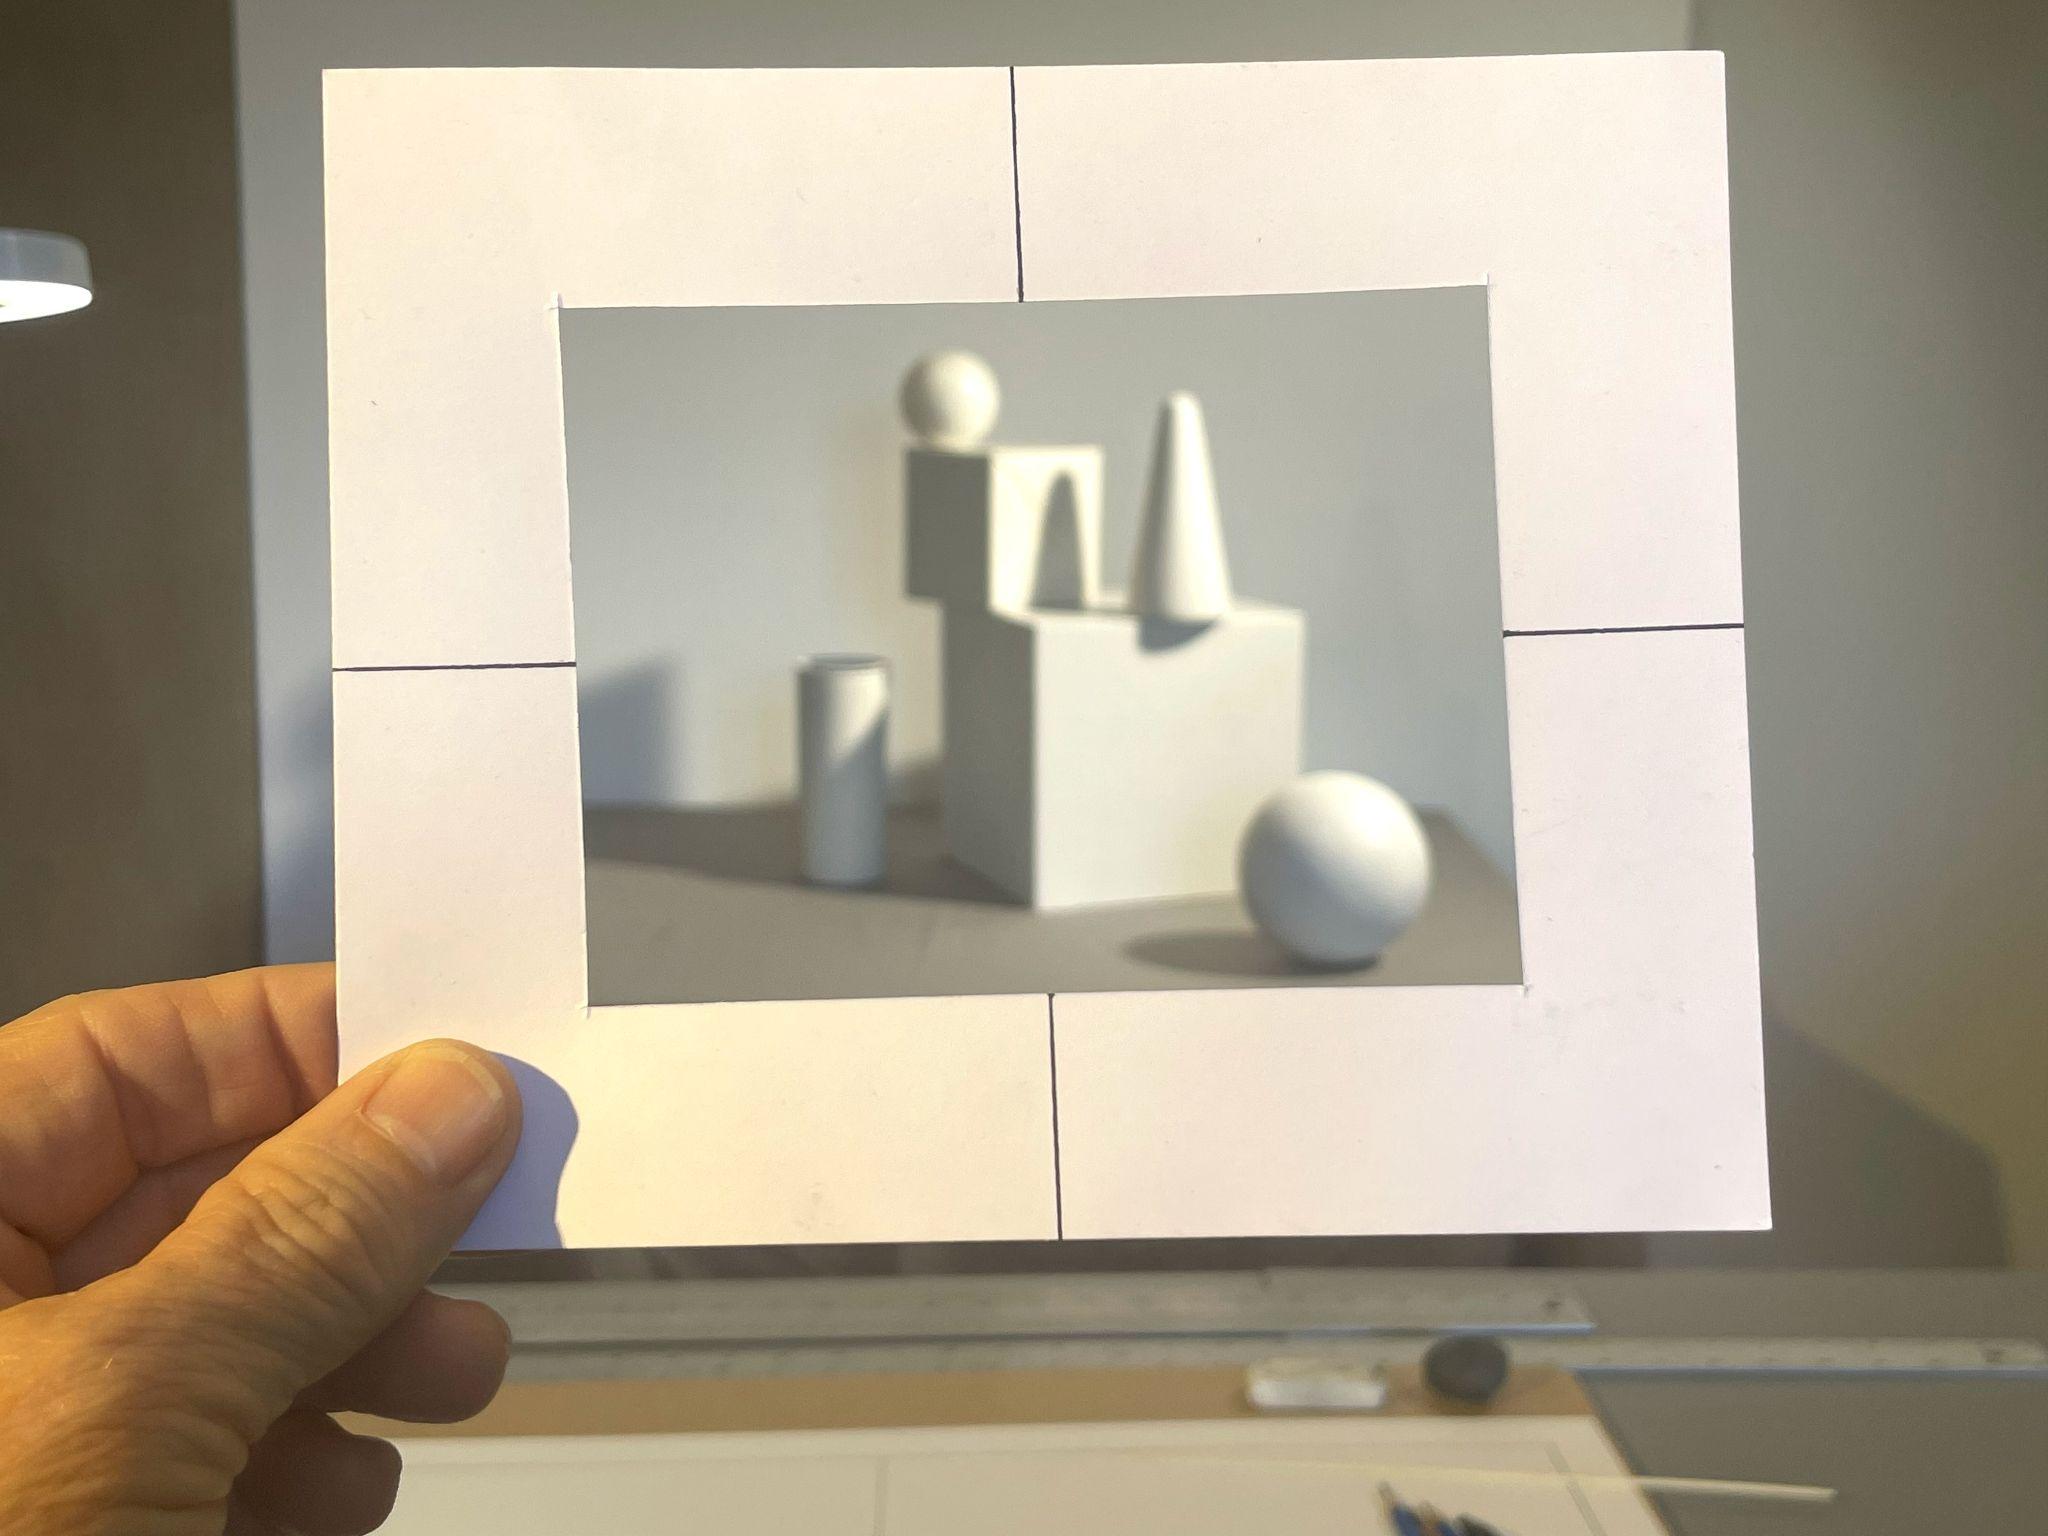
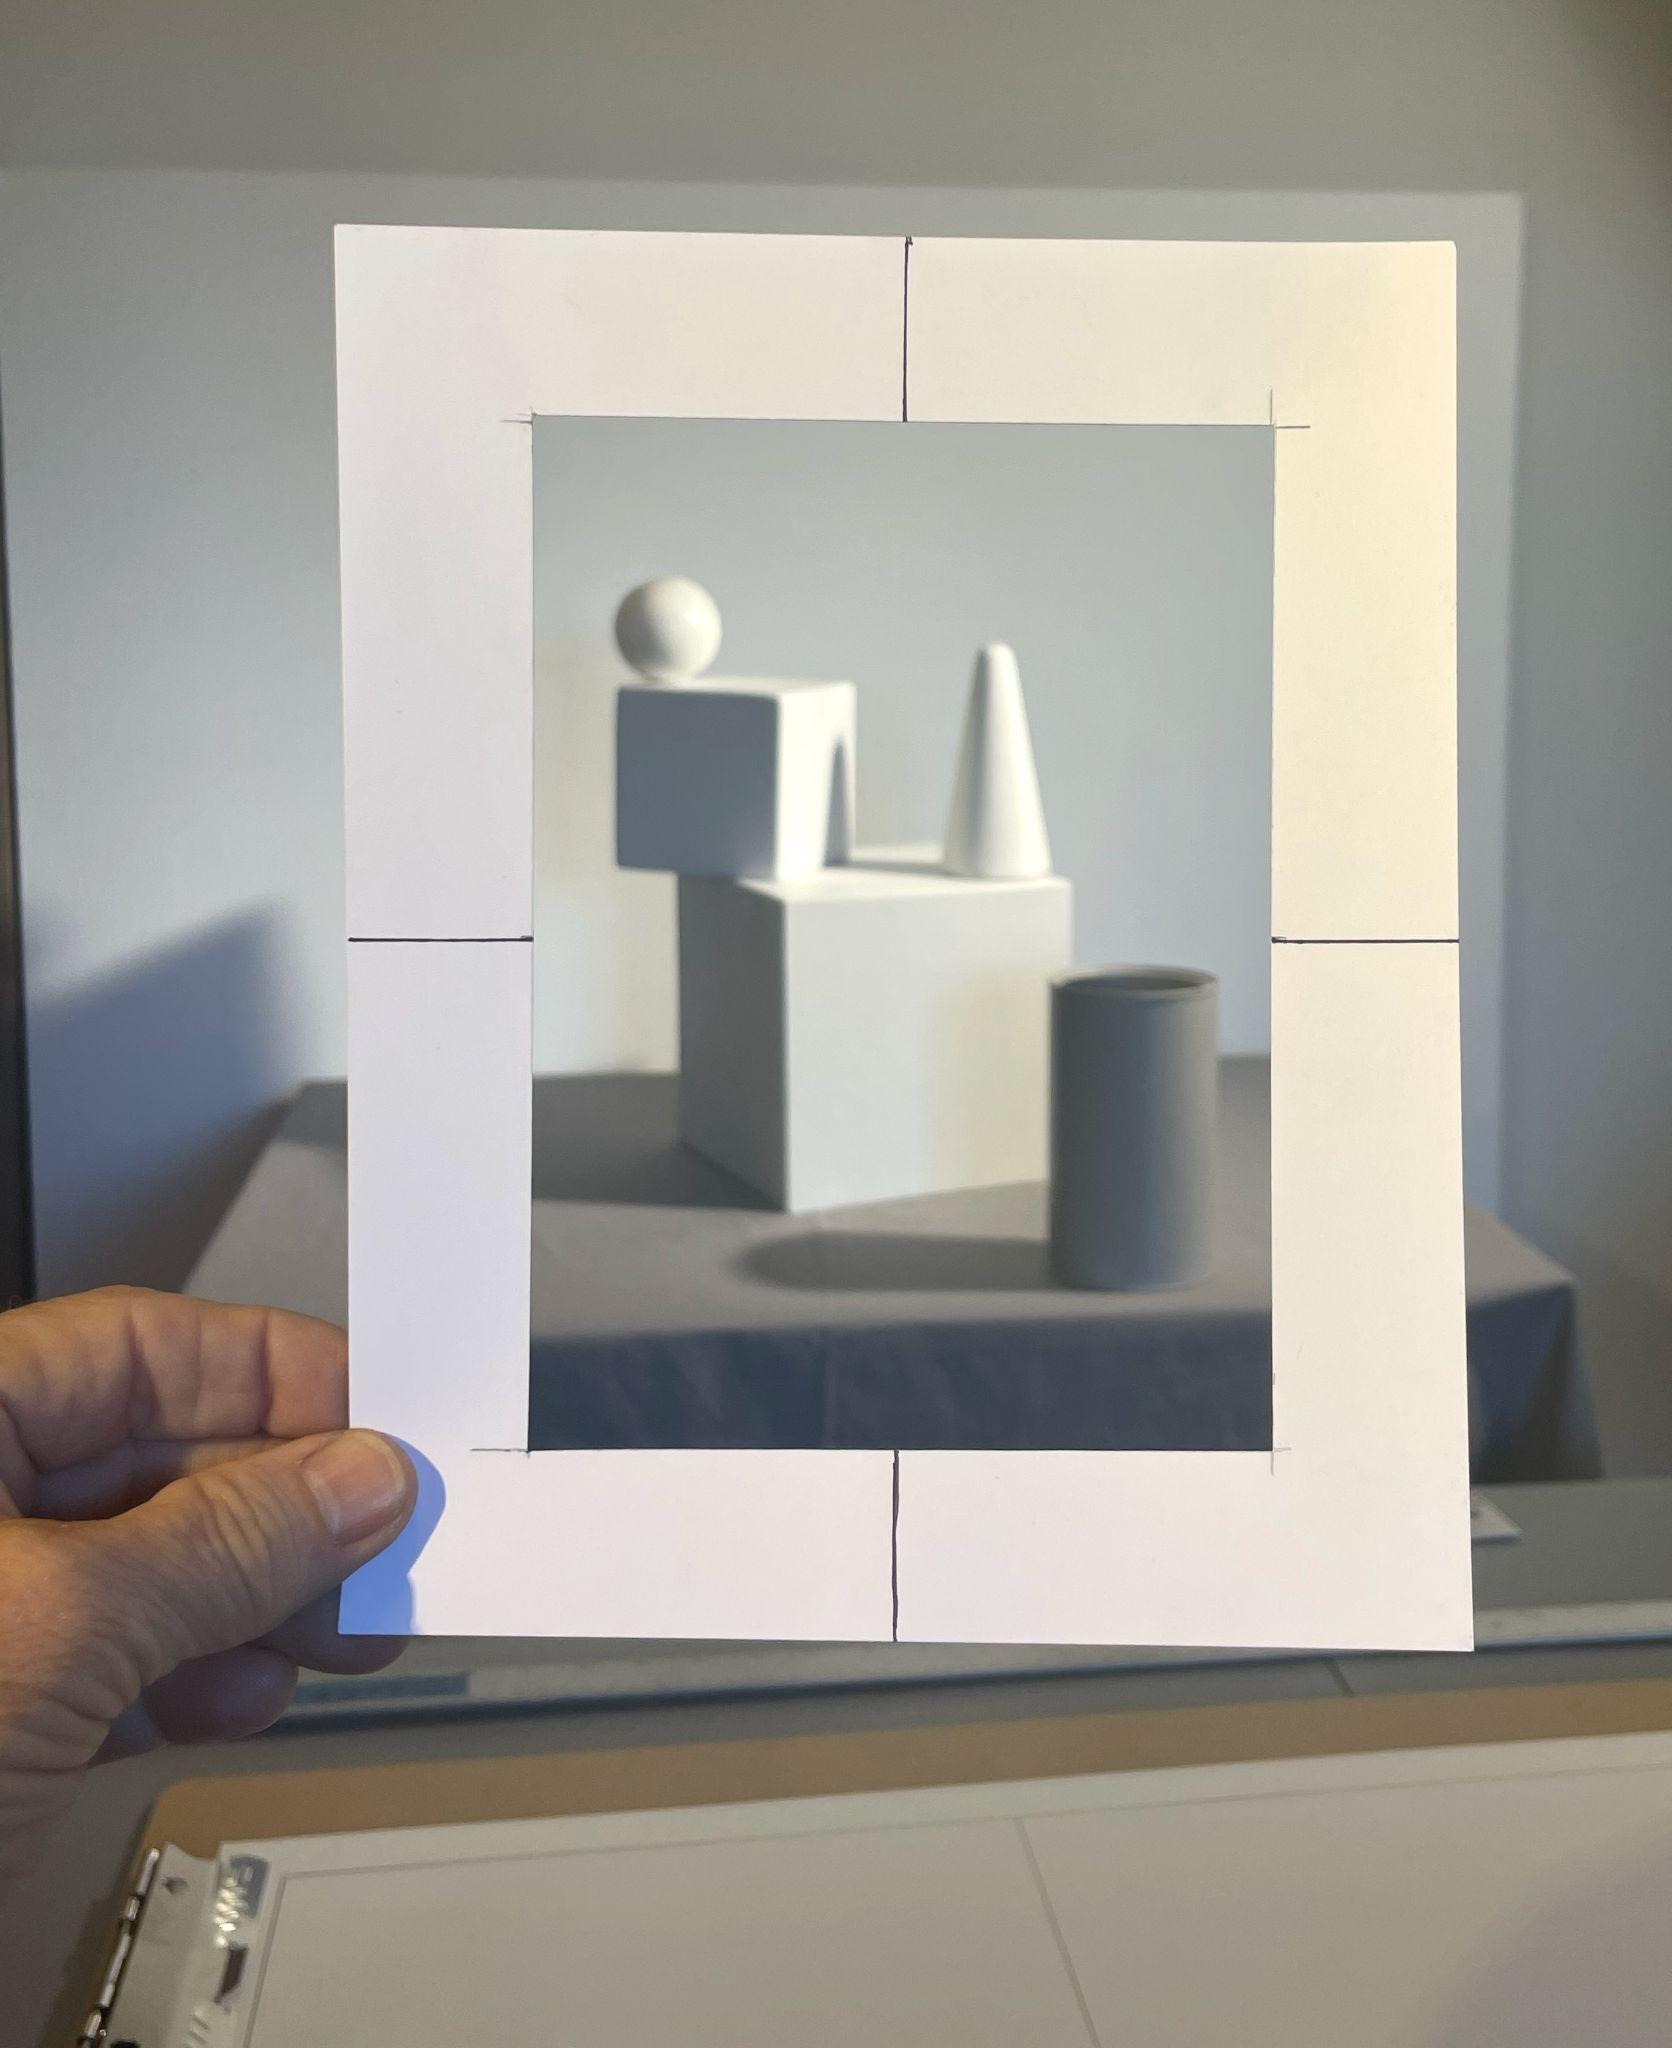
Example of viewfinder framing and vertical and horizontal orientation, Stephen P. Curry, digital photo, License: CC BY NC 4.0
- Once you have decided on the compositional framing of the still life through the viewfinder, make light marks on the paper to indicate the placement of the highest, lowest, leftmost, and rightmost shapes within the overall composition. Then, expand on these indications to create proportion boxes for prominent objects. These objects are typically positioned in the foreground and middle ground.
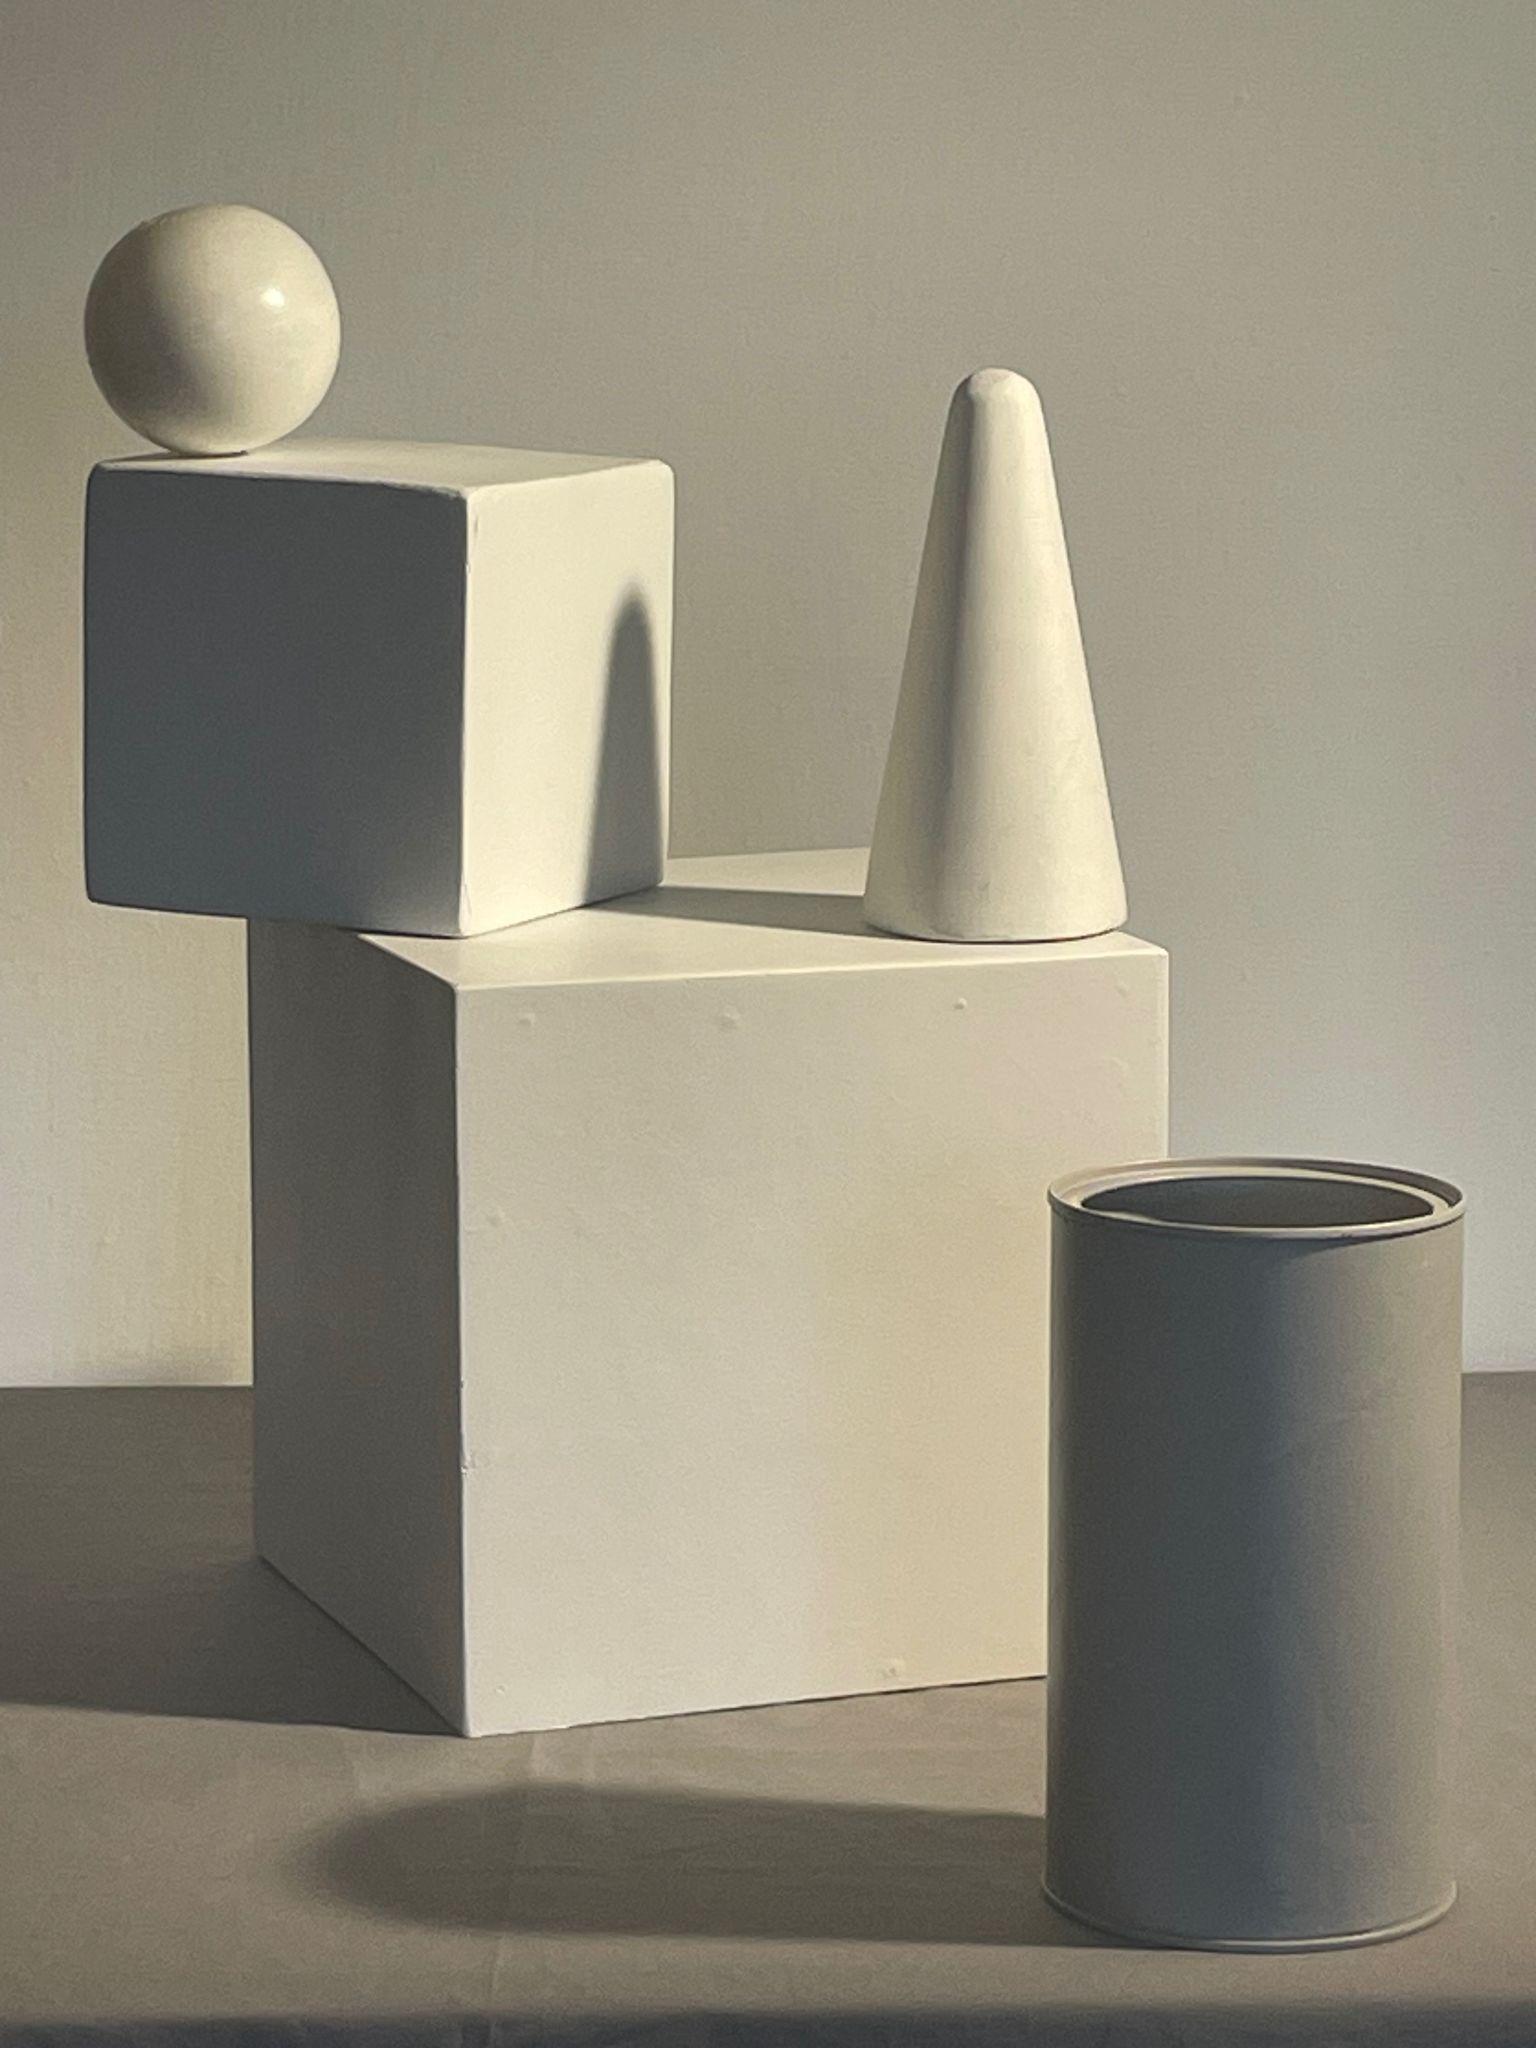
- Lightly gesture the composition, using the initial marks to place the still life composition within the picture plane. When gesturing, consider the still life grouping as a whole, rather than its individual components. The gesture should only take 2 or 3 minutes.
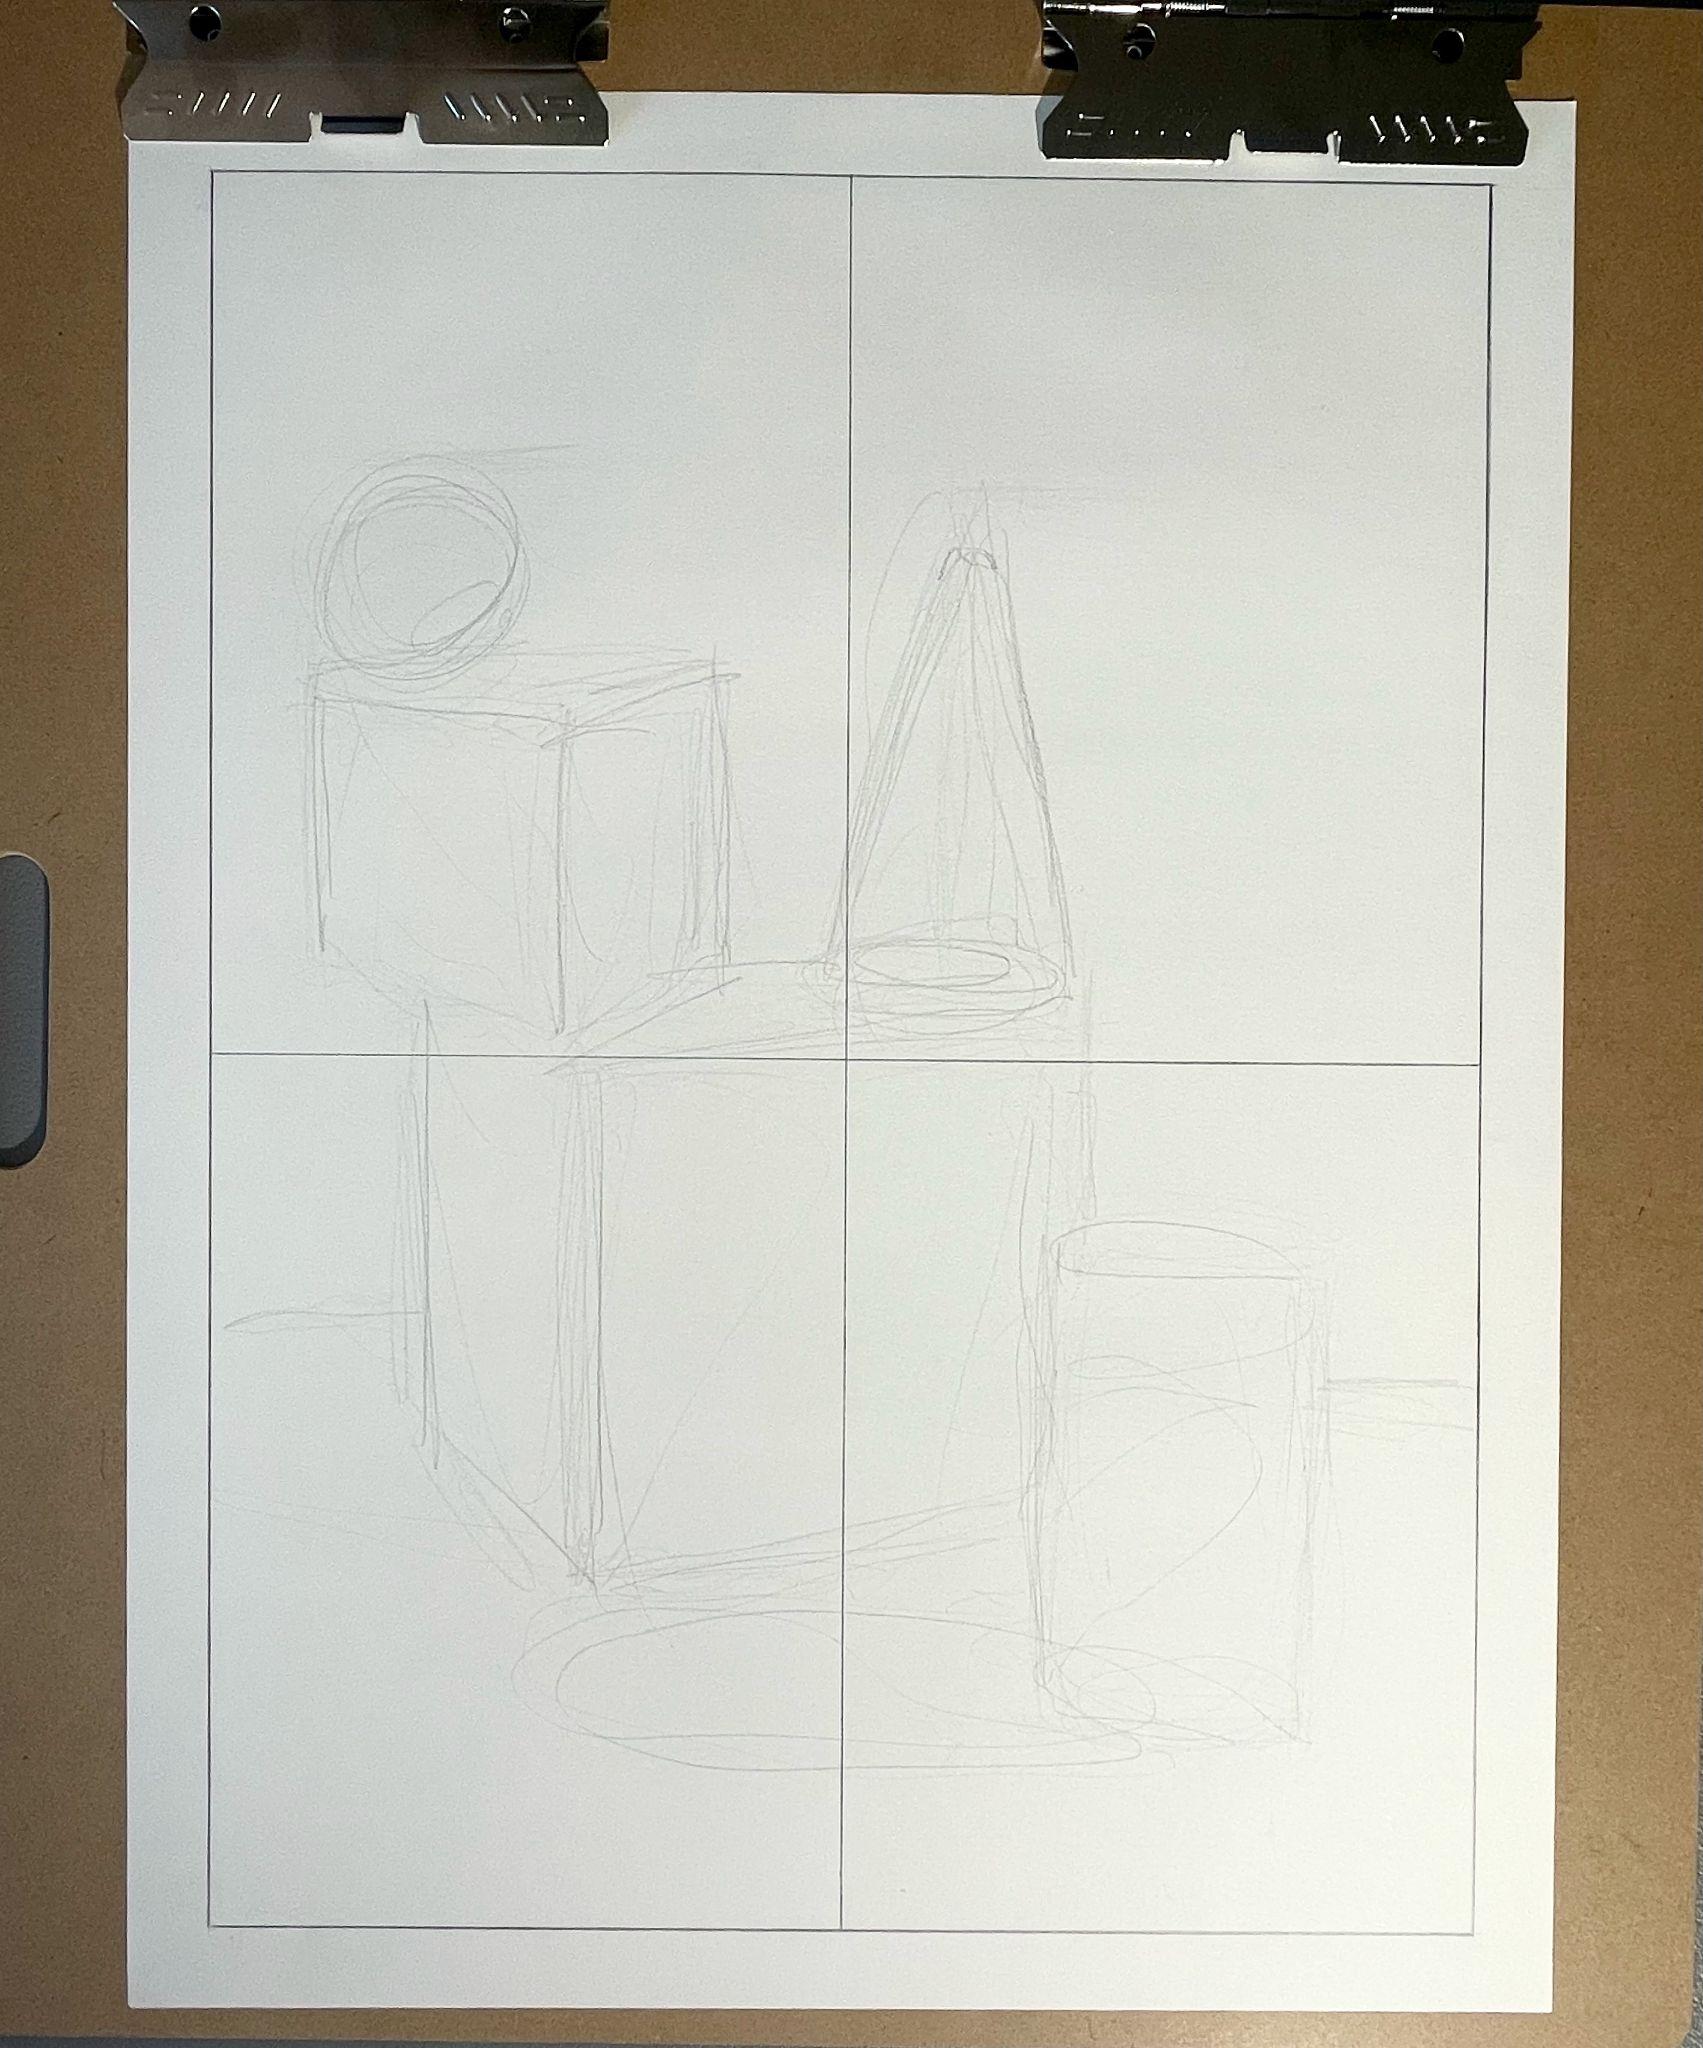
- Choose an object in the arrangement to start with and use it to compare to other objects for scale, proportion, and placement.
- A box or cube is a good starting point, since you can use the vertical edge as a straight line to measure the height and compare that to the width as well as the proportion of everything else in the still life grouping.
- Sight by holding your sighting tool (skewer or pencil) out at arm’s length in your non-dominant hand with the elbow locked. Close the corresponding eye, look down the length of your arm, and use the sighting tool to measure from the tip of the sighting tool to your thumb.
- Hold the sighting tool vertically to sight/measure the height, then compare it to the width. Make a small mark to indicate the bottom and top of the object. Rotate the sighting tool horizontally and compare the measured height to the width. Make small marks to indicate the left and right sides of the object based on the difference in height compared to the width. Alternatively, you can choose to use the Proportion Box Method as described in detail earlier in the chapter. Wth the box method, draw a simple square or rectangle that represents the difference between the overall height and width, as well as establish the placement of each object within the composition.
- Then measure with sighting to determine the placement and scale of the other objects in the still-life composition. Sight and compare the height of each object and measure any spaces between objects as you draw simple boxes to represent the placement of all the objects in the composition.
- Extend organizational lines horizontally across the picture plane to compare the tops and bottoms of objects in relation to each other. Do the same with vertical organizational lines to determine the placement of objects between the left and right edges of the composition and to measure the spaces between subject matter.
- To determine the angle of horizontal edges, such as the top and bottom of a cube, align your sighting tool with those edges to find the angles. Horizontal edges will appear to converge, or get closer together, as they extend away from you. If they appear to diverge or grow further apart, recheck the angles with your sighting tool or a pencil.
- When drawing shapes that are symmetrical or rounded, such as cylinders, spheres, or cones, always draw a plumb line through the center of the object to aid in placement and help with symmetry. Use the sighting tool to compare and confirm if each side of symmetrical objects is drawn at the same size.
- You can also use the sighting tool to sight the angles of cast shadows created by a light source.
- Look away from your drawing for a minute. Step back a few feet and see it from a new angle and at a distance. Compare it to your reference and make note of what needs to change, is missing, or needs to be refined.
- Make the observed changes.
- Tip: At this stage, it might be helpful to lighten preparatory lines before the final touches on your drawing.
- Thoroughly knead your kneaded eraser.
- On a smooth surface, roll the eraser into a sausage shape
- With the palm of your hand, gently roll the eraser over the drawing to lighten any overly dark lines, such as sight, organizational, plumb lines and any other overly dark lines.
- Do not completely erase these lines.
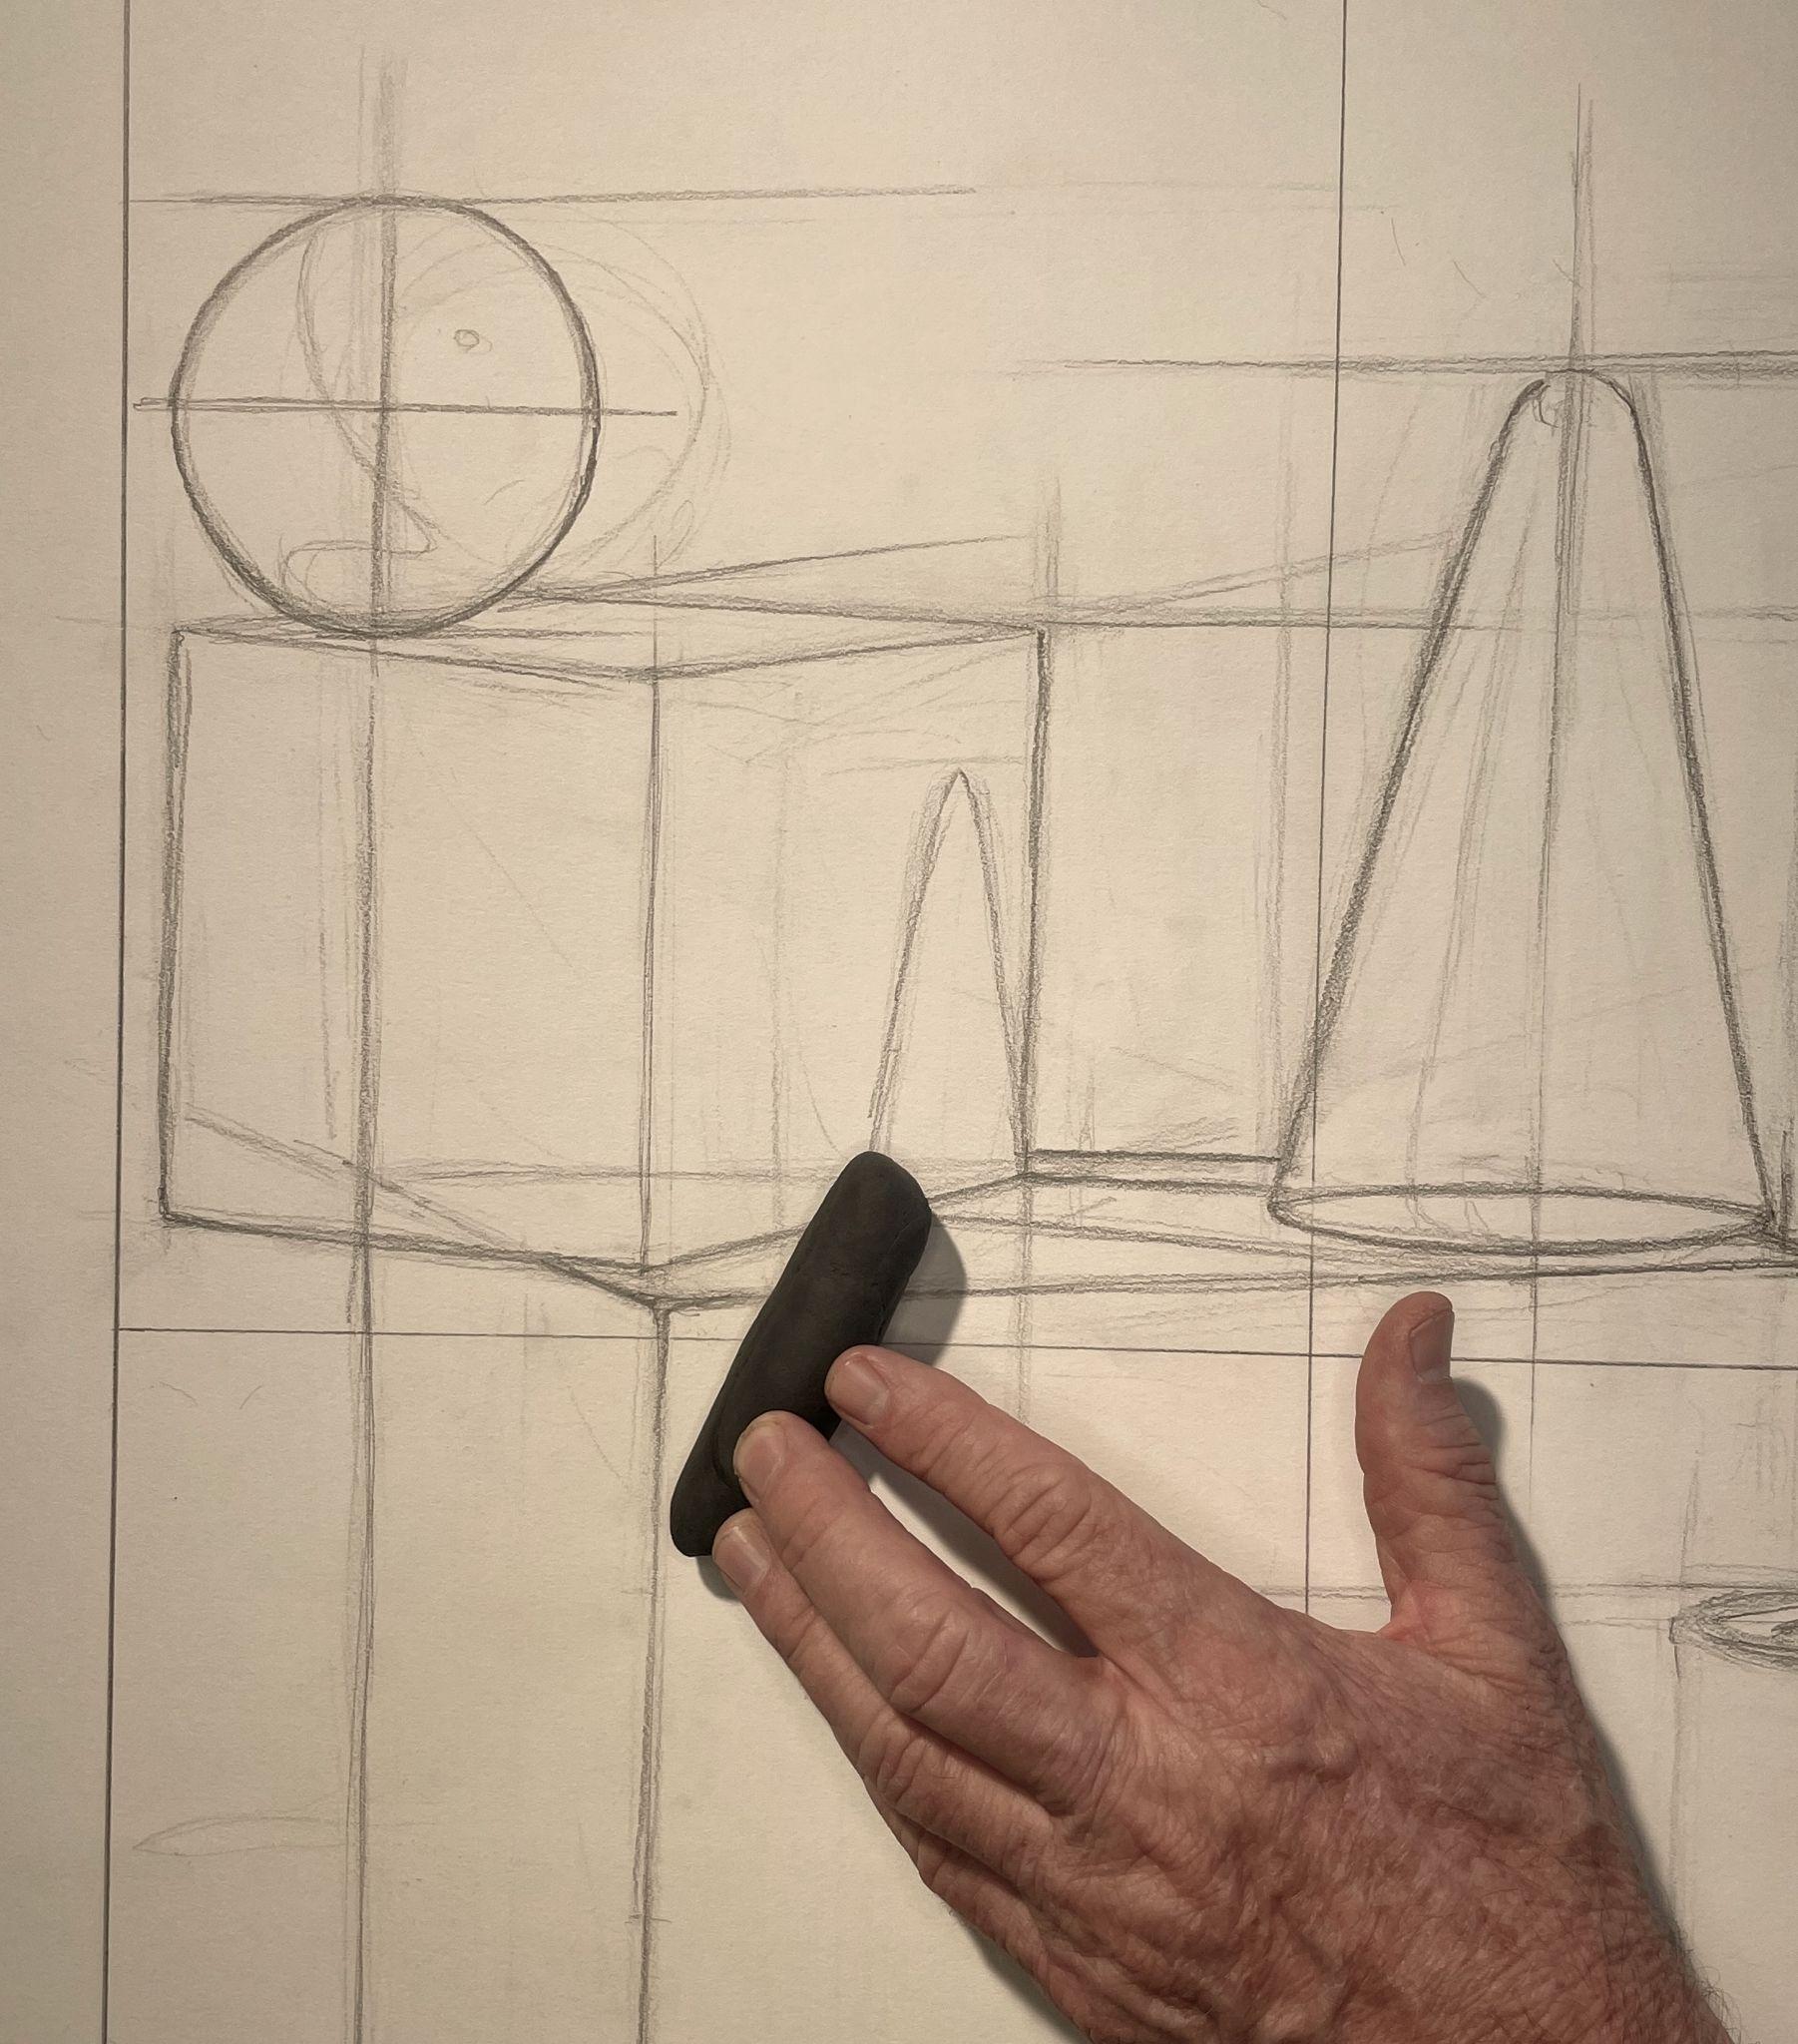
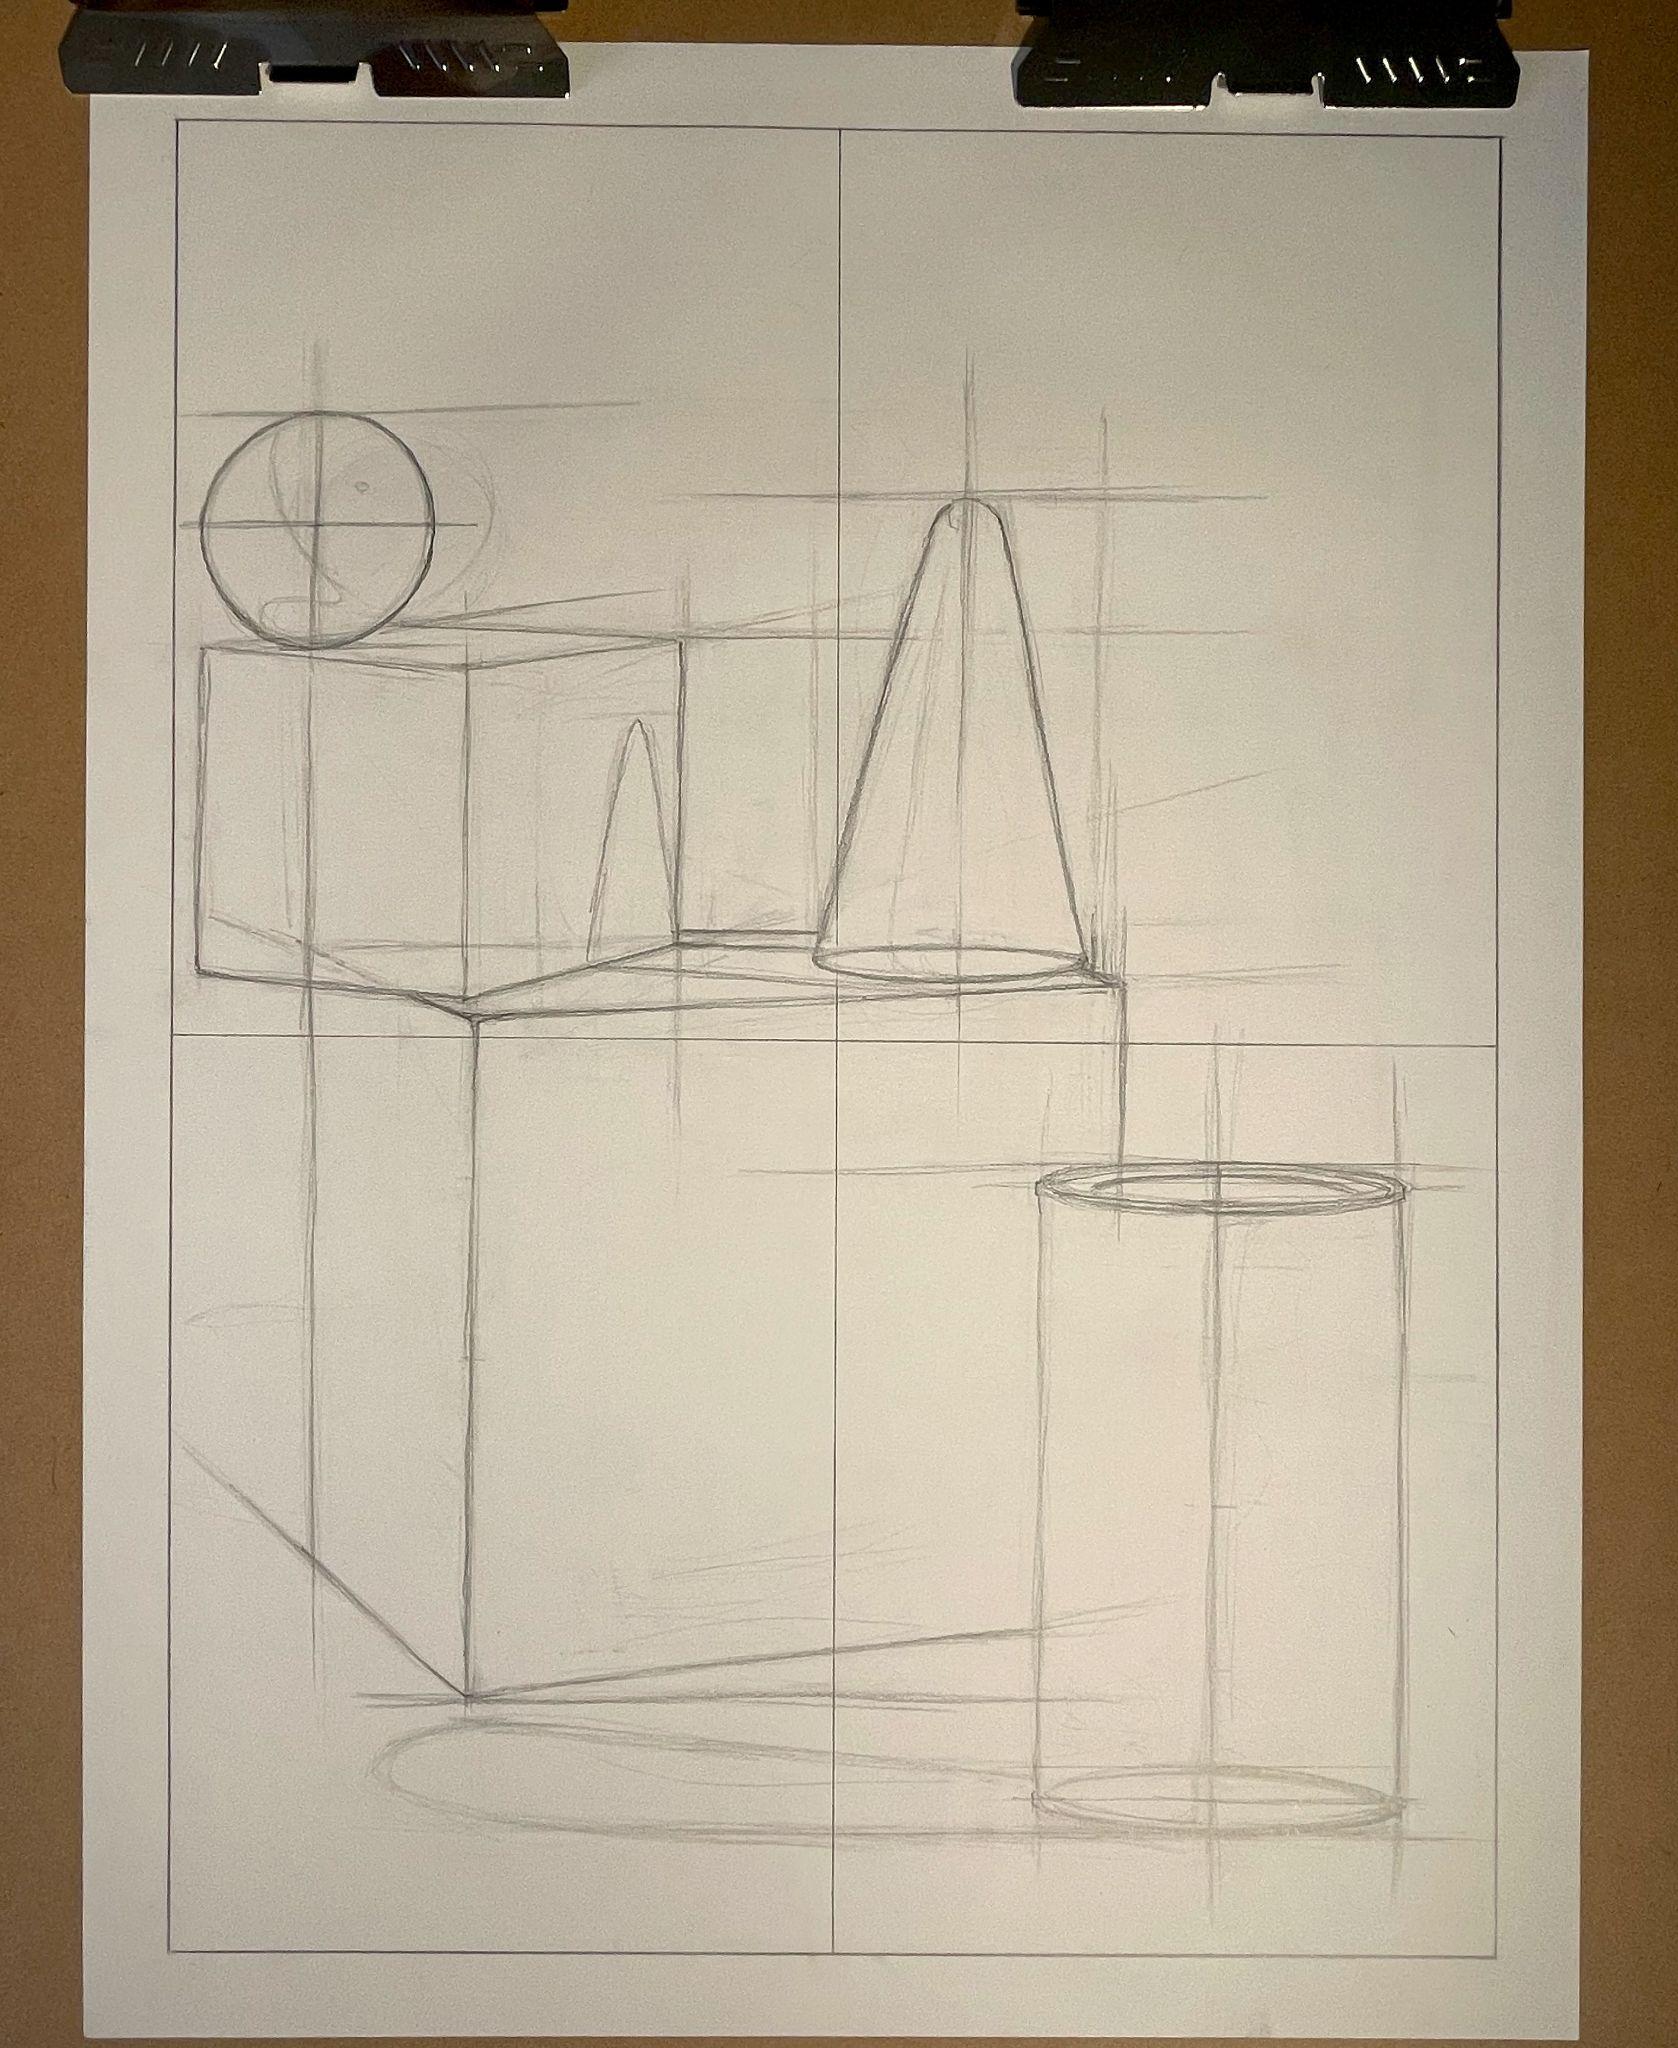
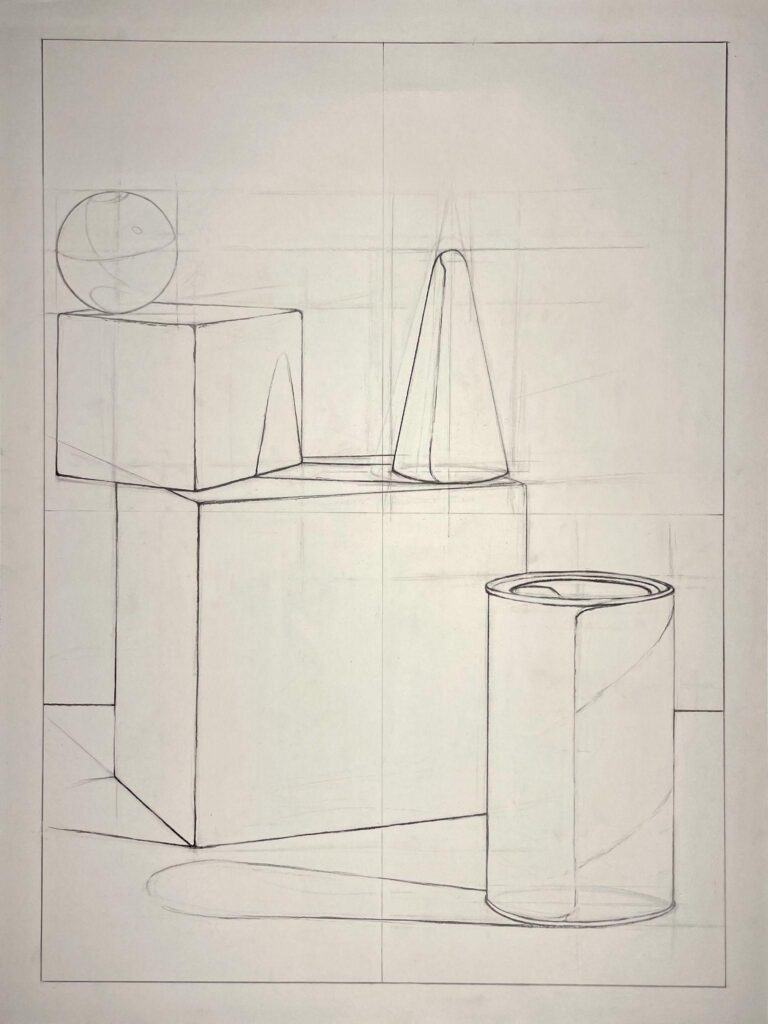
Line clean-up with a kneaded eraser and cleaned up result example, Stephen P. Curry digital photo and graphite on drawing paper, License: CC BY NC 4.0
- As the final step, add emphasis with line weight variation. Darken, widen, thin out, and lighten lines as needed with 2B or 4B pencils and your erasers to finish the drawing. Continually refer to the reference for guidance on where to apply or remove emphasis.
- Use a ruler to clean up straight lines.
Lastly, you can use a kneaded eraser to lighten, but do not completely erase “searching lines” such as gesture, organizational lines, plumb lines, axis lines, and perspective lines. Leaving the preparatory lines visible is part of the exercise.
Results
The results will be a direct- observation drawing with graphite pencil. It will show an understanding of scale and proportion using sighting along with organizational, plumb, and axis lines to create an accurate composed still-life of geometric objects in perspective.
3. Advanced Still Life Activity
Description
This is an advanced line weight variation still life drawing activity. The activity combines many of the techniques you’ve learned in the Elements & Principles, Line, and now this Observation Drawing Chapter. The assignment involves accurately translating three-dimensional forms with sighting techniques into a two-dimensional line drawing with implied spatial depth and texture.
To create this drawing, you will:
- Only use lines
- Portray accurate proportions
- Use line weight variation to imply spatial depth, texture, and details
You will NOT use value – no shading, cross-hatching, scumbling, etc.
Before you start drawing, you will need a still-life reference composed of a variety of objects. It’s best to include volumetric objects that vary in size and have different textures. It is recommended to include at least one glass or metal object, a white object, a black object, and an organic object (such as flowers, shells, leaves, etc.) with a fabric backdrop. A good still life will set you up for success in your drawing by providing the opportunity to use descriptive exterior and interior contour lines to record immense detail in both glass and metal objects, and to begin developing precise dexterity and control in translating reflective versus matte surfaces.
*Reviewing the “Proportion Box Method” in this Observation Drawing chapter is highly recommended for completing this project.
Activity Parameters
Duration
8-10 Hours
Size
18 x 24’’ shown in example
Subject
A still-life composed of a backdrop and objects (minimum of 5) of varying surface texture (matte, glossy, translucent). For example, one glass/metal object, one white object, one black object, and one organic object (such as flowers, a shell, or leaves) with a fabric backdrop.
Technique
Direct Observation – draw the still-life object as it is seen. Do not add or subtract from the observed reference.
- Application of sighting techniques and tools, including using a viewfinder, sighting tool, and the proportion box method.
Materials
- One sheet of 18×24” paper
- Drawing Board
- Ruler
- Sighting Tool
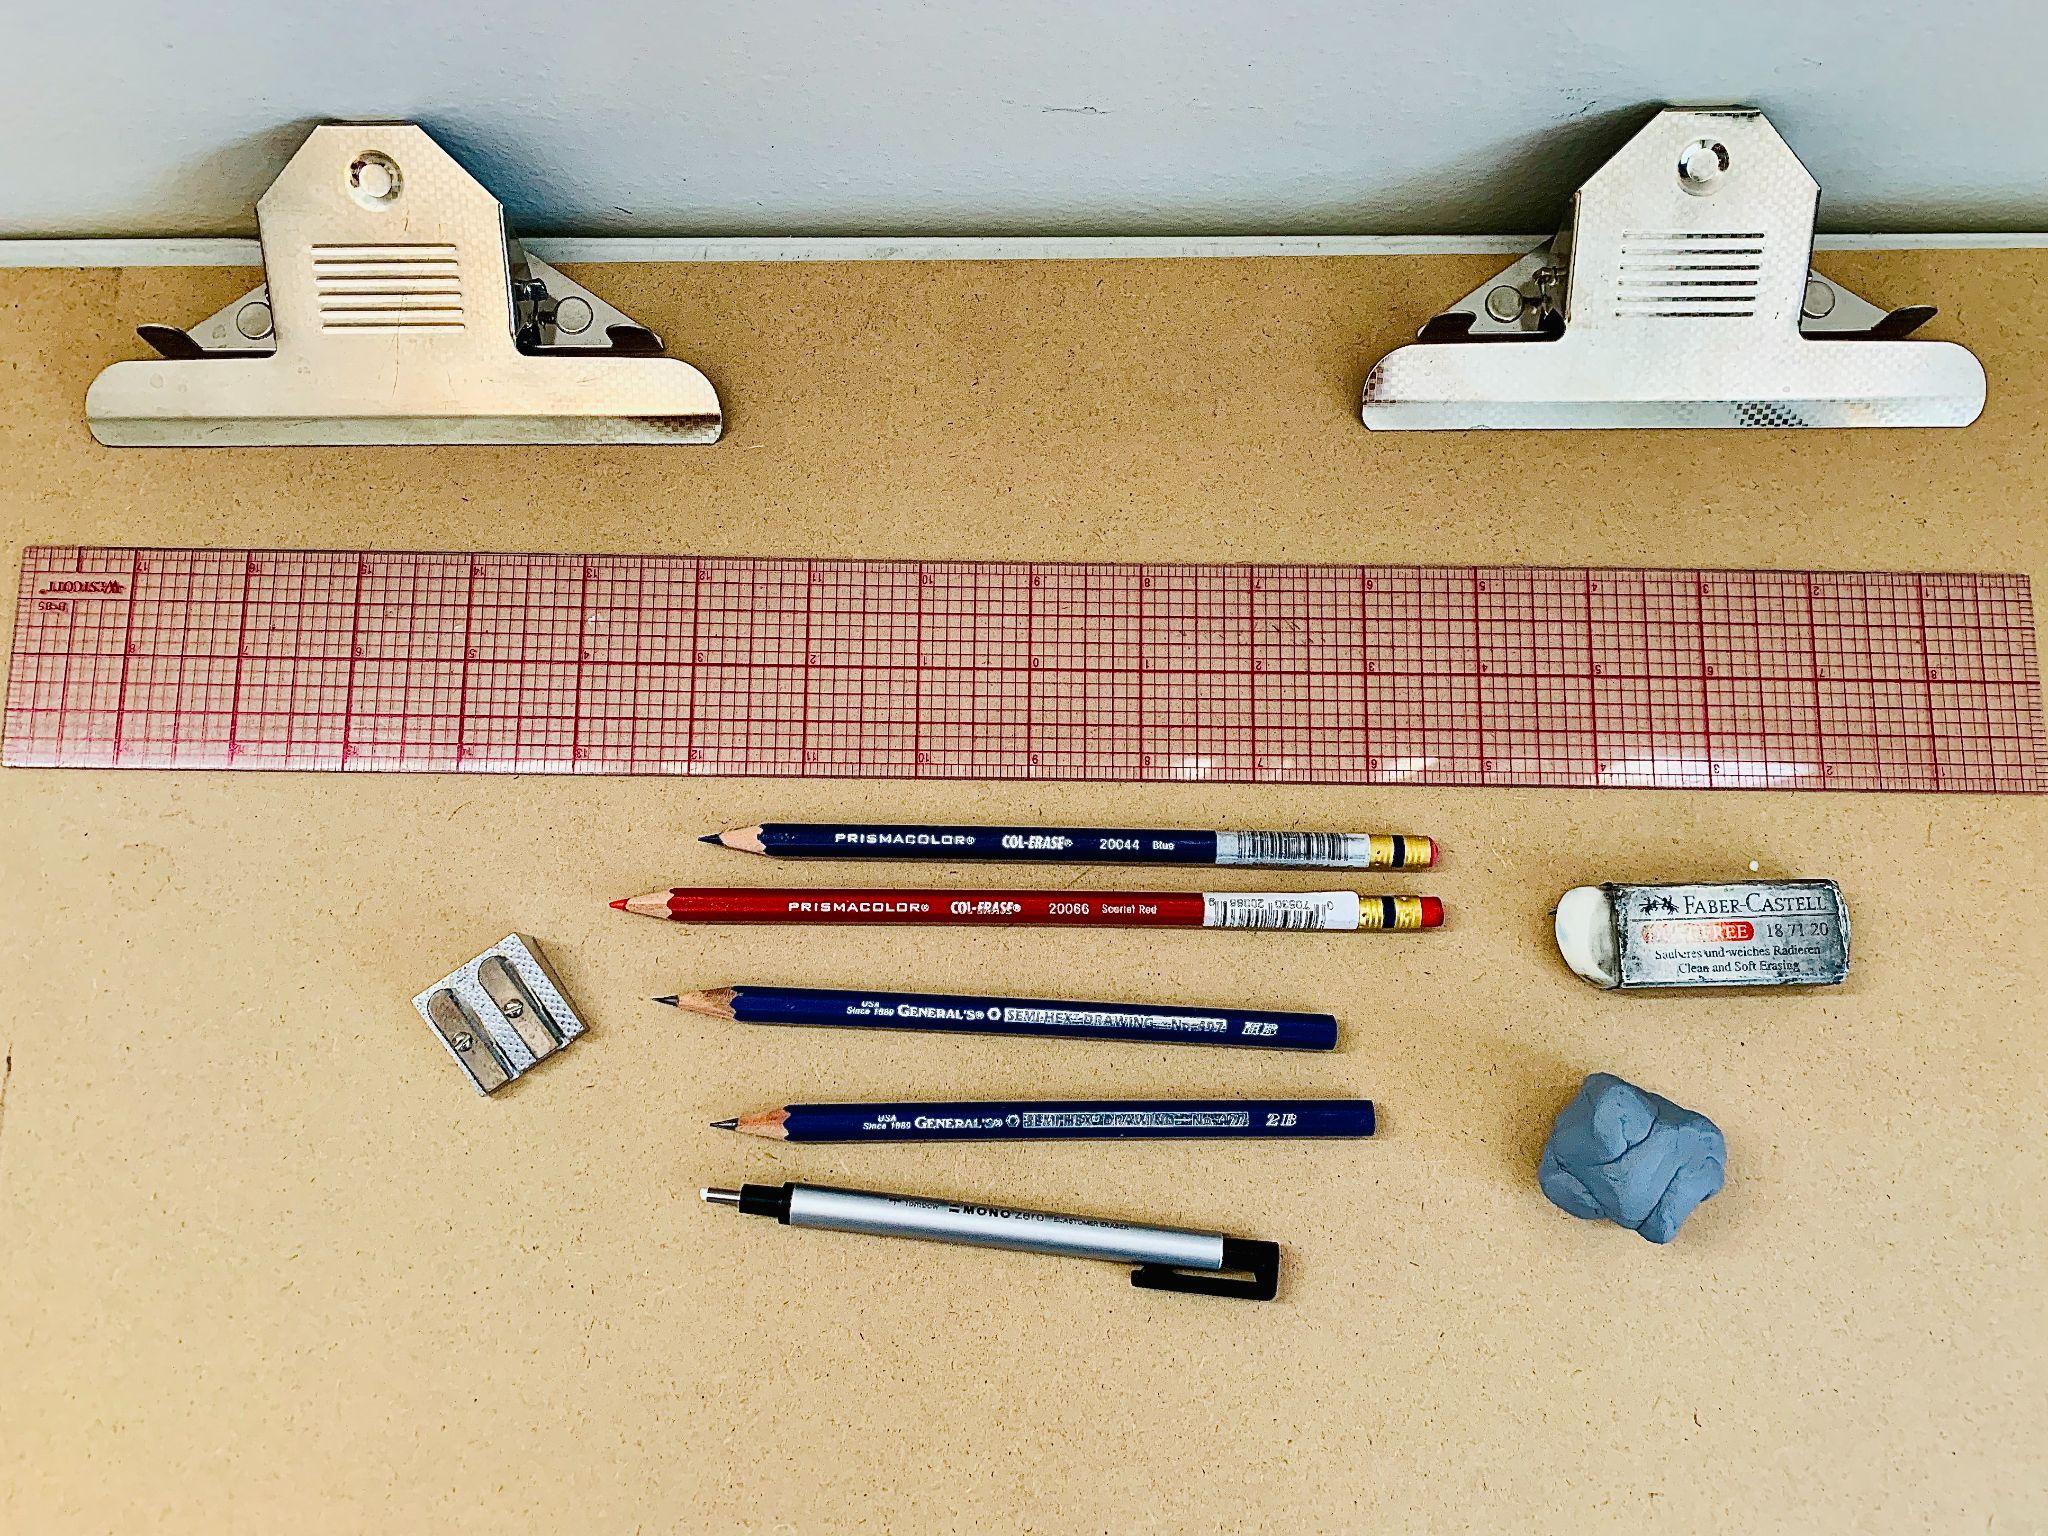
- Col-Erase Prismacolor Pencils
- Graphite Pencils – HB & 2B
- White Rubber Eraser
- Kneaded Eraser
- Mono Zero Eraser
- Pencil Sharpener
- Viewfinder
- T-square (optional)
- Crop Angle Tool (optional)
Student Learning Outcomes (SLOs)
Use graphite and colored pencils to create a direct observation drawing with accurate proportions, believable perspective, intentional line weight variation, descriptive surface texture, and implied space.
Method
Still-Life Setup
- Gather still-life materials that vary in size and surface texture.
- Building Materials
- Backdrop – paper or fabric
- Platform Items (optional) – boxes/additional items to act as supports to vary the height of objects in the still-life
- Object Categories – 1 of each (but you can add more objects)
- Glass or Metallic Object
- Light Object – white, cream, etc.
- Dark Object – black, gray, etc.
- Organic Object – shell, dry plants/bark, pumpkin, artificial plants, etc.
- Lighting:
- Spotlight – single light source to illuminate the setup; position it to create interesting highlights and shadows (while you will not use value in this drawing, an intentional light source will still be useful for showcasing reflections on glossy surfaces)
- Building Materials
- Build the Still-Life Setup
- Arrange the objects to create a foreground, middle-ground, and background.
- Try to place objects so that some overlap, showing clearly what is in front or behind another object to add a sense of space.
- Account for both negative and positive space.
- Form connections that lead the eye around the composition.
- Be willing to change out objects and add others in.
- Arrange the objects to create a foreground, middle-ground, and background.
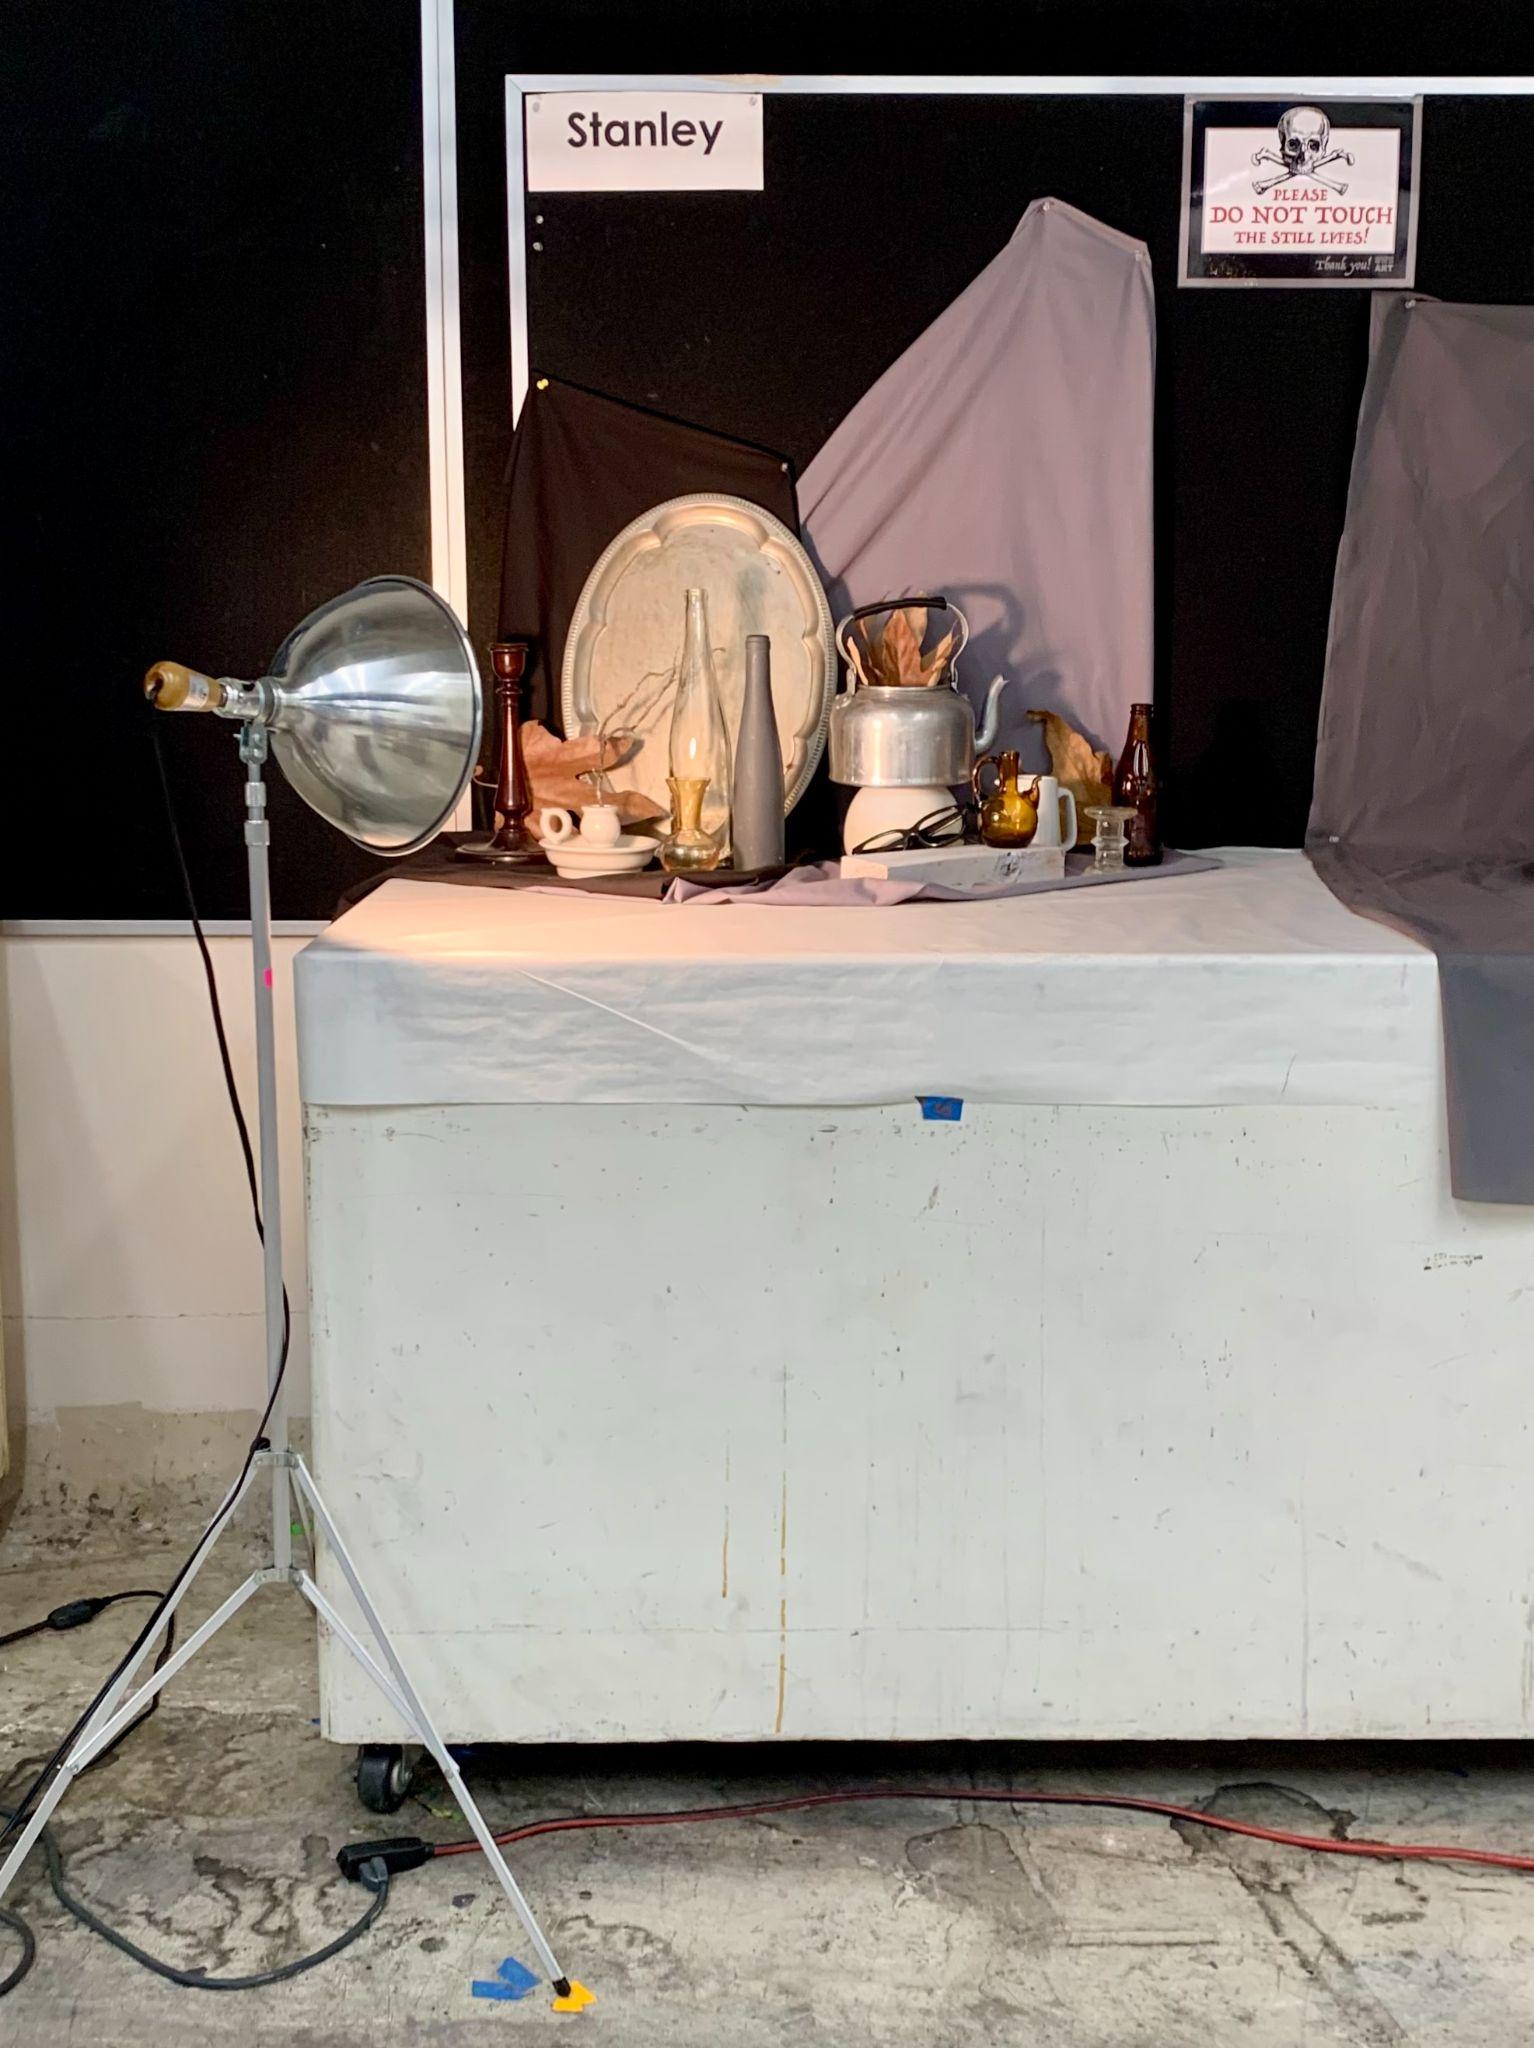
- Intentionally Light the Still-Life Setup
- Lighting in a still-life setup is critical and can enhance or ruin a composition.
- A single source of light, preferably from the side, creates a clear pattern of light and dark that helps define forms and relationships between objects.
- During setup, try different light solutions; different light effects can dramatically change the feel of the same composition.
Drawing Process
- Set up a drawing station
- Place an easel or drawing horse in a location with a clear view of the still life setup.
- Use a viewfinder to determine the composition – make sure you can see at least part of a glass/metal, white, gray/black, and organic objects through the viewfinder’s window.
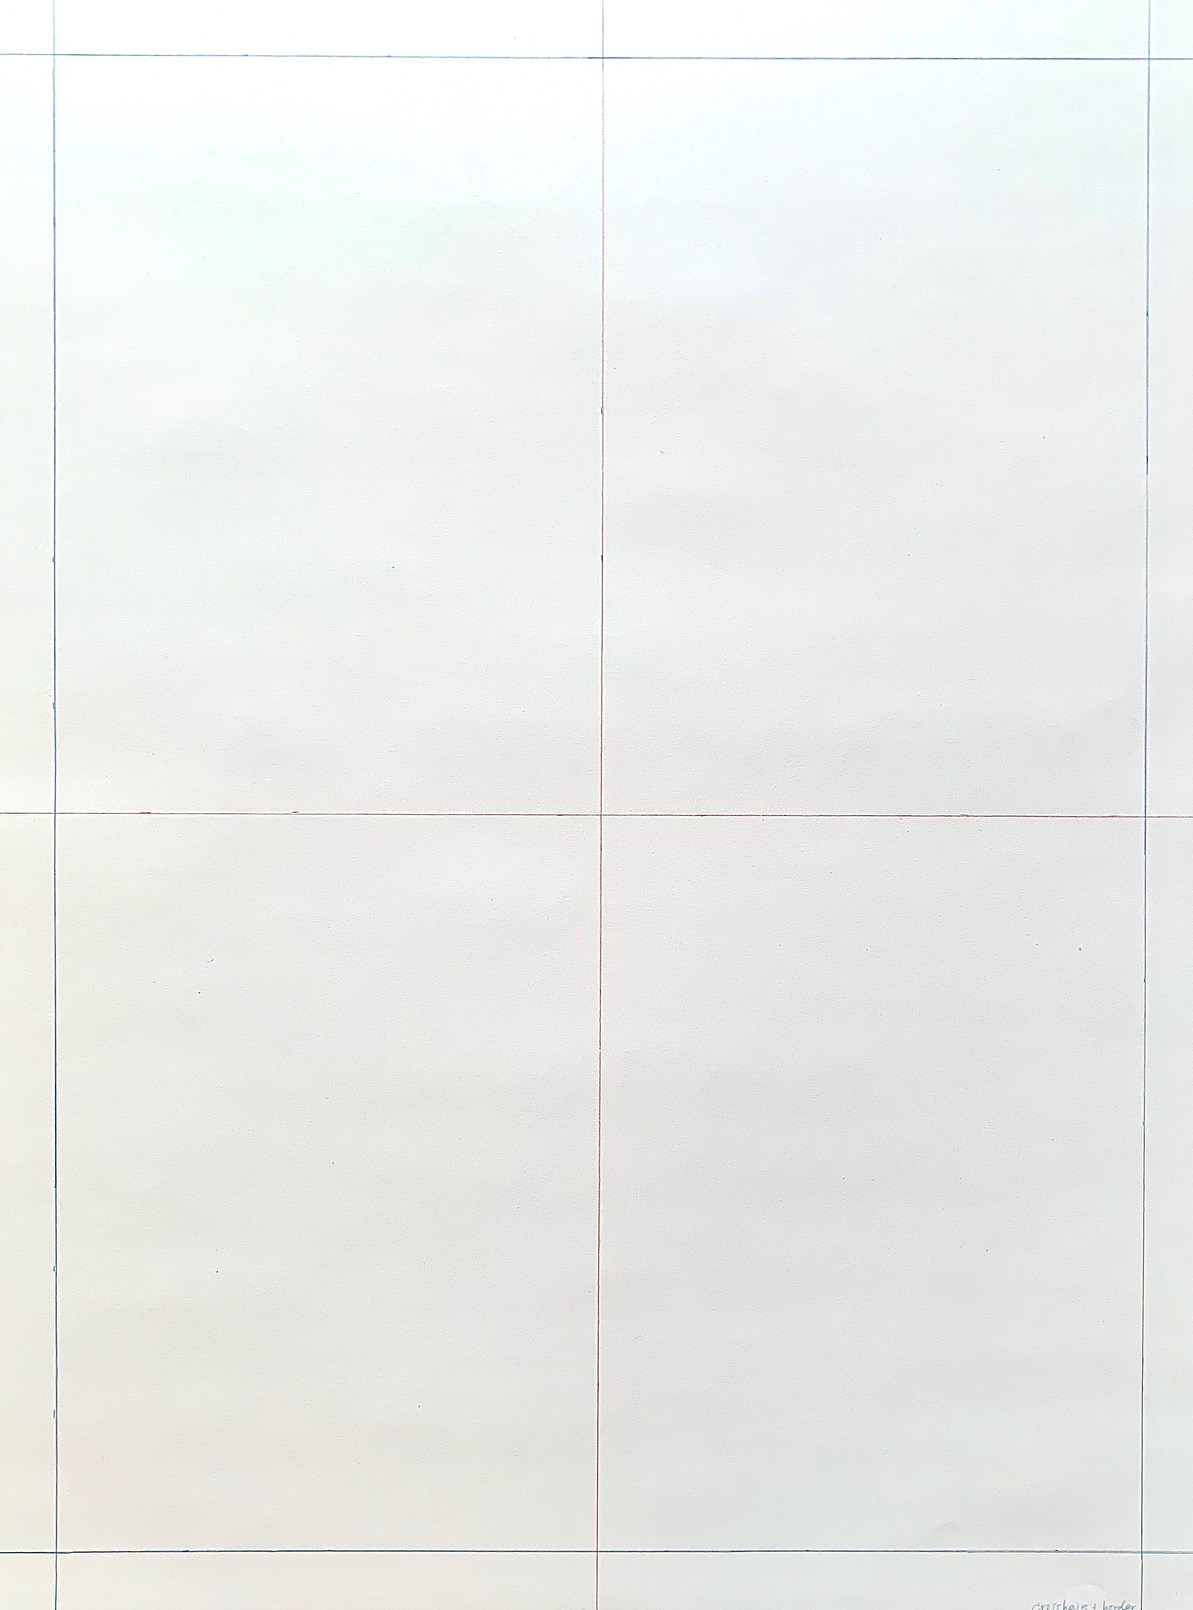
- Set up the 18×24” drawing paper
- Lightly draw crosshairs with a Col-Erase Prismacolor pencil.
- If your drawing paper is in portrait orientation, the crosshair lines will be 12” down and 9” across.
- Then, use a different Col-Erase Prismacolor pencil to draw a 1” border on all sides.
- Clip the prepared sheet to a drawing board.
- Lightly draw crosshairs with a Col-Erase Prismacolor pencil.
- Determine the composition
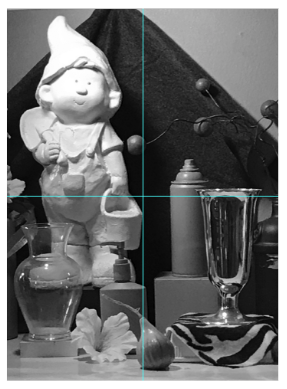
- Use a viewfinder to determine the composition – the orientation and area you want to draw
- Remember – everything you see through the viewfinder must be drawn – do not omit any objects or pick and choose what to include in your drawing.
- Avoid visual tangents – awkward amputation of objects that create visual distractions.
- Use a viewfinder to determine the composition – the orientation and area you want to draw
- Create the first proportion box
- Locate the most prominent object in the foreground. Then, use the Proportion Box Method to create the accurate framework for the first object.
- Use a different Col-Erase Prismacolor pencil from the ones used for the crosshairs to draw the proportion box.
- Alternate using the viewfinder and sighting tool to mark and measure where the object is located on your drawing paper in relation to the observed still life setup.
- Locate the most prominent object in the foreground. Then, use the Proportion Box Method to create the accurate framework for the first object.
Tip: Add crosshairs to your viewfinder. Then, use them to help speed up the process of determining if the object’s proportion box will be towards the center, bottom, etc. of the paper. Use your Col-Erase Prismacolor Pencil to make light small marks in the observed location. After making these approximate marks, switch to using a sighting stick to carefully measure and record the height and width of the object to determine its correct proportions. Use these measurements to fine-tune the approximate marks and ultimately create an accurate proportion box. Be patient and double-check your work. Making this first proportion box accurate will save you time in the long run.
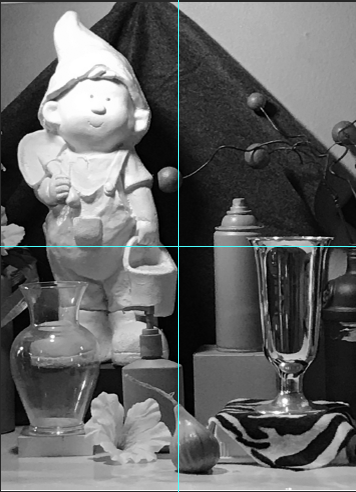
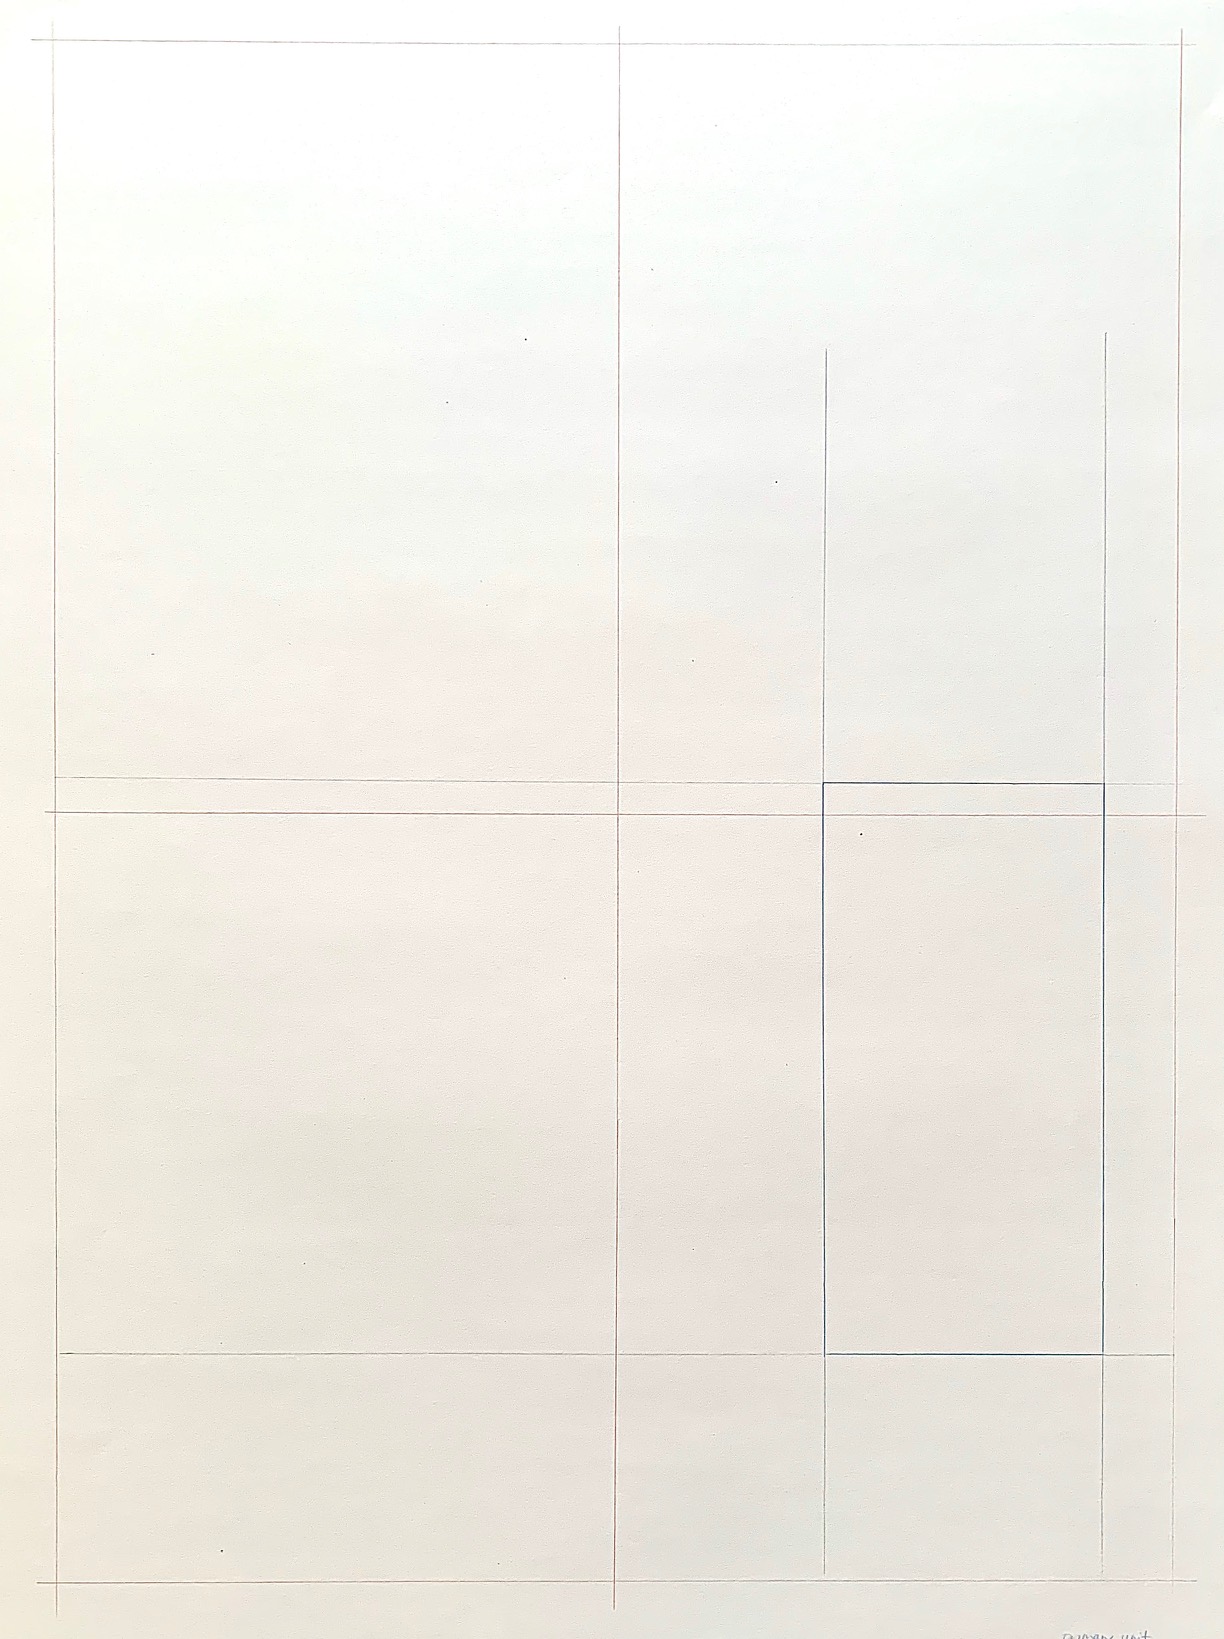
Contour Line Still Life Project Reference (L) and First Proportion Box Example (R), Briana Miyoko Stanley, Digital Photo (L) and Col-Erase Prismacolor Pencil on Drawing Paper (R), License: CC BY NC 4.0
- Neighboring proportion boxes
- After you establish the proportion box of the first object, sight and measure to create a proportion box for a neighboring object.
- Continue to create proportion boxes for neighboring objects until all of the foreground and middle ground objects have a corresponding proportion box.
- Remember to alternate using the viewfinder and sighting tool to measure.
- Double-check your measurements and compare the size and placement of your proportion boxes to one another and the still life setup. It is much easier to correct the drawing at this early stage.
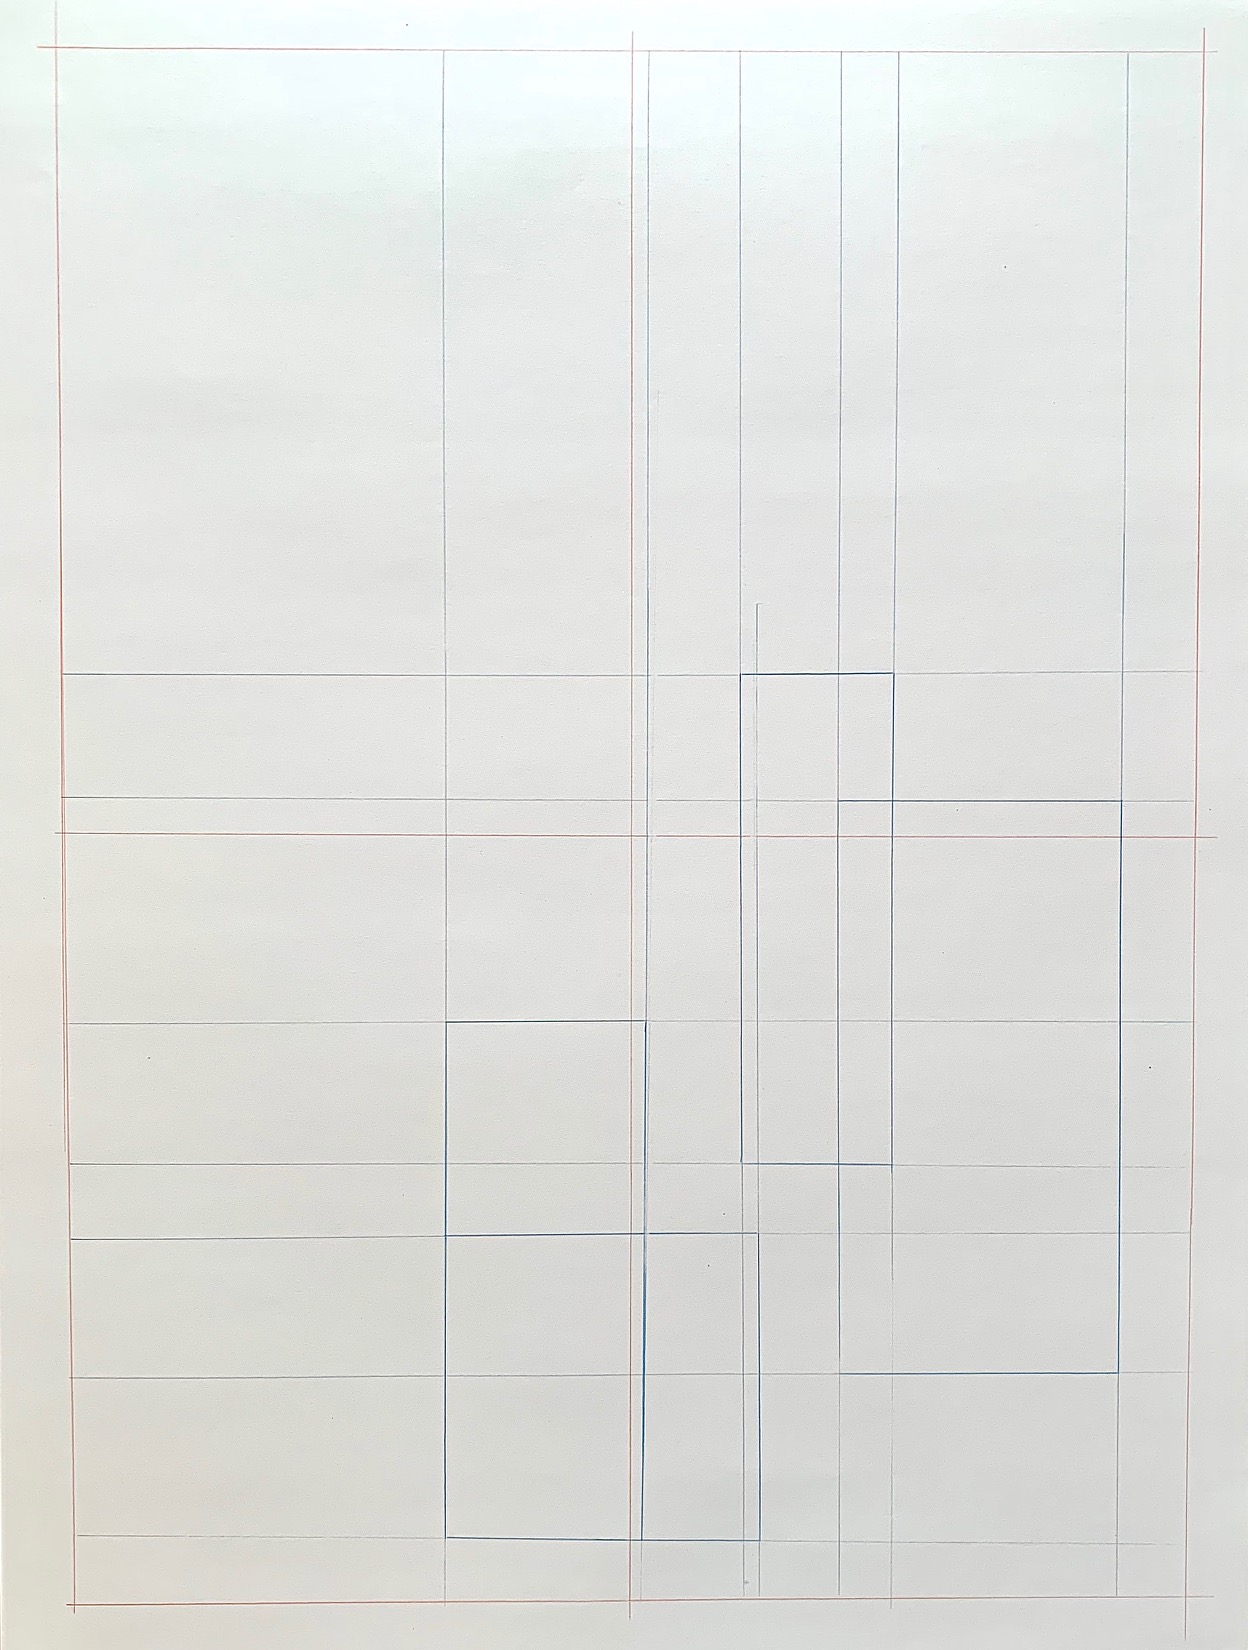
Contour Line Still Life Project Reference (L) and Foreground/Middle Ground Proportion Boxes Example (R), Briana Miyoko Stanley, Digital Photo (L) and Col-Erase Prismacolor Pencil on Drawing Paper (R), License: CC BY NC 4.0
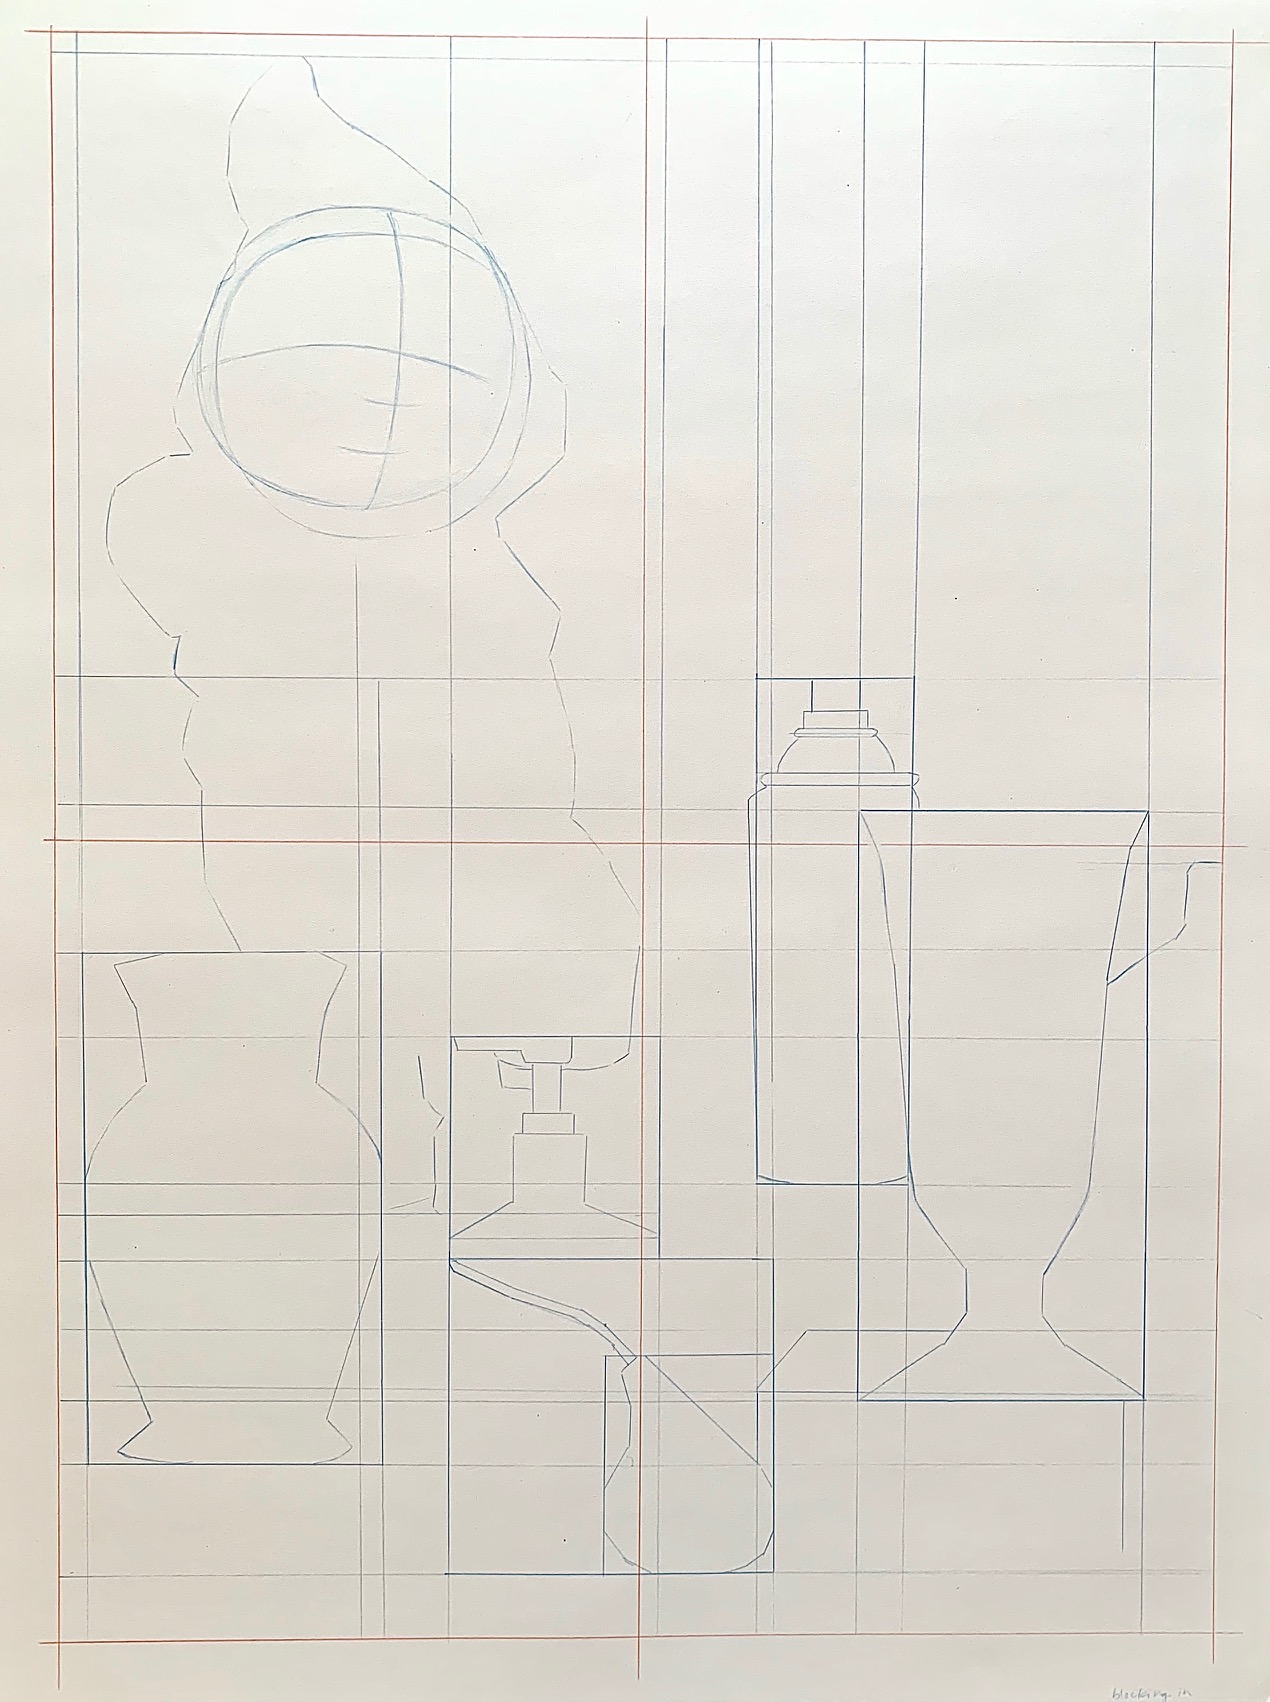
- Block in the general forms
- Once the foreground and middleground objects have proportion boxes, use a new Col-Erase Prismacolor pencil to block in the shape of the objects with simple contour lines. Imagine the proportion box is a block of stone, and you are carving away the excess stone to reveal the general form of the object. Only exterior lines are needed at this stage.
- Alternate between blocking out the form and using gestures to draw quick and light lines around the full composition. Continually reference the still life setup and use the proportion boxes to develop intuitive yet accurate line structures for the objects.
- Do not add detail. Inevitably, you will find yourself needing to revise the placement or size of objects, so you will ultimately save yourself time if you work from general to specific.
- Avoid working like a printer, where one section is completed at a time. This way, you will avoid erasing detailed work if corrections are needed.
- Draw through symmetrical objects
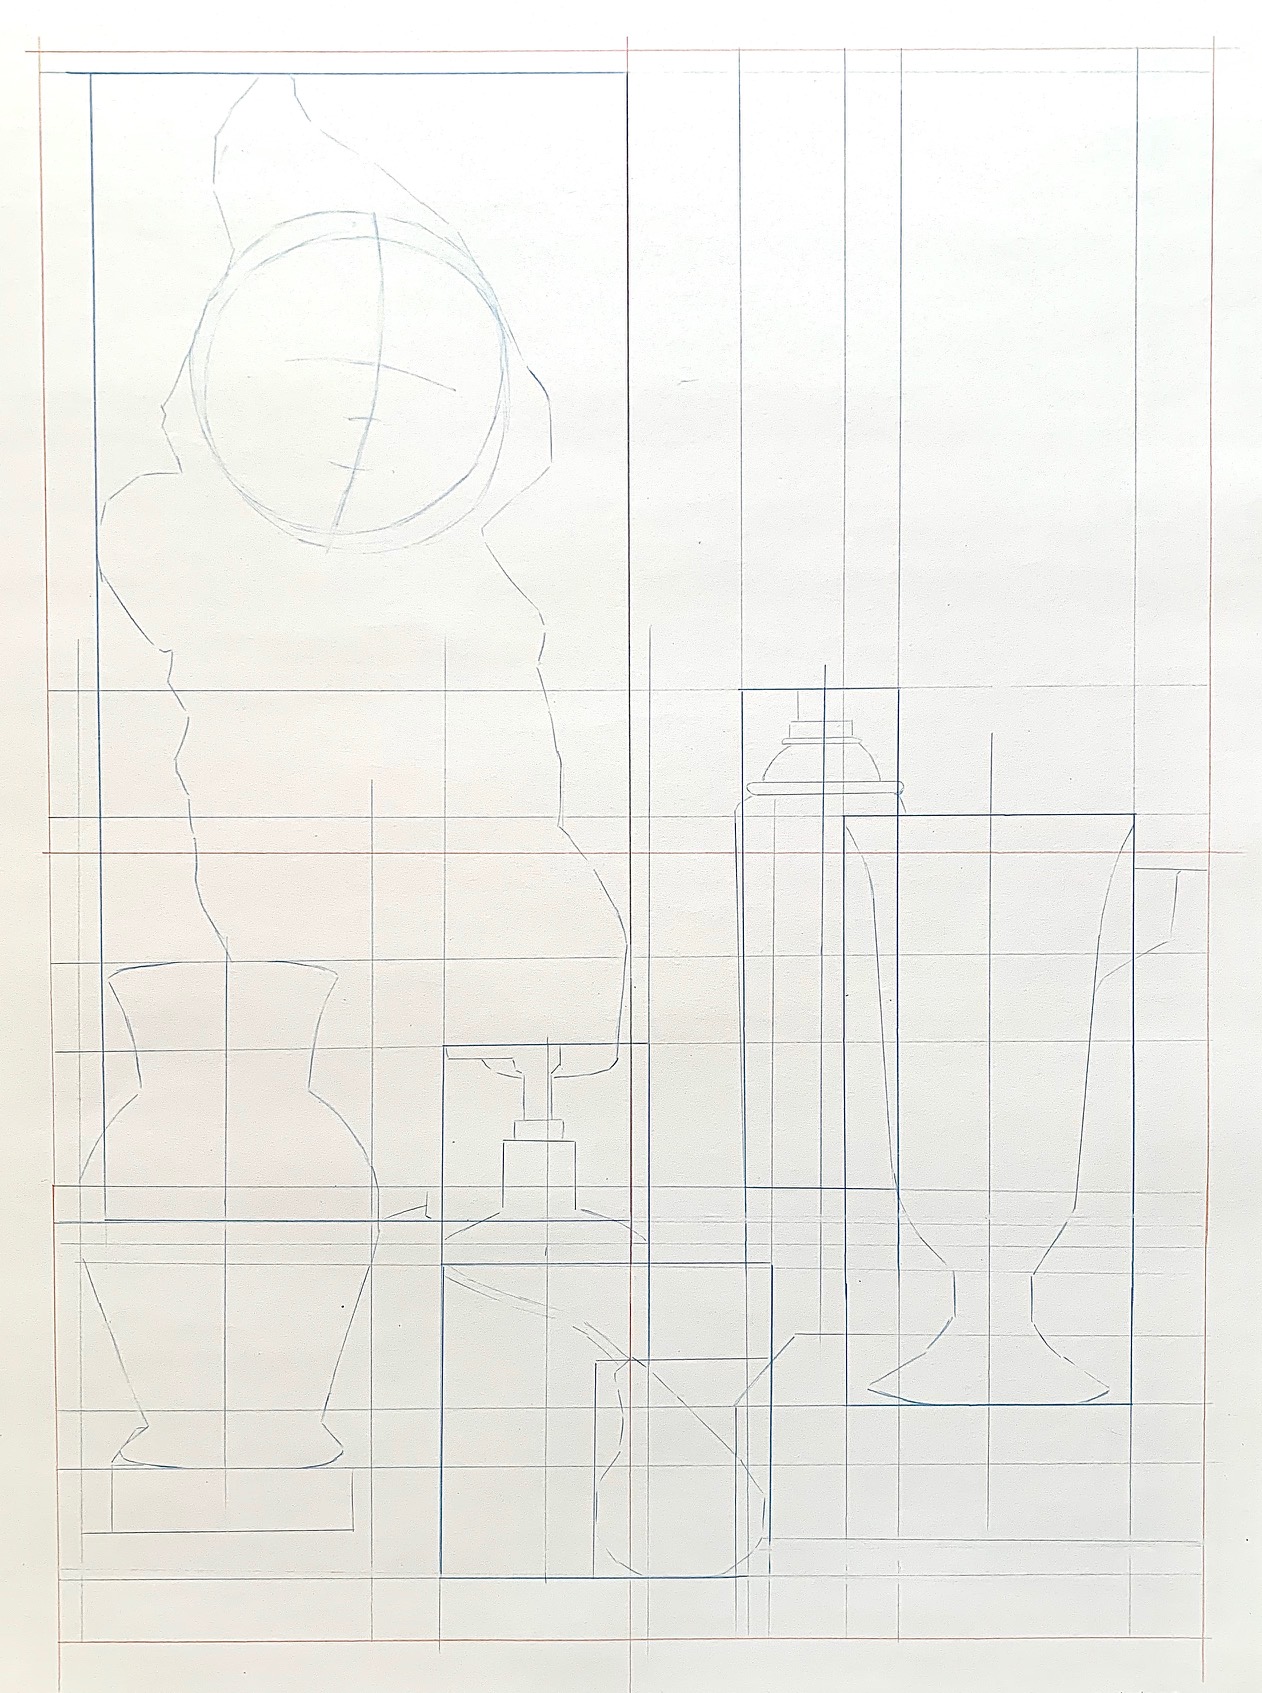
- Identify symmetrical objects – still life items with equal mass on either side of the midline.
- Use a ruler (or T-square) and a different Col-Erase Prismacolor pencil to draw a center line down the proportion box of each symmetrical object. Then, measure and compare if the left and right sides of the blocked in object match each other. Make corrections as needed.
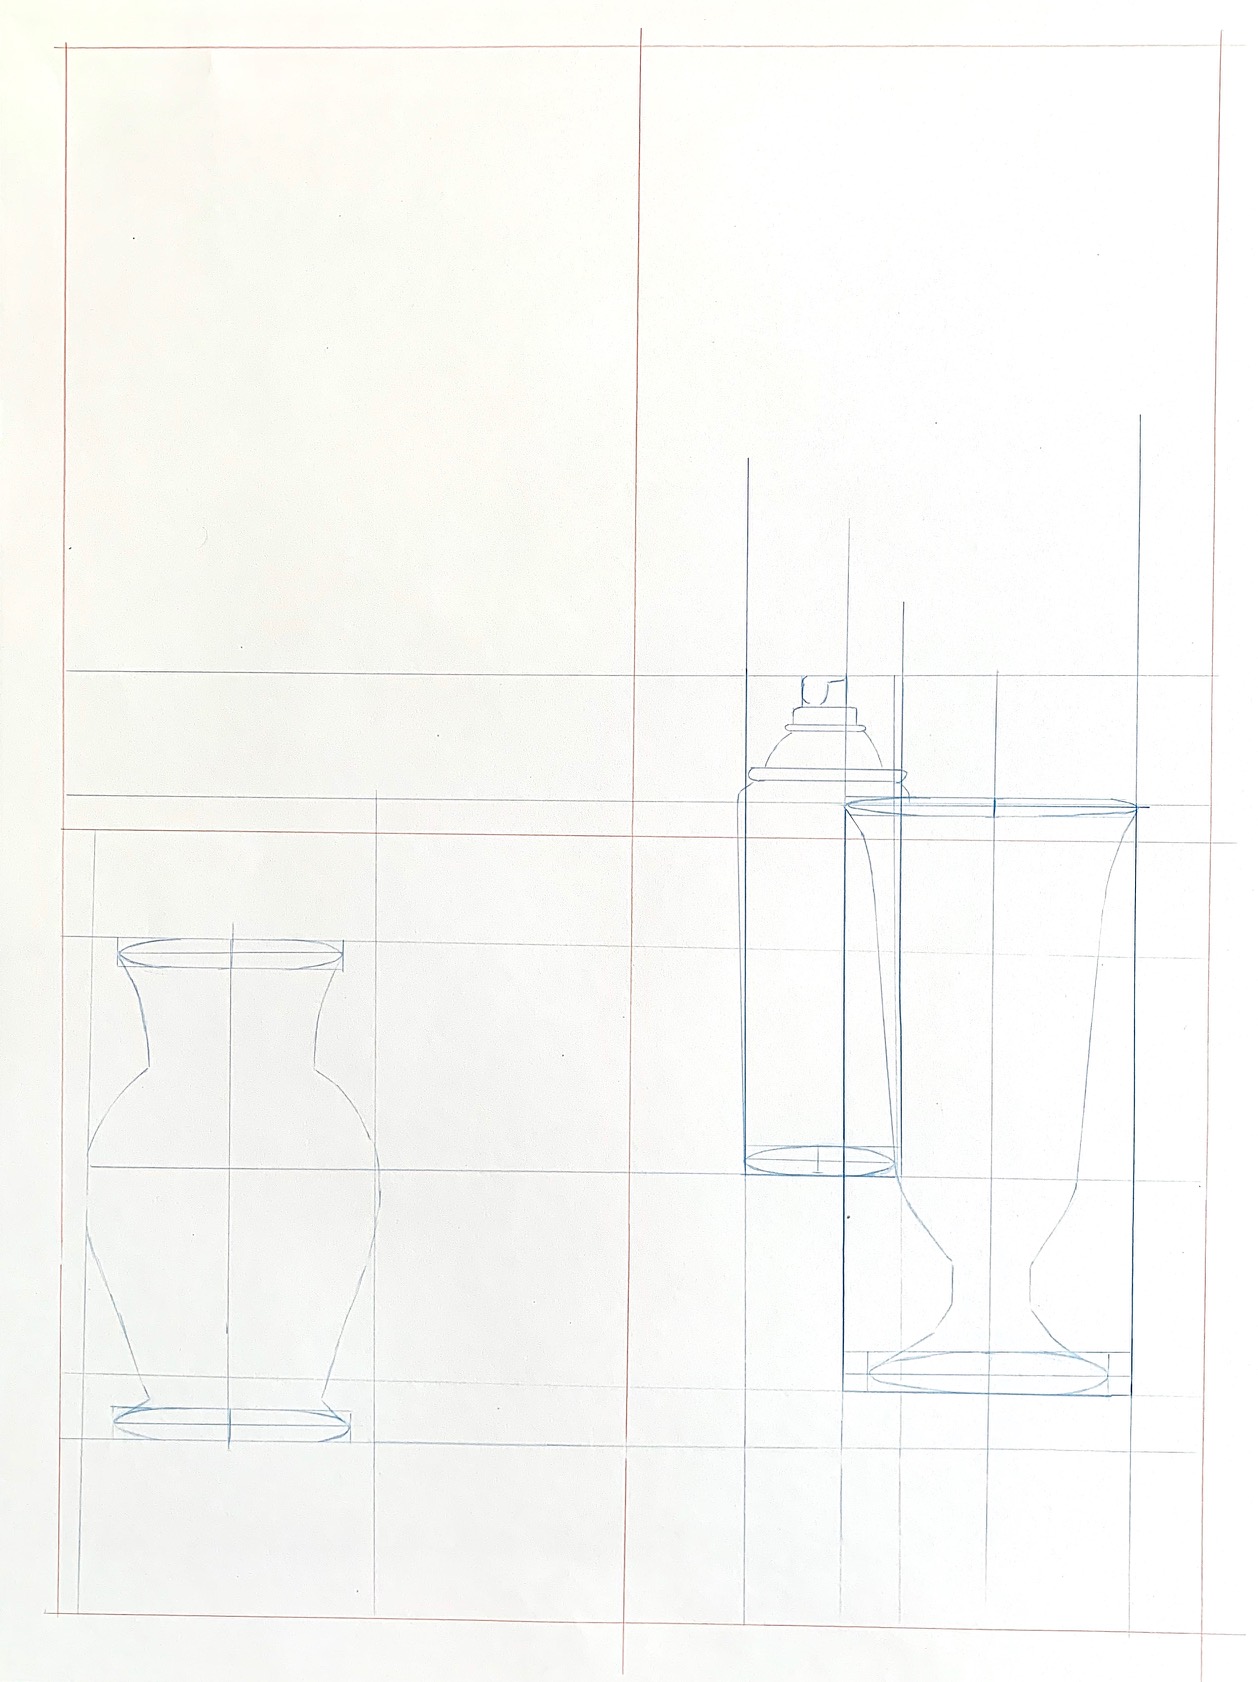
- After comparing the left and right sides of symmetrical objects, apply this through drawing on cylindrical objects.
- Through Drawing: a technique, employed during early stages of a drawing’s development, in which all objects are drawn is if they are transparent. This is used to maintain the symmetry and imply spatial depth when objects overlap. In this way, an artist can see and check the basic structure underlying volumetric forms.
- As you go through drawing on objects, also draw ellipses. Ellipses are ovals, elongated circles. An ellipse is curved all the way around like a race track. The bottom of the ellipse is especially important because its curve will signal to viewers that the object is volumetric. (If a round object is drawn with a straight line on the bottom, it will appear flat rather than volumetric.)
- After blocking in all of the foreground and middle ground objects, double-check positive and negative space with the sighting tool. Compare the still life reference and the drawing. Make corrections as needed.
- Then, add interior and exterior contour lines to all of the objects. Record the exterior and interior structure with only lines, no value. Only draw what you see; do not omit or add any content that is not observed in the still life reference.
- Contour Lines: highly descriptive lines that delineate, without tonal variation of shading, the edges and ridges of a form’s shape, volume, mass, and surface indentations, undulations, and modulations.
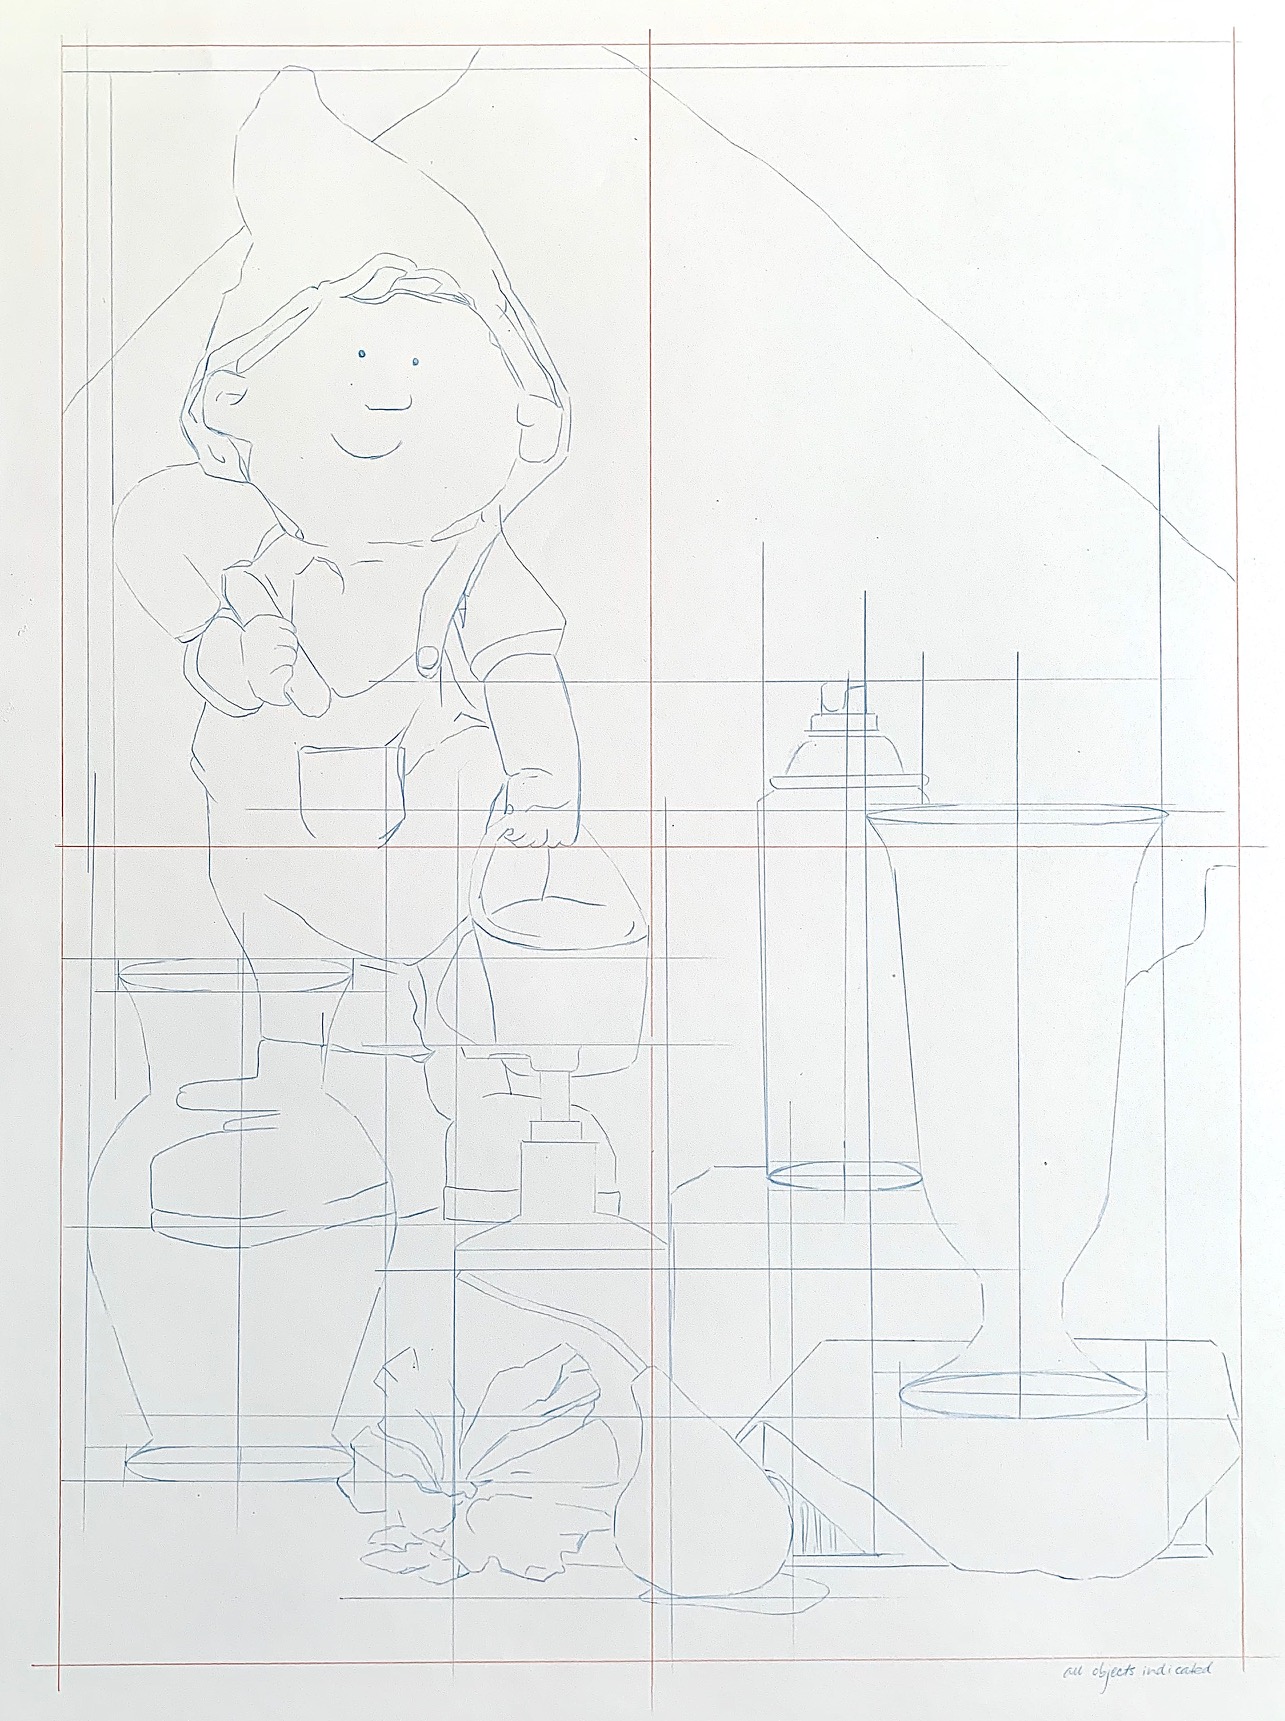
Contour Line Still Life Reference (L) and Interior and Exterior Contour Lines Example (R), Briana Miyoko Stanley, Col-Erase Prismacolor Pencil on Drawing Paper License: CC BY NC 4.0
- Format in a Format – create an interior area to finish the drawing.
- Determine the most interesting area of your drawing, about 50% of the composition.
- Then, use a t-square and ruler to draw lines to indicate this area. A rectangle is often preferred.
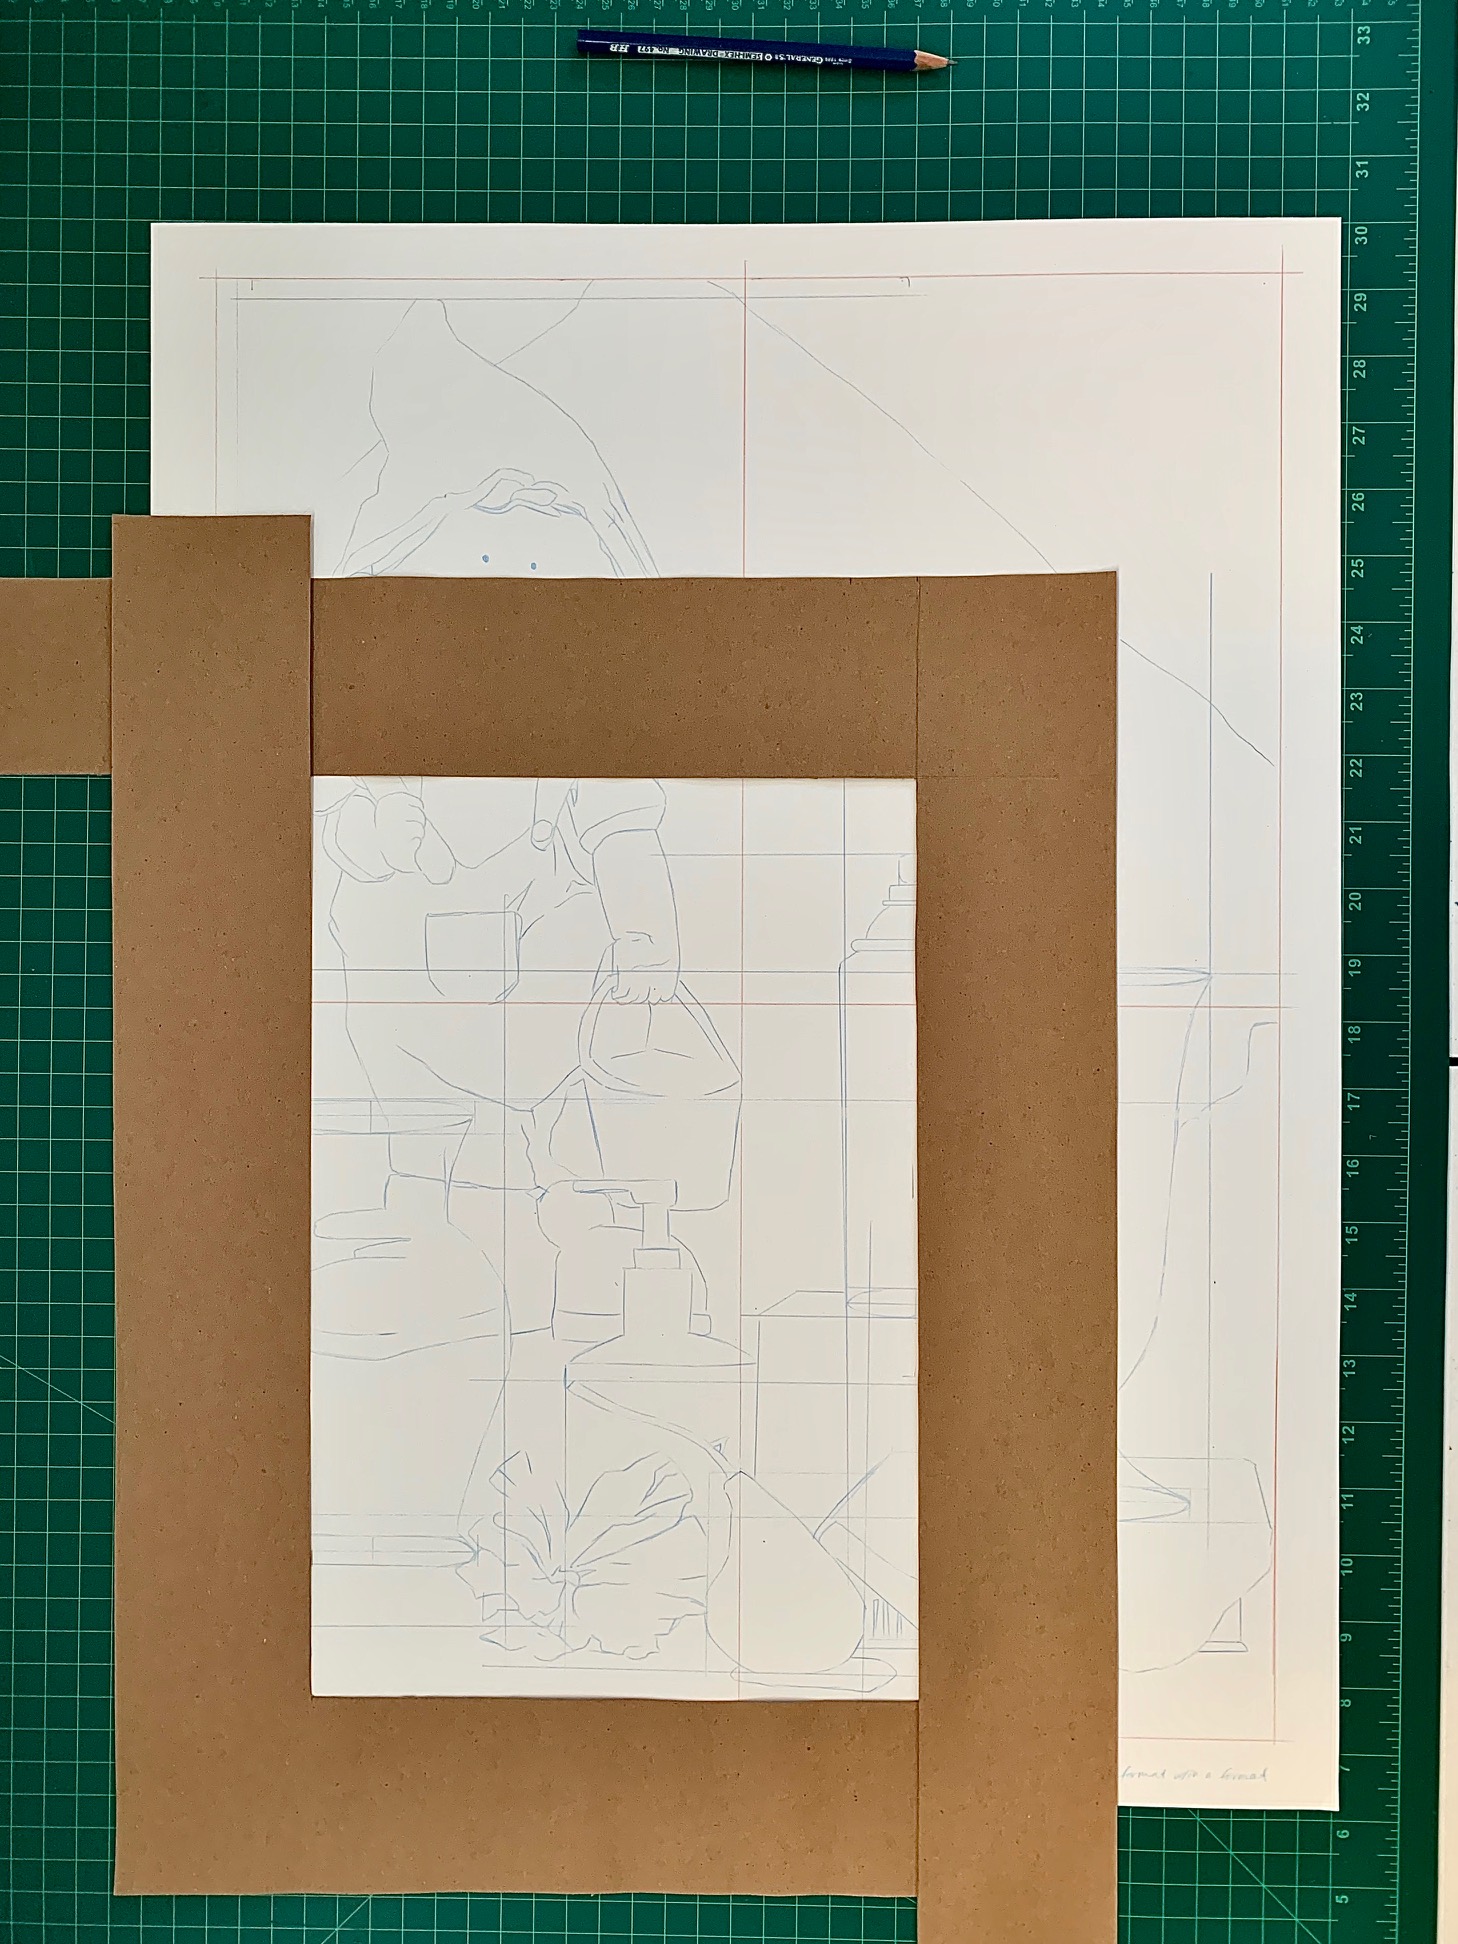
- Add descriptive contour lines inside the format in a format.
- Add lines to imply the texture and reflective surface of objects, as well as the edges of cast shadows and folds of fabric.
- Add the most detail to the focal point and objects in the foreground.
- Include slightly less detail on objects in the middleground and generalize objects in the background.
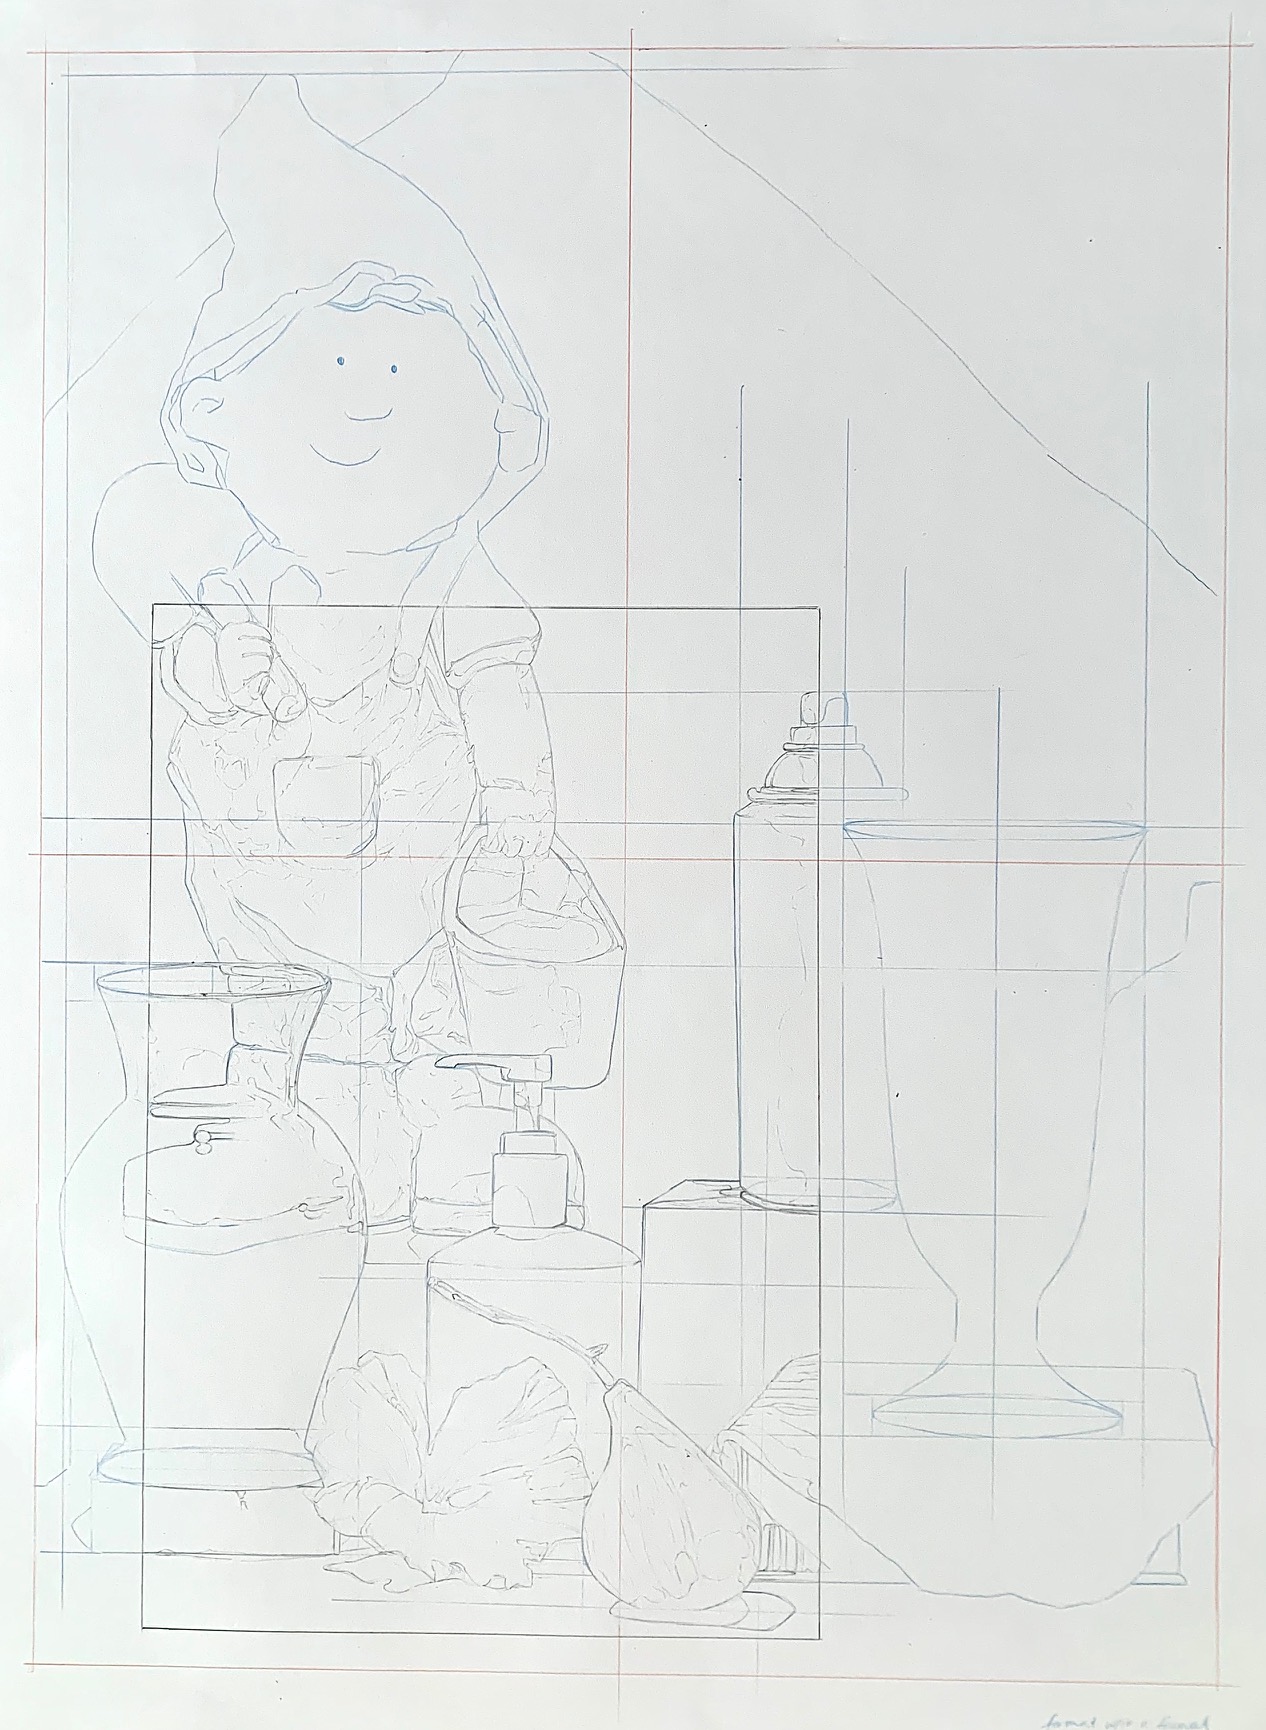
- Develop line weight variation
- Alternate using a variety of graphite pencils (2H, HB, 2B, 4B, etc.) to develop line weight variation inside the format in a format.
- You no longer need to work on the areas outside of the format in a format.
- Only use the line. Create thick to thin lines, long to short, and found to lost lines, that mimic the observed structure and surfaces on the still life setup.
- Keep in mind that line weight is determined by multiple factors
- Proximity to the viewer
- Thickness of the edge
- Creases in fabric, paper, etc.
- Alternate using a variety of graphite pencils (2H, HB, 2B, 4B, etc.) to develop line weight variation inside the format in a format.
Tip: Glass and metal objects can be particularly challenging. To imply a reflective surface, use delicate and curved lines as if you are mapping the highlights and reflective shapes you observe on the glossy surface. Thick to thin lines that are seen and then lift as if to disappear work best for this. Also, avoid enclosing the lines, since this will create outlined shapes. Outlines tend to flatten objects, so lifting the line so it’s not visible, even the smallest bit, can give the effective illusion of space and form. For glass objects in particular, record what is not only seen on the surface of the object, but also through the object. The glass will warp and displace what is seen through it. Record what you actually see, not what you think it should look like. And don’t forget to indicate the thickness of objects, especially glass.
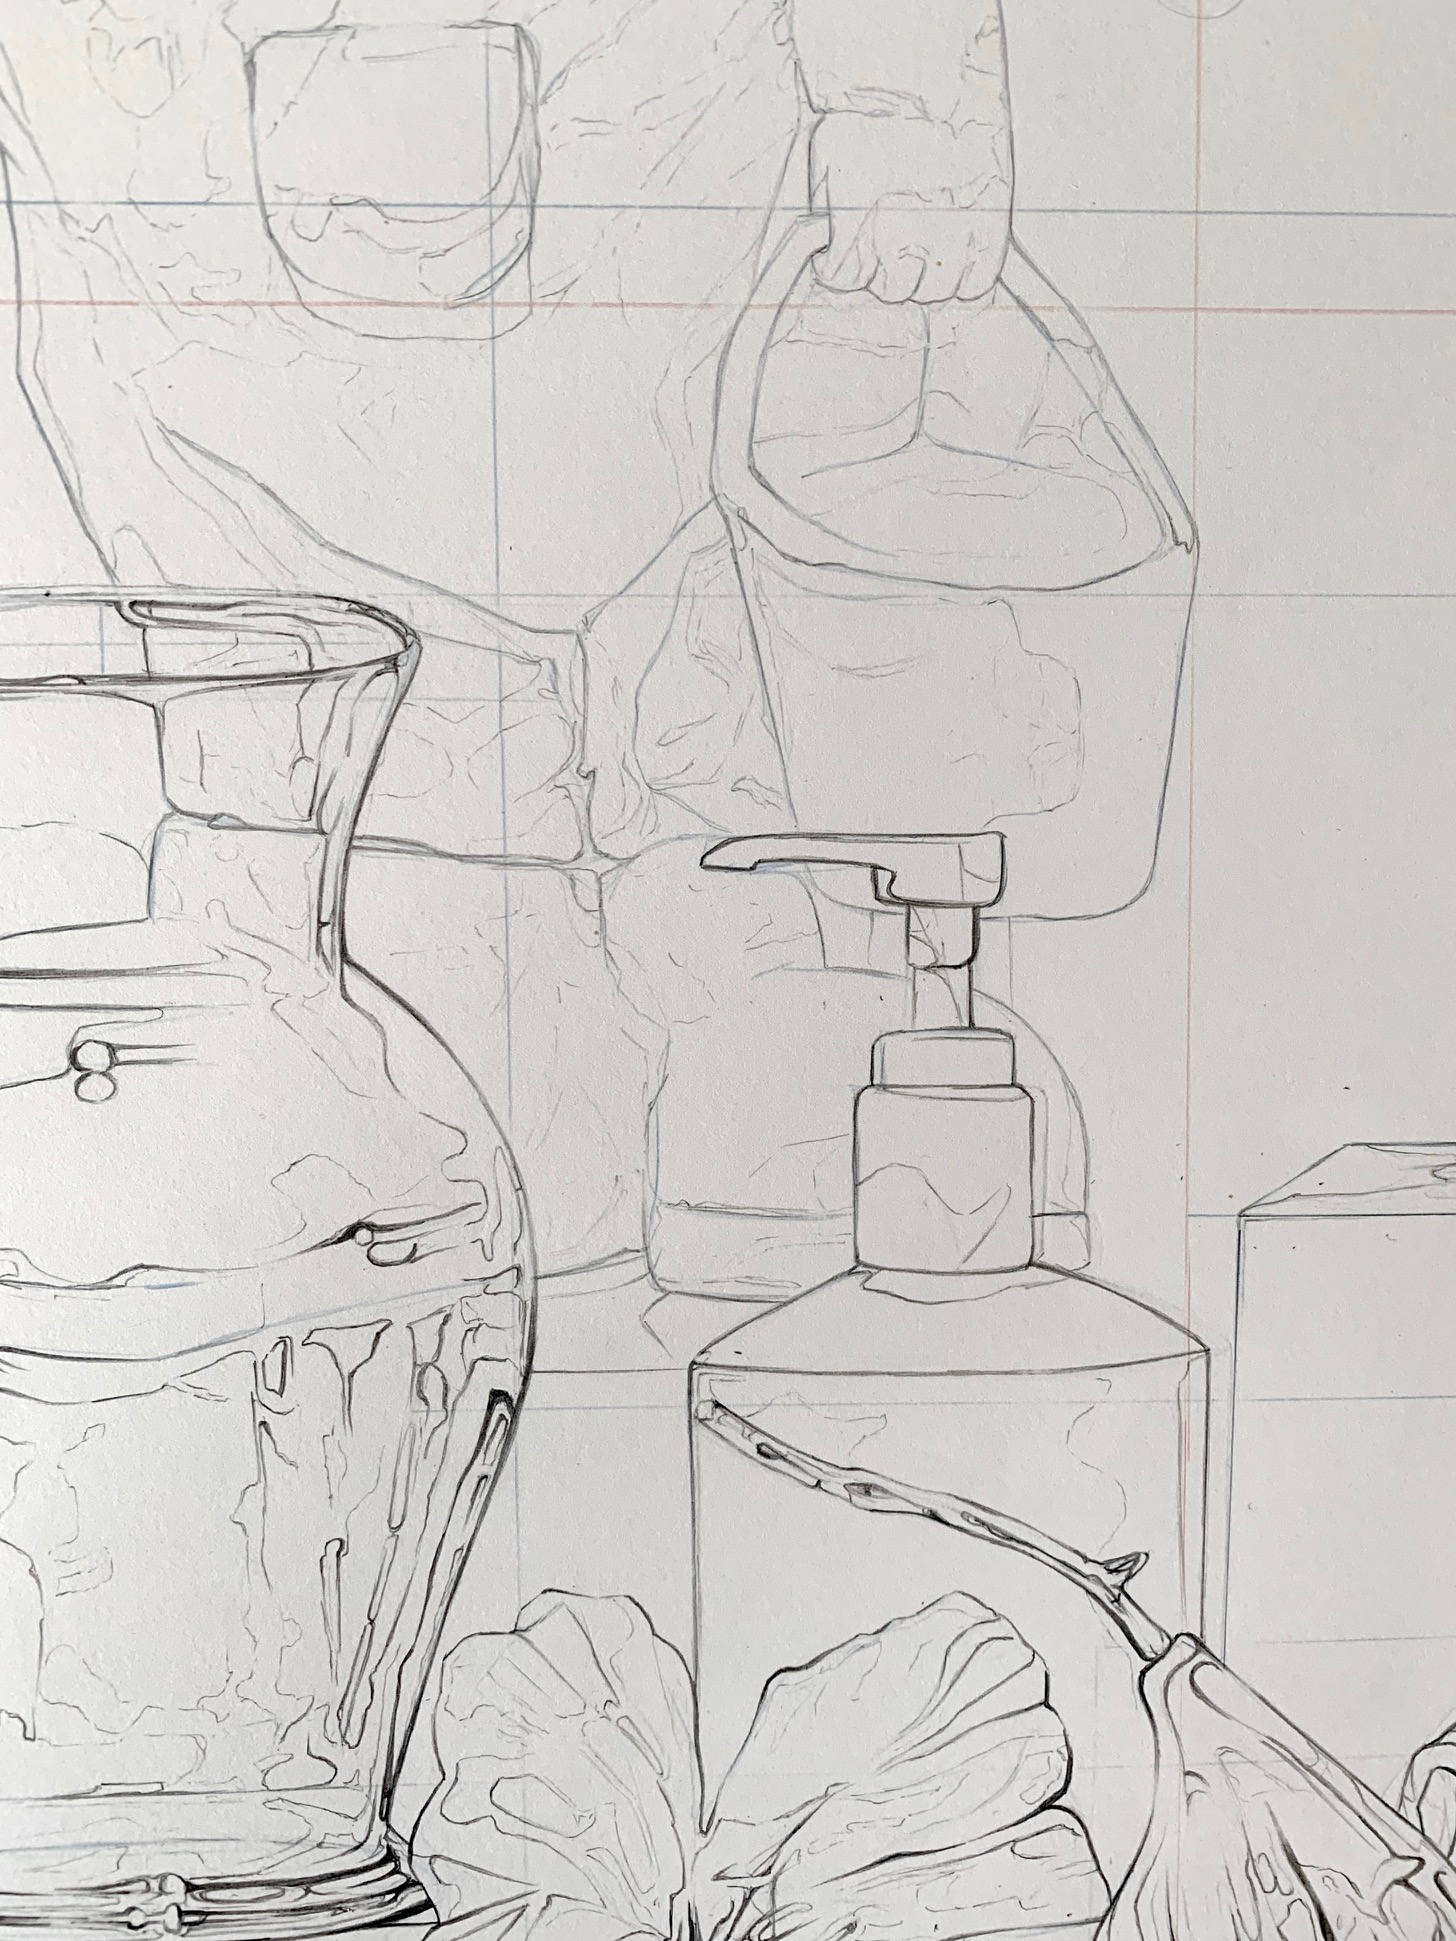
- When you’ve recorded every aspect of the positive and negative space in as much detail and accuracy as possible, step away from the drawing. Take a break, look at something else, go on a walk, etc. Then, return to the drawing and look at it from a vantage point. Compare it with fresh eyes to the reference and note if there are any differences. Are the objects the right proportion, in the correct location? Does glass look like glass? Are background objects less detailed than foreground objects, etc.?
- Make adjustments as needed.
- Then, admire the finished drawing. The result of all your time and effort!.
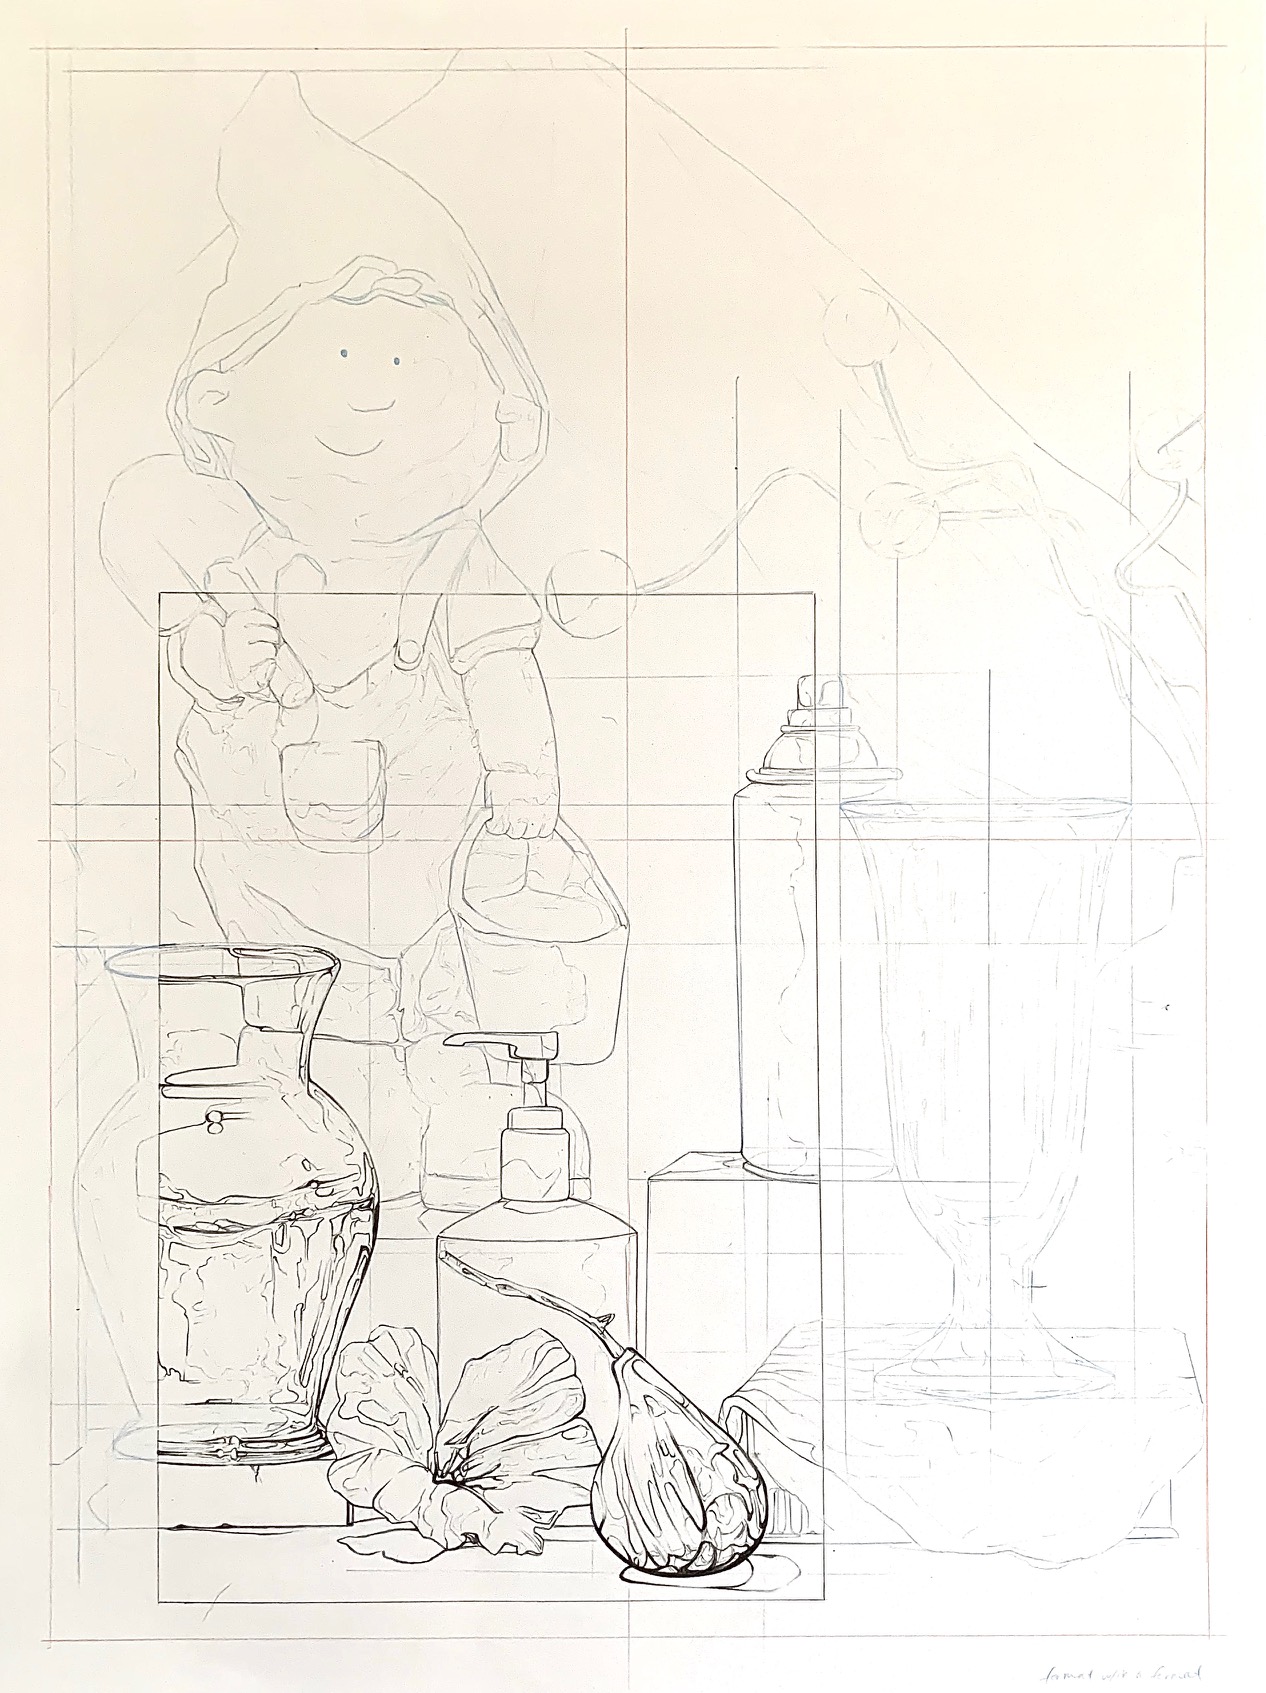
Contour Line Still Life Reference (L) and the Completed Contour Line Still Life Project Example (R), Briana Miyoko Stanley, Col-Erase Prismacolor Pencil on Drawing Paper License: CC BY NC 4.0
Result
The result will be a direct-observation drawing created with Col-Erase Prismacolor pencils and graphite pencils that displays a scene with believable space and texture.
Tips
Still-Life Tips
- When picking objects for the still-life setup, consider whether they are more important for their shape, texture, or pattern.
- Patterns can be lively and colorful, but they tend to obscure shapes. Don’t include more than 1-2 patterned objects in the same still-life setup.
Drawing Tips
- Allow for more time than you expect. Be patient, especially at the beginning, and double-check the accuracy of your sightings and measurements.
- Draw with light pressure and utilize your erasers as needed to make corrections or lighten lights.
- Develop the drawing from general to specific. This will unify the drawing. Avoid creating a drawing composed of beautiful segments and details.
- This drawing assignment is all about relationships. Pay attention to edges and transitions from light to dark.
- Record more details with dramatic line weight variation in the foreground and areas of emphasis. Then, start generalizing as objects move back in space, use less line weight variation, and use lighter lines as you depict middle-ground and background forms. This will create implied spatial depth.
Licensing and Attributions
“Simple Geometric Objects Drawing.” Written by Stephen P. Curry. License: CC BY
“Geometric Object Still Life Project.” Written by Stephen P. Curry. License: CC BY
“Advanced Still Life Project.” Written by Briana Miyoko Stanley. License: CC BY