
Drawing Concepts
The essentials of idea-based drawing
Introduction
It could be argued that almost all art is based on an idea or considered conceptual. Art begins with an idea, whether it is about something representational, such as a landscape, still life, portrait, or narrative, or something non-representational, such as abstraction, text-based art, or artworks about the actual physical process involved in creating it.
Conceptual art contends that the idea is the most important part of the artwork, so much so that in some cases the idea supersedes the physical product. In a 1967 essay titled “Paragraphs on Conceptual Art:” the influential American artist Sol LeWitt famously wrote:
“The idea itself, even if not made visual, is as much a work of art as any finished product. All intervening steps –scribbles, sketches, drawings, failed works, models, studies, thoughts, conversations– are of interest. Those that show the thought process of the artist are sometimes more interesting than the final product.”[1]
Concept drawing and any conceptual art emphasize the idea and its development through various tools of visual and creative thought. The process or method of producing it are equally important aspects of the finished artwork. Creating artwork involves much more than simply looking at a subject, such as a still life or landscape, and drawing it from observation. The drawing may start out as a vague idea, but through research, various iterations, and preliminary sketches, it evolves into a more complete and resolved artwork that communicates an idea. The idea could be a narrative, or it might reflect ideas about social, historical, religious, political, or emotional content. Some other possible considerations are identity, environment, or perhaps the nature of existence. Furthermore, the idea’s intent might be to educate, create mystery, raise questions, or even humor the viewer.
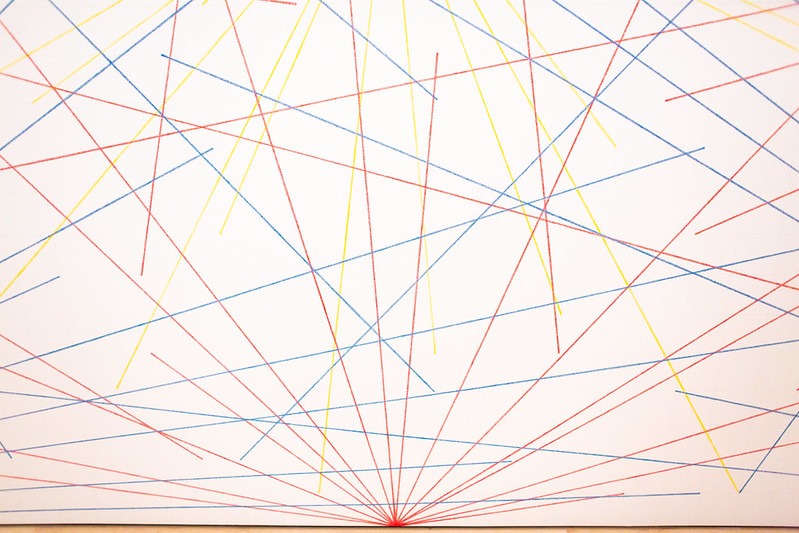
This chapter contains two Learning Activities, which each offer different approaches to concept drawing. The first project at the end of this chapter is a non-objective, nature-inspired design in charcoal, using conventional and non-conventional, inventive mark-making techniques. It uses various tools to develop and refine the concept to complete the drawing. The second approach puts concept at the forefront of the making process. This approach will be applied in an abstract drawing project that incorporates pen and ink. The abstract drawing project uses Sol Lewitt’s “Wall Drawing” method of mark-making to create a design based on a simple idea of written instructions to inform the drawing process. This project will consist of two components: the finished drawing and the written instructions of the steps involved to create it.
Master Artist: Sol LeWitt
Sol Lewitt (1928 – 2007) was an American artist associated with the late-20th-century Minimalism art movement and one of the pioneering members of the Conceptualism art movement. He worked in a variety of mediums including drawing, painting, printmaking, sculpture, installation, and art books. Lewitt showed extensively, nationally and internationally, in hundreds of galleries and art museums, and influenced many contemporary artists.
One of Lewitt’s main contributions to the Conceptual art movement was his belief that the most important aspect of the artist’s work was the idea or concept. He developed a system for making his artworks as instructions or directions for other individuals or teams of assistants, often art students, who would physically make them into drawings. This process is similar to that of a composer of a musical score and an orchestra performing the composition, or an architect who creates architectural plans and a contractor who physically builds the structure. He is probably best known for his “Wall Drawings” series, which he began in the 1960s and continued until his death in 2007 at the age of 79.
Lewitt stated that the actual drawings could never be permanent, and at the end of a showing or exhibition, the artwork must be painted over and destroyed. He believed that by using this democratic and collaborative process, the directions and their wording were open to interpretation by whoever produced the work, so the artwork could be recreated repeatedly and remain unique by being slightly different in each iteration. Lewitt said, “The idea becomes the machine that makes the art.”[2]
For more information and examples of Sol Lewitt’s “Wall Drawings”, you are encouraged to explore his work at this link, Sol LeWitt retrospective, Mass MOCA , and as discussed in this article, “Why Are LeWitt’s Wall Drawings So Influential” Public Delivery
“Master Artist: Sol LeWitt.” Written by Stephen P. Curry. License: CC BY
Ideation
Ideation refers to the entire creative process of conceiving, developing, and refining an idea for a finished drawing artwork. It may involve many steps and creative thinking tools, such as lists of ideas, brainstorming, subject-matter/visual research, thumbnail sketches, value drawing studies, and drawing diagrams. These tools set the groundwork and ultimately lead to the final concept and finished work of art. Ideation includes the following concept development components.
Brainstorming
Brainstorming is a casual and rapid way to generate a large number of ideas by jotting down lists, doing quick sketches or doodles, and even having collaborative discussions with teammates. When brainstorming, one idea can spark the next idea, and then another, and so on. Brainstorming can be a spontaneous way of beginning the ideation process.
Visual Research
Artists are visual thinkers, and the use of visual research is an important step in the development of a concept. It’s a great way to get the creative juices flowing to inspire ideas in the ideation phases of a project. Visual research is also important because it can lead to reference material for various compositional elements. Examples of visual research include, but are not limited to, photographs taken of subject matter or components of an idea, internet research of imagery, book or periodical research about a subject, style, technique, or inspiring artist. It can also involve collecting objects used for an idea, arranging and lighting subject matter such as a still life, and practicing the use of materials and techniques intended for the final iteration of the drawing concept.
Thumbnail Sketch
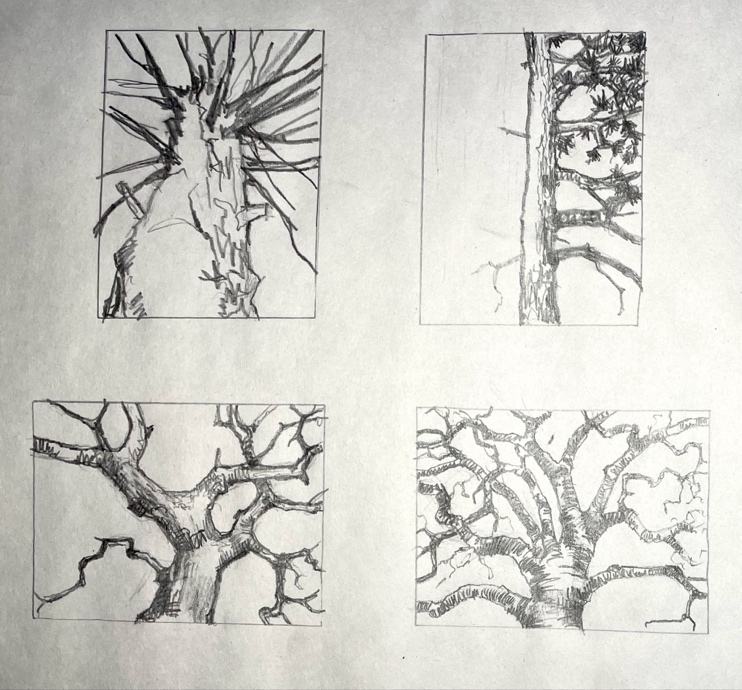
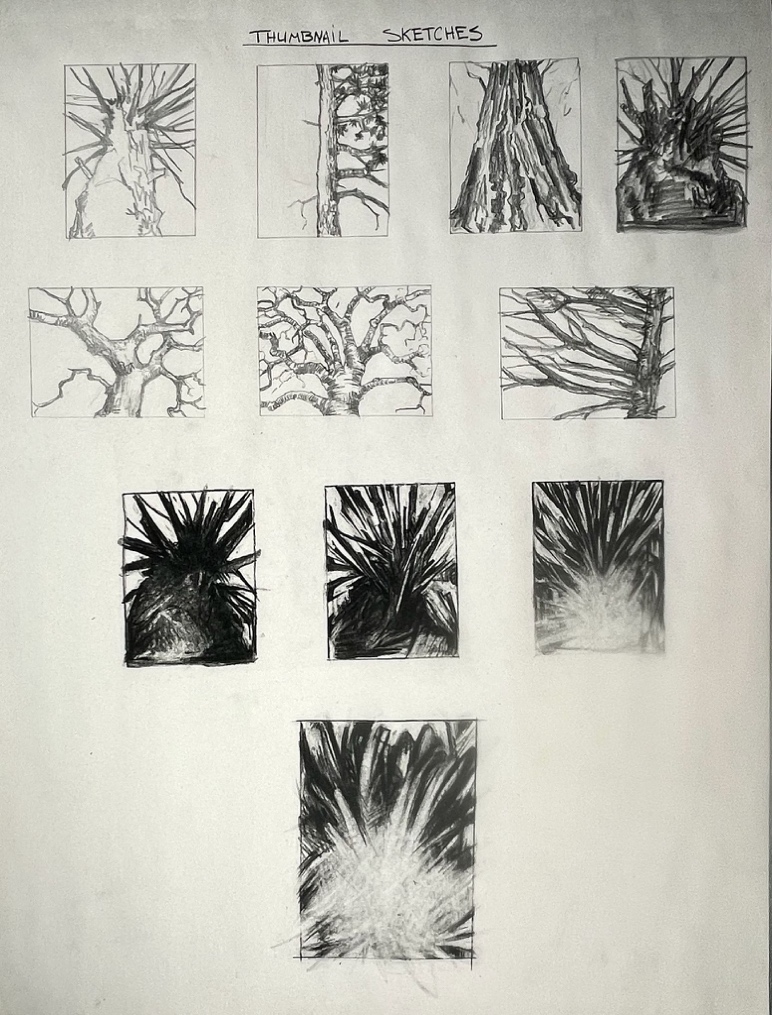
A thumbnail sketch is a small, quick drawing, usually two to four inches wide and often done in a series of three or more variations of an idea. They are used along with brainstorming and ideation to visually work out ideas about the composition, such as framing, cropping, and orientation. Thumbnail sketches can be done as quick gesture drawings, simple contour line drawings, or more involved value studies; however, the intent is to save time and materials and promote the creative flow of the ideation process before committing to the final iteration of the drawing concept. Thumbnail sketches can be a fun, spontaneous way to quickly generate a number of ideas that have the potential to build on early ideas and inform a greater number of concepts.
Iteration
Iteration is equivalent to the use of many rough drafts in a writing project. Beginning with thumbnail sketches and then progressing to one or two preliminary sketches based on a chosen thumbnail to further explore an idea in a little more detail are examples of iterations.
Value Study
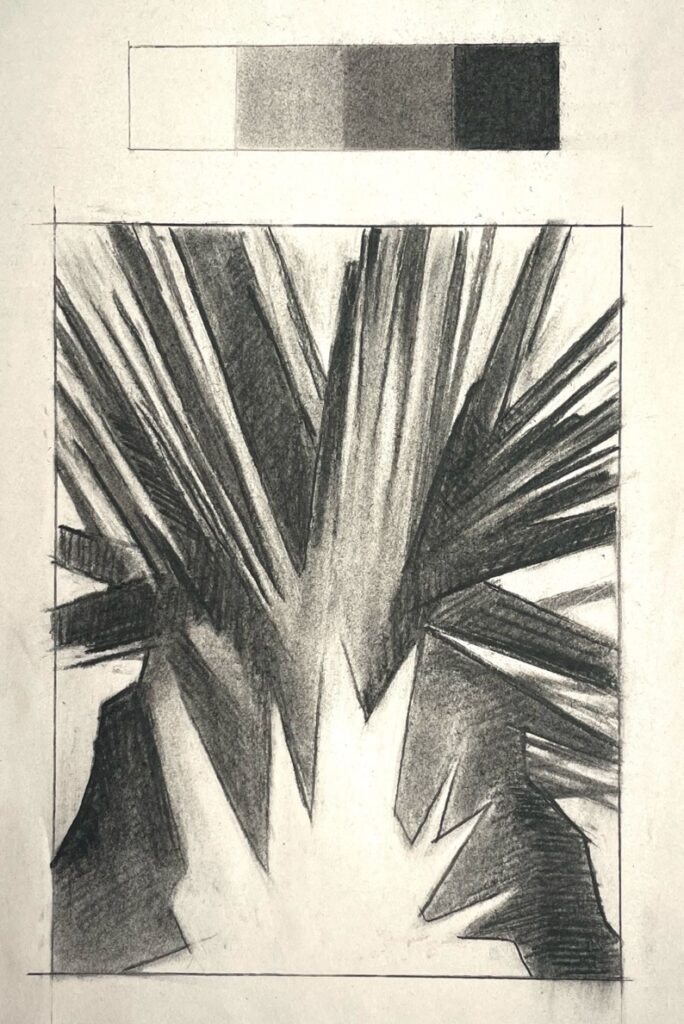
A value study is a small sketch, usually larger than the thumbnail sketches, but much smaller than the final artwork. It is a simplified study of the basic tonality of the subject matter. Think of it as a map of the general shapes of values and where they are placed within the whole composition. A value study is usually done with just 2 to 4 values, ranging from the lightest value, usually the paper, one or two mid-gray tones, and a dark value. It does not need to have clean, sharp edges or show fine details and it can usually be completed fairly quickly (5 to 20 minutes). Using a step value scale, as was addressed in Chapter 7 – Value, is a good visual tool to use with your value study.
Diagram Drawing
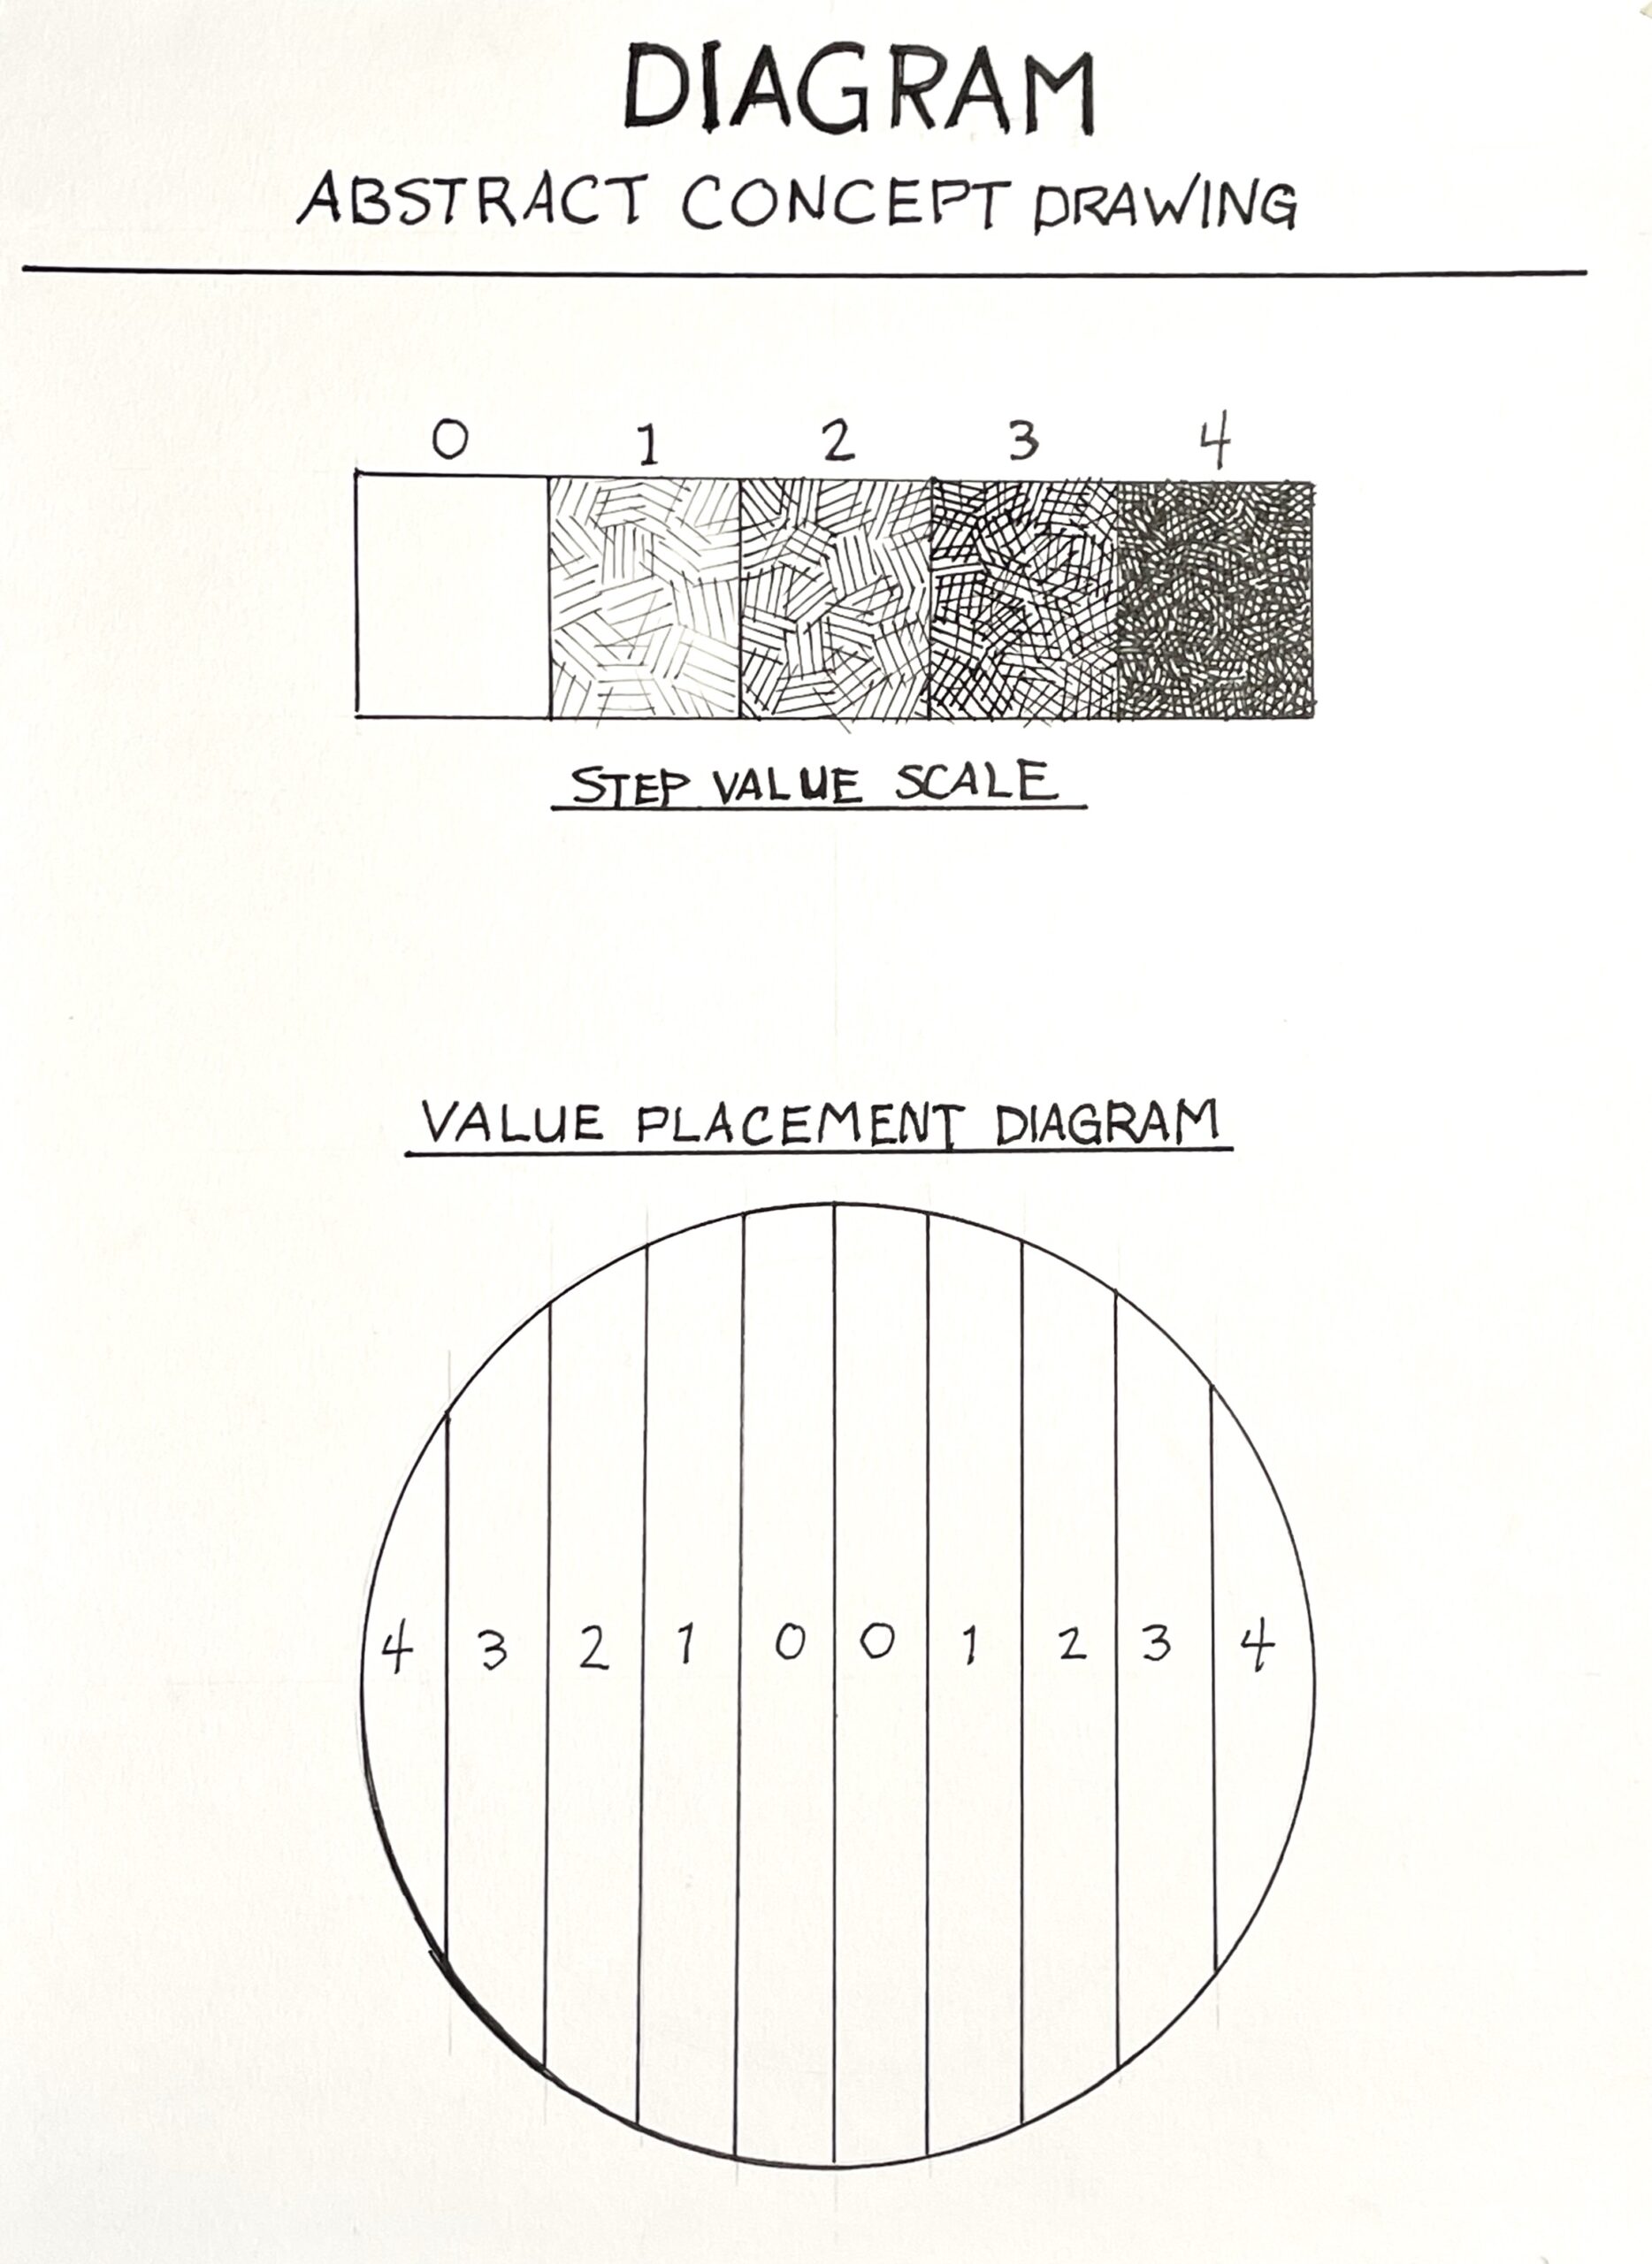
A diagram can be a very simple or quite a complex set of instructions about one or more components of a drawing or artwork to work out or explain a technique or structural element of a drawing. Some examples could include value scales, hatching technique examples, line style, texture, or pattern. A diagram drawing can also be a way to consider and plan out proportions and compositional arrangements before committing to the final drawing.
Creative Constraints and Concept Tips
As important as it is to use many or all of these tools to develop drawing concepts, overthinking an idea can sometimes affect the spontaneity and originality of the finished artwork. Some amount of discovery during the process of making can lead to surprise with exciting results. We often think that the more information and content behind an idea, the better. However, too many options or ideas baked into a concept can overwhelm and stagnate the finished drawing.
Constraints or creative limitations built into the structure of the drawing process can have the opposite effect, forcing creativity and innovation. As the common phrase goes, “less is more.” Sol LeWitt used these ideas of limitations extensively in his “Wall Drawings.” His drawing concept instructions, which he considered the actual artwork, would often dictate limitations to how each drawing must be produced. Limitations to materials, size, shape, or even specifications about what kind of line can be used restrain options while at the same time encourage or even force problem-solving and creativity. Many creatives throughout history, including writers, musicians, designers, and architects, have relied on self-imposed constraints for these reasons. Examples of intentional constraints that an artist might use to create a challenge could be to decide that all lines drawn in a design had to be straight and one inch long, or that every line in a drawing must not touch another line. In many of LeWitt’s drawings, he specified that only yellow, red, blue and black colored pencils could be used to produce a composition.
Master Artist: Kara Walker and Concept
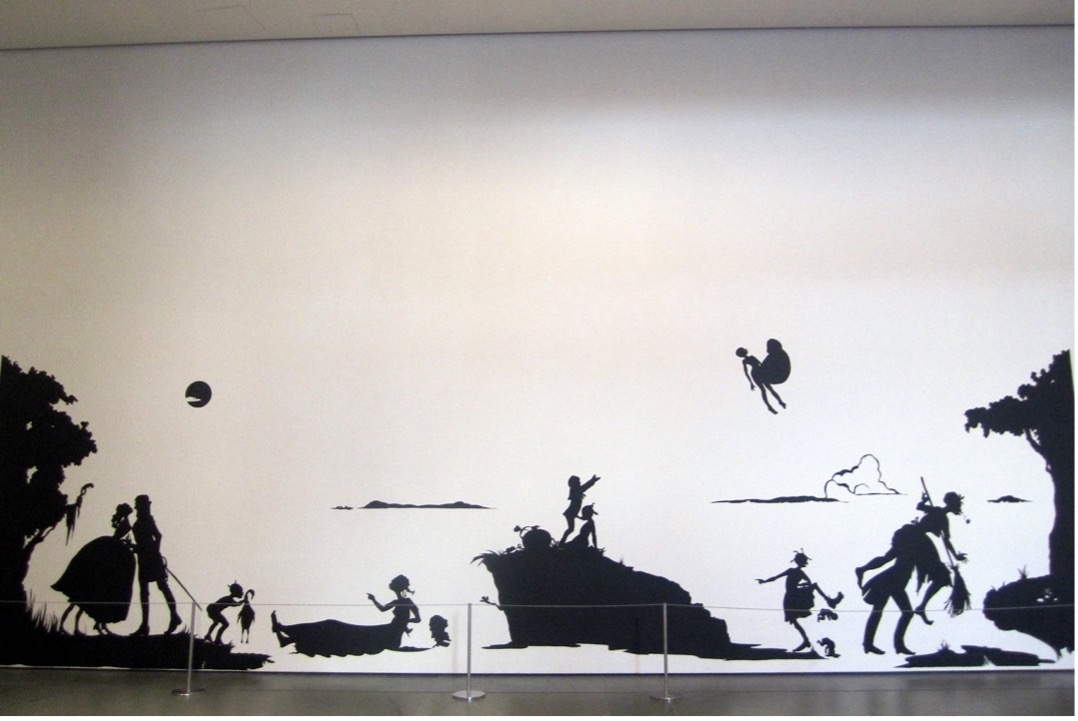
Kara Walker is a Contemporary artist who masterfully uses media and technique to communicate her concept. To engage with the social concept of skin color from a historical lens, Walker uses black paper cut-outs on a white ground. This stark method solely utilizes positive and negative space to reference the popular artform of the 18th and early19th century: the silhouette. However, unlike the original intended meaning of showing the patron’s beauty and status, Walkers’ pieces emphasize contrasts of beauty and horror that mirror the sharp value contrasts of her technique.
In the image below, the viewer can look beyond the visually pleasing aspects of fine clothing and graceful poses to notice distortions of the human form, as well as sexual and violent actions taking place. Walker’s work adds a double meaning of the black silhouettes, referencing skin color, as she says “whiteness is just as artificial a construct as blackness is.1 Walker also comments on the artificiality of the silhouette technique itself, specifically when used in the 19th century for phrenology, the racist pseudo-science of determining personality characteristics by head shape.2 Thus, her distinct aesthetic, created by media and technique, perfectly underscore the original concept’s intent.
“Master Artist: Kara Walker and Concept.” Written by Elaine Wilson. License: CC BY
Conclusion
The idea or concept is the point of most artwork. Concept drawing and art in general is about visually communicating something to the viewer. Developing ideas through the ideation process with brainstorming, research, thumbnail sketches, and drawing iterations, are the spark that make your drawings engaging and give them complexity and meaning.
Footnotes
1The Museum of Modern Art, “Kara Walker, Gone: An Historical Romance of a Civil War as It Occurred b’tween the Dusky Thighs of One Young Negress and Her Heart 1994,” The Museum of Modern Art Collection, accessed July 15, 2026, https://www.moma.org/collection/works/110565.
2 Isabella Bragoli, “Kara Walker 1969-,” HASTA, November 25, 2019, https://www.hasta-standrews.com/birthdays/2019/11/25/kara-walker-1969-.
Drawing Concepts Activities
1. Nature Inspired Mark-Making Project
Description
This project will use a different approach than other chapters to avoid more traditional methods of observational drawing. Instead, you will explore mark-making with an imaginative use of materials and composition, inspired by nature and organic forms, to guide the development and completion of a non-objective, abstract drawing using charcoal as the main medium.
In this project, use various tools for ideation and development (brainstorming, visual research, and thumbnail sketches) to assist in creating a concept drawing in charcoal. Work through several iterations, including at least three thumbnail sketches and at least one preliminary value study, to create a finished drawing.
Activity Parameters
Duration
6-9 hrs.
Size
18” x 24” (12×16” minimum Image Size)
Subject
Your subject will be the inspiration of forms in nature, your surroundings, and natural phenomena.
Techniques
- Conventional and additive charcoal techniques – line, hatching, value, tonal drawing, blending, and gradation
- Reductive charcoal techniques – erasure, smearing, removing, and manipulating charcoal for light creation and effects
- Unconventional charcoal techniques – alternative tools and material use
(sponges, paint brushes, toothbrush, Q-tip, spray bottle, to apply and manipulate
charcoal with water)
Required Materials
- Drawing board
- Drawing paper (18” x 24”) – optional, Charcoal paper.
- Newsprint (18” x 24”) – optional
- Straight edge ruler
- Graphite pencil (H or HB)
- Kneaded eraser
- Rubber eraser
- Mono Zero eraser
- Charcoal pencils ( HB and 2B)
- Vine charcoal
- Compressed charcoal
Recommended Materials
- White charcoal or pastel
- Workable spray fixative
- 1” painters tape
- Viewfinder
- Powderpuff
- Blending stump
- Rag or chamois
- Sketchbook
Student Learning Outcomes (SLOs)
- Use of ideation components to conceive and develop a drawing concept
- Use of charcoal and optional drawing materials to create a nature-inspired design composition utilizing conventional and non-conventional mark-making
- Use of value range
- Application of additive, reductive, and experimental charcoal drawing techniques
Method
Ideation
Consider the different concept-development components discussed earlier in the chapter to begin the ideation process.
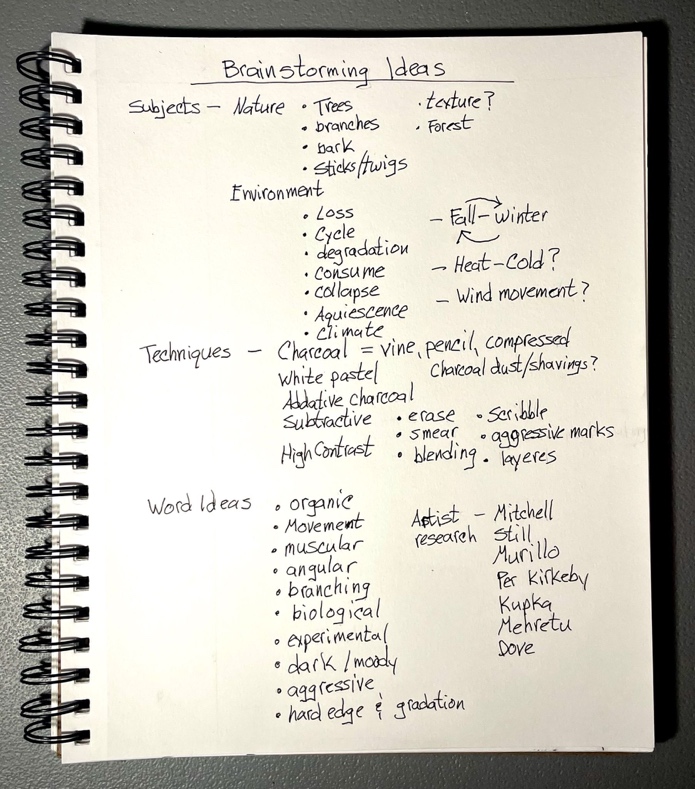
- Brainstorming: List as many ideas as possible. Brainstorming should be approached in a playful manner to spark engaging ideas and get the creative juices flowing. Ideas to consider might include natural subject matter, setting, mood, lighting, types of marks, and the use of the charcoal medium; stylistic considerations; and drawing techniques, such as conventional and unconventional uses of charcoal.
- More examples of concept ideas
- Plant and nature shapes and forms
- Light and shadow through foliage
- The movement of water or wind
- Textures in nature
- Seasons
- Weather events
- More examples of concept ideas
- Visual Research:
- Begin by exploring nature, organic forms, and natural phenomena.
- Photograph nature subject matter you encounter or find from your list of topic ideas.
- Do some internet searches for images on Instagram, Pinterest, Google Images, or other image applications.
- Research art and nature books and periodicals.
- Find and gather objects from nature for reference material.
- Begin by exploring nature, organic forms, and natural phenomena.
Note: On the use of AI in visual research and art making in general, make sure you are aware of your learning institution and instructors policies on the use of AI. Check with your instructor on their guidelines for AI use. AI imagery and other content is an amalgamation of sources and work produced by artists, photographers, and creative content providers. Using AI to generate ideas and brainstorm, can be a helpful and quick way of starting the ideation process, but overreliance on it and passing off AI-generated content as your own is unethical and ultimately impairs the creative learning process. Transparency about its use and using your own creativity is the best policy.
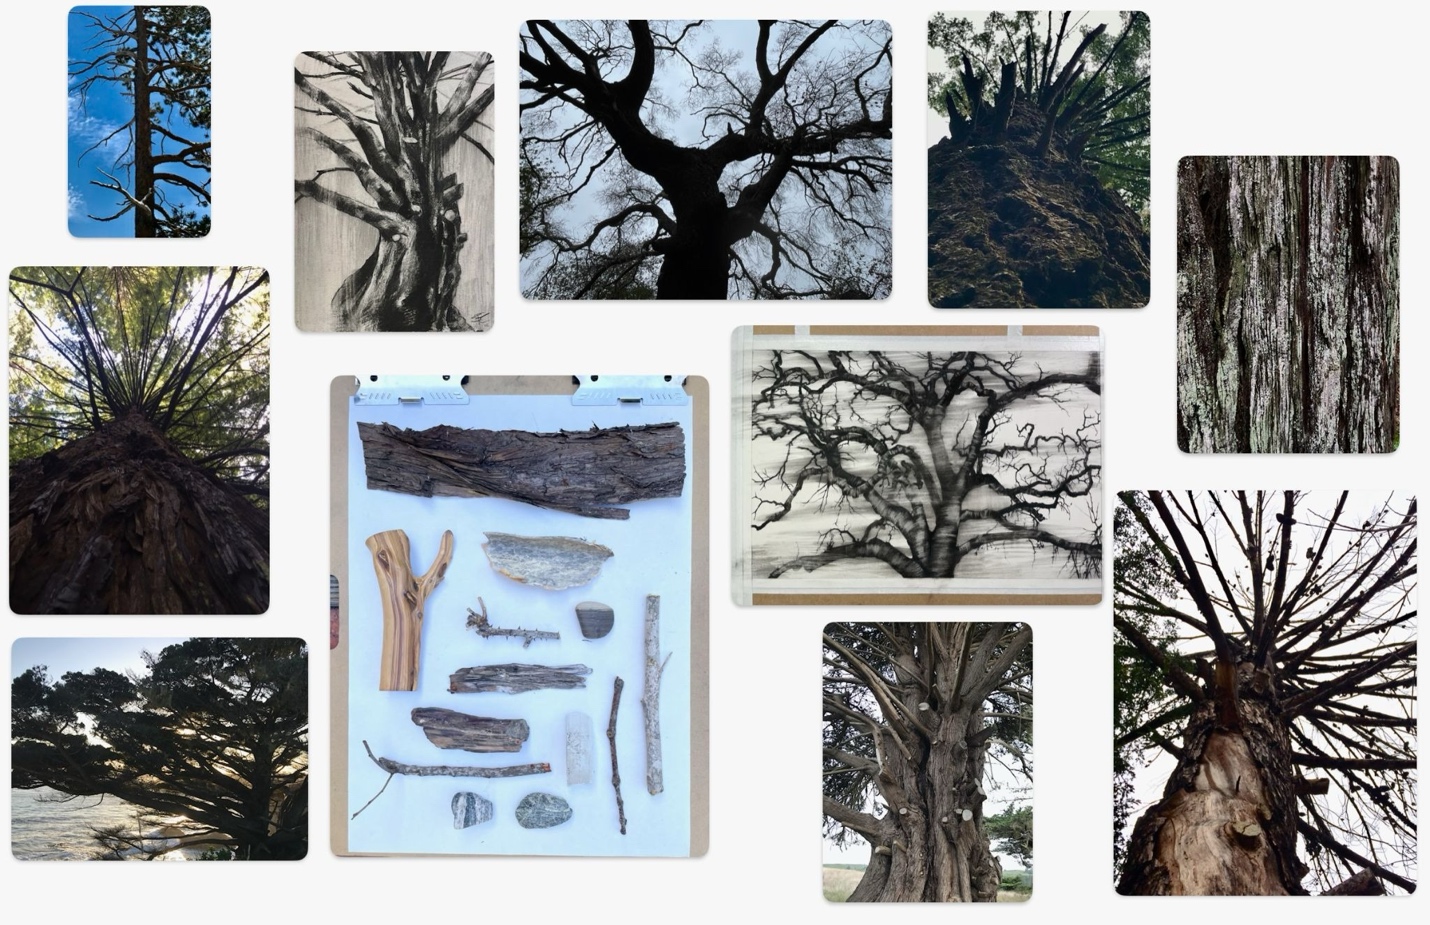
- In a sketchbook or drawing pad, experiment with mark-making, designs, and textures inspired by your natural surroundings, visual research, and natural phenomena. Try to be spontaneous, inventive, and experimental.
- Thumbnail Sketches
- On a sheet of newsprint or drawing paper, draw 3 to 6 rectangles about 2” x 3” with a pencil or pen.
- Thumbnail sketches should be quick and maybe even messy.
- Spend no more than 2 – 5 minutes on each sketch.
- Avoid excessive detail and focus on variations and the concept’s evolution.
- The thumbnail sketching process works best if you work rapidly on one at a time, responding to each thumbnail in the next iteration.
- In graphite or vine charcoal, start with a quick thumbnail sketch from observation or your visual research.
- Based on the first drawing, create the next thumbnail by abstracting the initial sketch.
- Consider line, inventive mark-making, movement, and value.
- Continue this process, adding inventive and experimental marks and shapes until you create a selection of interesting and dynamic compositions inspired by nature and your surroundings.
- On a sheet of newsprint or drawing paper, draw 3 to 6 rectangles about 2” x 3” with a pencil or pen.
- Preliminary Value Study: Choose the most promising thumbnail as a reference for the next iteration.
- Optional step: Work with a classmate, share and discuss the thumbnail for your concept with each other. Offer feedback and suggestions for variations and improvements on each of your ideas, and collaborate to help each other produce a more successful drawing.
- Draw a value study on an 8” x 10.5” rectangle with graphite or vine charcoal and a ruler along with the thumbnail sketches or on a separate sheet of newsprint.
- Finish the value study by focusing on mark-making, values with lights and darks, and any corrections or variations from the original idea, before beginning the final artwork. Do not feel the need to replicate the thumbnail; be intuitive, and improvise as needed.
Preparatory Drawing
- On an 18 x 24” sheet of drawing paper or charcoal paper, measure in 1” to create a border around the edge of the picture plane, creating a 16” x 22” format.
- Mask a 1” border with de-tacked painter’s tape.
- Option 1: Leave the white of the paper to begin the drawing on.
- Option 2: Tone the paper with vine charcoal and a powder puff or cloth rag.
Final Drawing Method
- Use the preliminary value map to lightly lay out the basic composition for your nature-inspired mark-making design in vine charcoal on the prepared drawing paper.
- Work with additive charcoal techniques using vine charcoal to begin. Add charcoal pencil as needed for small details, specific techniques, and line work.
- Make use of conventional and unconventional mark-making.
- Create reductive or subtractive techniques with various erasers and rags.
- Add any applications of splattered water or ink. (Tip: test and practice these techniques on separate paper during the ideation process before using on the final drawing.)
- At this point, vine or charcoal pencil may need to be added or re-applied to the composition.
- Save compressed charcoal applications for the darkest values at the end of the drawing process.
- Gently remove masking tape. Clean up the borders, smudges, and any lighter values needed.
- Lastly, you may choose to spray 1 or 2 light coats of workable fixative over the entire drawing surface to protect your drawing from smearing. Make sure to only spray outside or under a ventilation hood. (This is optional)
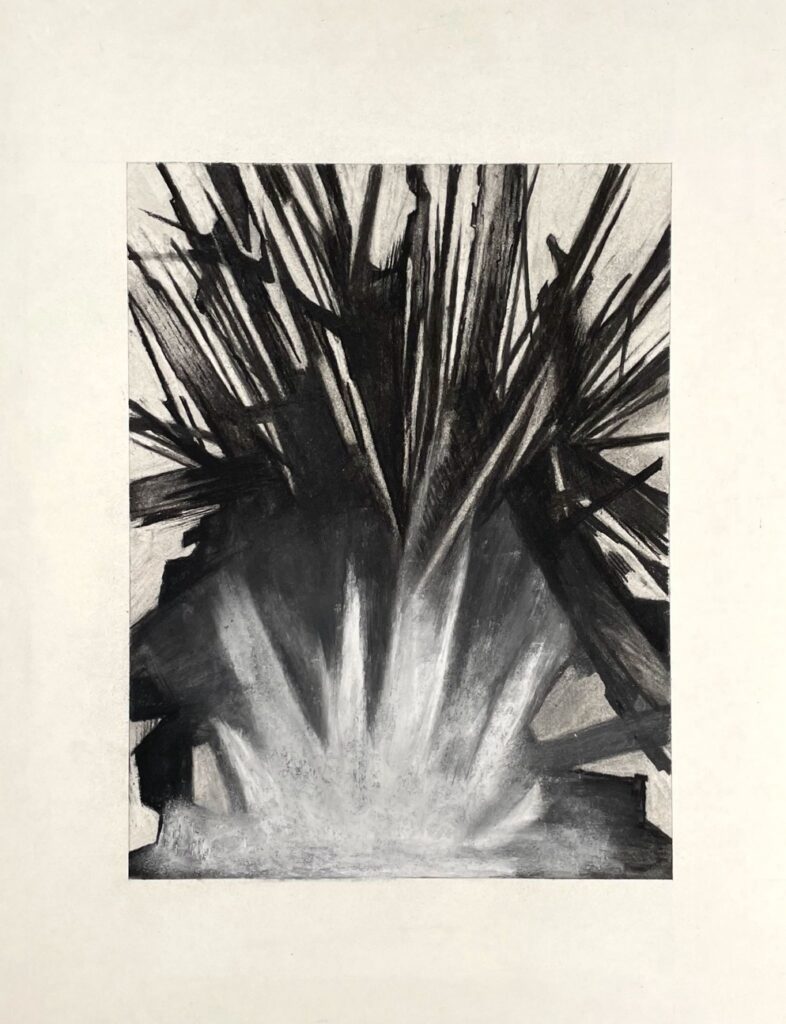
Results
The results will be a completed drawing in charcoal that uses mark-making with additive and subtractive techniques to create a nature-inspired abstract or semi-abstract design. The drawing will demonstrate an understanding of ideation in the development and resolution of a concept drawing.
2. Abstract Concept Drawing Project (Sol Lewitt Method)
This project is inspired by Sol LeWitt’s “Wall Drawing” concepts. It will use his method of creating a set of instructions to explain the steps involved in producing the drawing idea. LeWitt considered the idea for his drawings, paintings, or sculptures to be the actual work of art. The physical drawing or other artwork served more as a result of the idea, similar to how the performance of a musical piece is the result of the written composition. Once the song ends, the music exists only in the written work and our minds. He then created a form that included the instructions, the title, and his signature as a certificate of authentication, making the idea the official artwork.
Description
For this project, develop an idea using the various components of ideation and concept development, such as listing ideas, brainstorming, thumbnail sketches, preliminary drawing studies, and diagrams, to create instructions for the completion of the drawing. Unlike projects in previous chapters, this project will not be representational or drawn from observation; instead, you will create an abstract design invented from your imagination. This project consists of two parts.
Part One
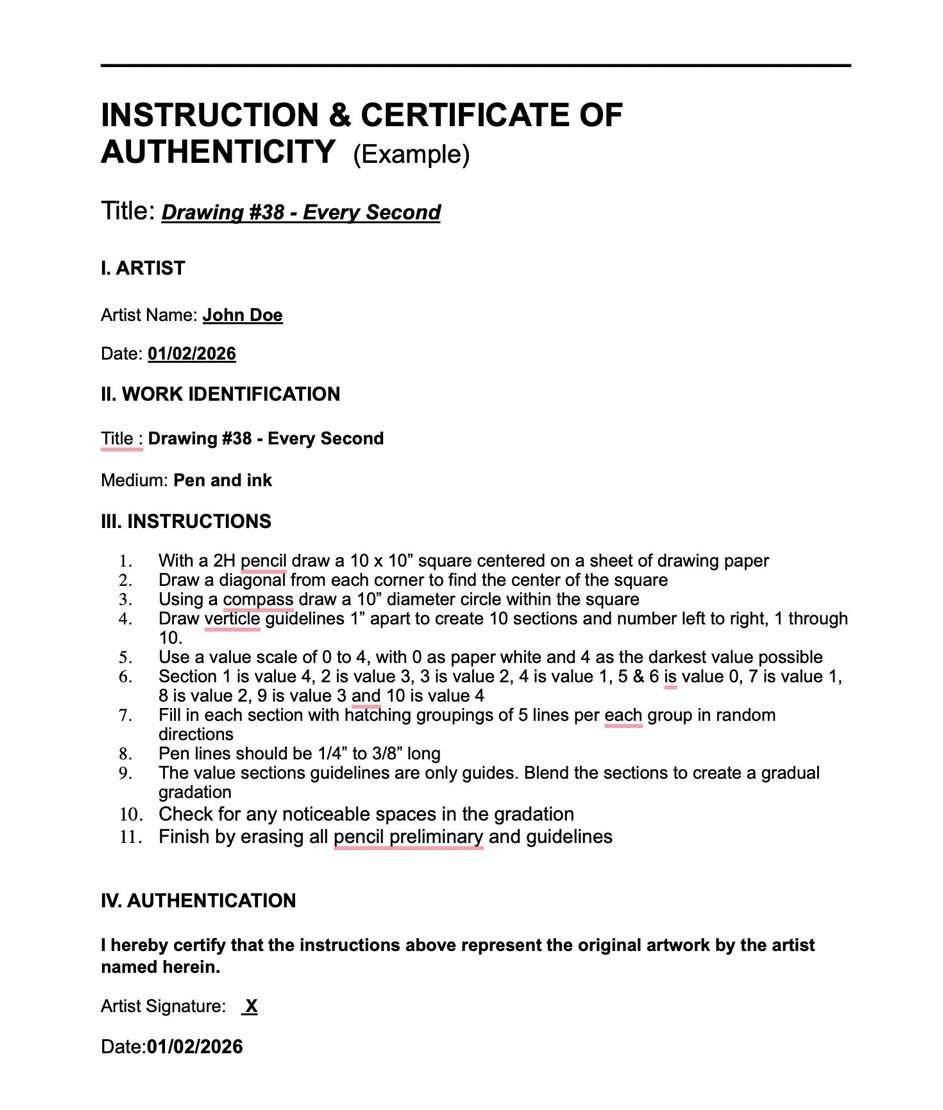
Part One will be the concept or idea typed out as instructions and representing your certificate of authentication. The instructions should be as clear and concise as possible and typed or clearly printed on plain printer paper so that anyone else can follow them and reproduce the drawing as you designed it. Make sure you give your concept a title and sign the instructions as if it is the artwork. Include any special diagrams or drawing process details if they are needed for the completion of the drawing.
Part Two
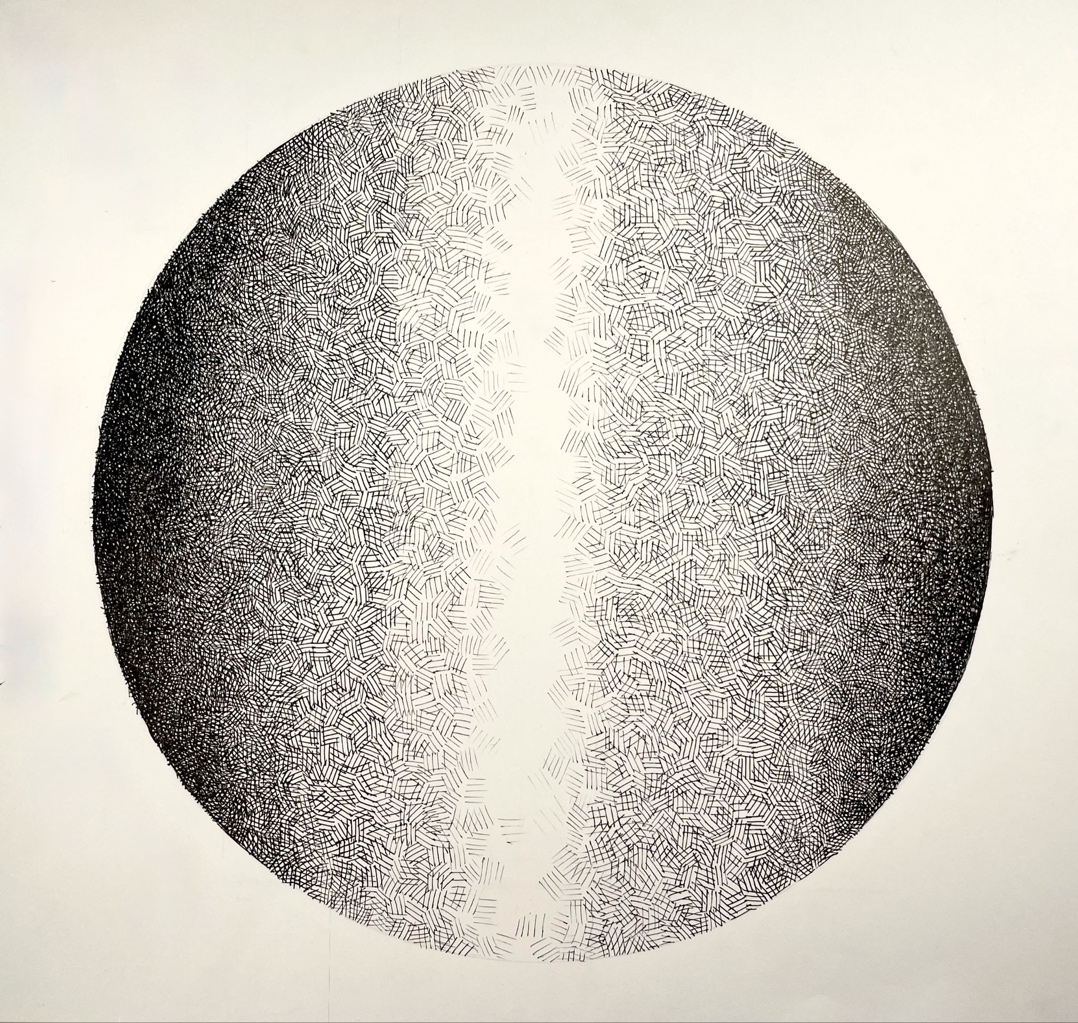
The second part is a drawing based on the concept instructions. It should be an abstract design or construction in pen and ink that uses one or more hatching or mark-making techniques to create a range of values. The value range can be expressed as a value scale or a gradual gradation from light to dark, depending on your concept. A simple, carefully thought-out, and well-developed idea often yields the most interesting results.
Activity Parameters
Duration
6 – 9 hours.
Size
8.5 x 11” – Instructions
10 x 10” centered on 18 x 24” – Drawing
Techniques
- Ideation – The process of developing a concept
- Thumbnail sketches – Small, quick studies.
- Iteration – Multiple drafts or versions of an idea to refine a concept.
- Pen and ink
- Additive value technique – Directional hatch, cross-hatch, pattern, or scribble hatch.
Required Materials
- Drawing paper (18″ x 24″) – 1 or more sheets (Optional: bristol board or mixed media paper).
- Printer paper (8.5” x 11”) – 1 or more sheets
- Artist technical pens
- Graphite pencil ( 2H or HB)
- Rubber eraser
- Kneaded eraser
- Straight edge ruler
- T-square
Recommended Materials
- Newsprint (18” x 24”) – optional
- Compass or stencil to draw circles (optional)
- Triangle ruler (optional)
Student Learning Outcomes (SLOs)
- Use of ideation components to conceive and develop a drawing concept
- Create comprehensive and detailed instructions to accurately describe the drawing process.
- Use of artist technical pens and at least one additive technique to create an abstract conceptual drawing design
Method
Ideation
- Brainstorming: Begin by listing as many ideas and variations as possible. Consider the elements of the drawing along with the overall concept, such as
- Drawing shape. (ie. square, circular, triangle, etc.)
- Hatch or mark-making styles. (directional hatch, cross-hatch, stipple, pattern, scribble, short lines, long lines, random length lines, etc.)
- Value scale.
- Gradation.
- Value range. (The number of values for a scale or gradation. A typical value scale has 5 or 9 values. For example, #1 = the white of the paper, #2 = light value, #3 = the middle value, #4 = dark value, and #5 = the darkest value possible or absolute black.)
- Visual Research: You might start by searching the internet for images, articles, and videos about Sol Lewitt’s “Wall Drawings”.
- Google images, Instagram, Pinterest.
- Research art books and periodicals for information and more examples.
- Search out and photograph inspirations such as patterns, textures, or shapes. They can be man-made or natural.
- On newsprint or in a sketchbook, quickly sketch out ideas from the ideation process. Draw and simplify ideas from photographic research.
- Practice hatching techniques for your idea.
- Thumbnail Sketches
- These thumbnail sketches should be quick and maybe even messy.
- Spend no more than 2 – 5 minutes on each sketch.
- Avoid excessive detail and focus on variations and the concept’s evolution.
- The thumbnail sketching process works best if you work rapidly on one at a time, responding to each sketch with the next.
- Preliminary Drawing
- The next step in the ideation process is to select one of the thumbnails and create a rough draft for the final drawing.
- On the same sheet as the thumbnails, or a new sheet depending on space, draw a larger square or your chosen shape.
- Elaborate on the thumbnail sketch in more detail.
- Test hatching and line techniques for your idea.
- This should not be approached as a finished drawing.
- While working on the preliminary drawing, it is advisable to begin taking notes and writing instructions for the steps involved in the process to create the final drawing. The notes and instructions will be used to compose the first part of the project instructions.
Part One
On a sheet of 8.5” x 11” printer paper, type or clearly print the instructions for your concept drawing. Make sure the instructions are clear, concise, complete, and detailed enough that someone else can comprehend them and recreate the drawing concept. List:
- “Abstract Concept Drawing”.
- Title your drawing.
- Number and list the detailed steps for the drawing.
- Date the instructions.
- Sign your name.
- Include extra sheets of instructions for any diagram drawings needed for the drawing process. (ie, example of hatching, value scale, composition layout, or other visual instruction examples)
Part Two
Following the concept instructions, create the design.
- Find the center on a sheet of 18” x 24” drawing paper, bristol board, or mixed paper.
- Using a 2H graphite pencil, follow the instructions accurately to lay out the design. Draw any layout structures or guidelines as lightly as possible so they can be erased later.
- Ink over the graphite pencil layout to complete the drawing. (Tip: do not draw any hatching technique in pencil prior to inking.)
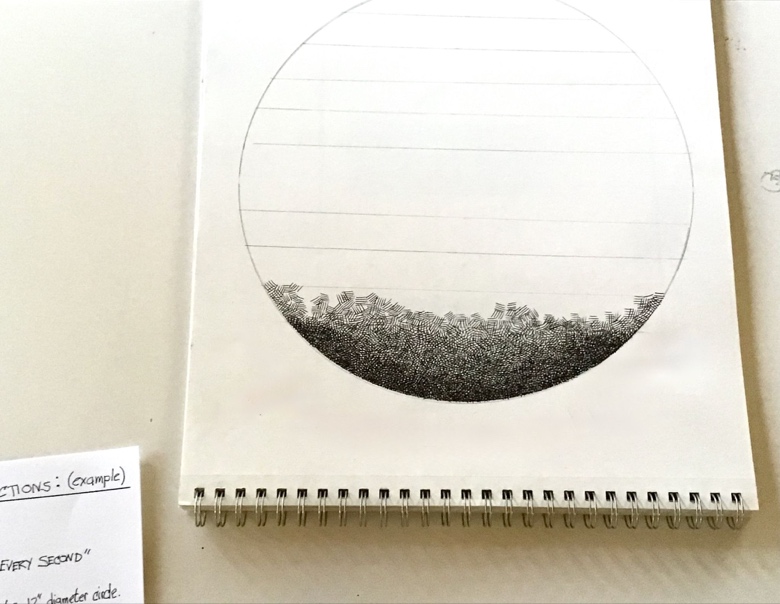
- Clean up pencil lines with a plastic and kneaded eraser.
- Optional: Cut or trim the finished design from the full sheet of paper, leaving a 1” border.
Results
The results will be the titled and signed typed drawing instructions as well as any accompanying materials and diagrams for the example of the drawing concept, and the finished Abstract Concept Drawing in pen and ink.
Licensing and Attributions
“Drawing Concepts.” Written by Stephen P. Curry. License: CC BY
Licensing and Attributions
“Drawing Concepts Activity.” Written by Stephen P. Curry. License: CC BY
- Sol LeWitt, “Paragraphs on Conceptual Art,” Artforum 5, no. 10 (June 1967), 80, Monoskop PDF. ↵
- Sol LeWitt, “Paragraphs on Conceptual Art,” Artforum 5, no. 10 (June 1967), 79, Monoskop PDF. ↵