
Documentation Boards
Not Just for Displaying Art
When you walk into a classroom what do you typically see on the walls? Quite possibly you will see colorful posters, charts, family photos, and lots and lots of artwork. Have you ever wondered why we post things on our walls? Is it to make our classrooms more aesthetically pleasing? More colorful and eye-appealing? Do we want to motivate our children to do their best work because it will be posted for all to see? Are we trying to create a cozy space where our children can feel comfortable and feel like they belong? Are we hoping our parents see all the great work that we are doing? Everything that is posted on your classroom walls should communicate a message. Documentation Boards help us to convey important messages. A central message that I believe to be most important is that “Children Learn Through Play!”
When parents drop off and pick up their child, they may see their child playing with blocks, puzzles, playdough, or in the dramatic play area with their peers. To some, this type of open exploration or child-directed play (sometimes called free play) may look frivolous, inconsequential or perhaps trivial because it lacks formal instruction. The idea that learning can be playful, and fun may be difficult for some parents to understand. Many parents like to see some type of tangible evidence – for example, a finished worksheet or completed art project, to “know” that teaching and learning are happening. Thus, it is necessary for us as intentional teachers to convey the importance of play through formal documentation. We must provide parents with information that explains not only the end result,(or product) but the process of how curriculum activities are specifically designed to help children master milestones in all the developmental domains. More importantly, we must showcase that learning is a direct product of play.
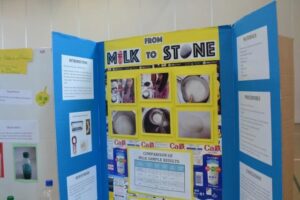
What are Documentation Boards
Documentation boards use observations and assessments to illustrate a child’s process of learning. When used effectively, documentation boards highlight the purpose of an activity and record the milestones that have been mastered (NAEYC, 2008). In order for parents to truly understand that children learn through play, documentation boards should include work samples or photos that highlight what the child did during the activity, along with several quotes to highlight the child’s thought process. When done correctly, teachers and families should be able to follow a child’s progress over time. Documentation Boards help teachers and families understand, without explanation, the child’s abilities and Interests. Documentation Boards provide clear evidence as to what children are learning throughout the school year in each of the developmental domains: Physical, Cognitive, Social, Emotional and Language.
What to Document
When I was a “young” teacher, I often felt obligated to post one piece of artwork for each child
in the classroom so as to be “fair” that each child was represented. On my classroom walls, Imostly posted artwork and I didn’t provide any caption or describe the purpose of the activity. Not only did that take a lot of time, but it also took up a lot of wall space. As I became more intentional (and a more “seasoned” teacher, I learned that there was a more efficient way to showcase children’s learning. I began to use documentation boards to make learning more visible. Since learning is happening all day – every day in the classroom, there are a variety of topics that can be presented. Documentation boards can illustrate something as simple as a child playing with sand and water for an hour, or something complex like a child learning how to tie their shoes over a long period of time. These boards can feature one child, a group of children, or the whole class. Here are some suggested topics to consider when creating a formal Documentation Board: daily routines, project-based activities, child-directed play and exploration, outdoor play experiences, circle-time conversations, developmental milestones, social relationships, and teacher-directed lesson plan activities. The topics are endless.
How to Make a Documentation Board
Posters, bulletin boards, and slide shows are all commonly used to create documentation boards. The format chosen to use for the documentation board should be reflective of the purpose, the audience, and the activity being presented. These boards can be simple, artistic, or even three dimensional.
Before creating the board, consider the collaboration of additional teachers, children, and families. Having a team create the board adds a new level of depth, with various ideas and opinions. The first step is creating a title that invites families to approach the board. Next, mention the developmental milestones and goals for the activity (what the children are learning). Add photos and children’s quotes (both parents and children enjoy this), Include the steps that were taken or the process, and work samples as the final product. An extra step would be to add a recipe card or take-home handout so parents can replicate the activity at home.
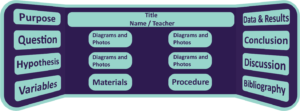
While constructing the board ask yourself, is this showing the child’s thought process, developmental growth, and both the child’s and teacher’s reflection. When creating your documentation boards remember that these boards respect all children’s work. The board needs to value efficiency over cuteness, and engagement over entertainment. (The Compass School, 2018).
Lastly, the Documentation Board replaces the concept there needs to be one piece of artwork for each child in the class. When you post several documentation boards, all with different themes and purposes, you will no doubt capture all of the children in your care.
Exercises
When you begin to design and develop your documentation board, consider the following.
Decide on what you want to communicate on the documentation board:
- Projects or themes
- Special events
- Specific curriculum areas
- Learning environments
- Skill acquisition
- Child development
Collect materials for the panel:
- Children’s actual work or photocopies
- Observation notes / anecdotal records
- Information and quotes from books and journals
- Curriculum webs
- Quotes and dictation from children and teachers
- Photographs
- Various sizes (enlarge or shrink on a photocopier)
- Color, or black and white.
Select the best items that represent the idea or theme of your panel:
- Write an educational Caption for each piece
- Use a type size large enough to be read from a distance
Layout of panel:
- Determine where the panel will be displayed (on a table or wall?)
- Select a type of panel: poster board (best for wall) or three side3d board
- Title the panel
- Select a strong image as the focal point on the panel
- Aesthetics are important
- Matte work and photographs
- Use colored paper to support, not detract from, the images
Media Attributions
- image17 © Candateshia Pafford is licensed under a Public Domain license
- image18 is licensed under a Public Domain license